
cocos ClippingNode相關
阿新 • • 發佈:2018-12-23
ClippingNode 用於對節點進行裁剪或遮罩,繼承於Node。根據指定的模版(Stencil)裁剪圖片生成不同的形狀,可像普通的節點放到Node,Layer,Scene中。其原理圖如下:
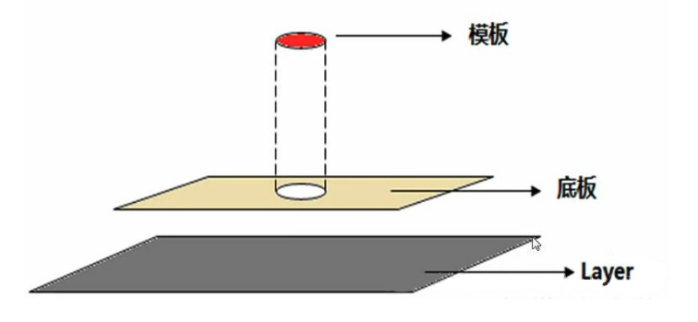
模版(Stencil):可設定任意形狀
底板: 根據模版形狀裁切底板
Layer: 用於顯示裁切出來的圖片
在策略動作遊戲中,我們經常會看到人物屬性表,如下效果圖:

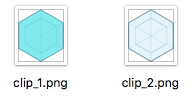
為了美觀,我們需要兩張圖資源,一張用於背景,另一張用於裁切。其圖片為正六邊形,如下:
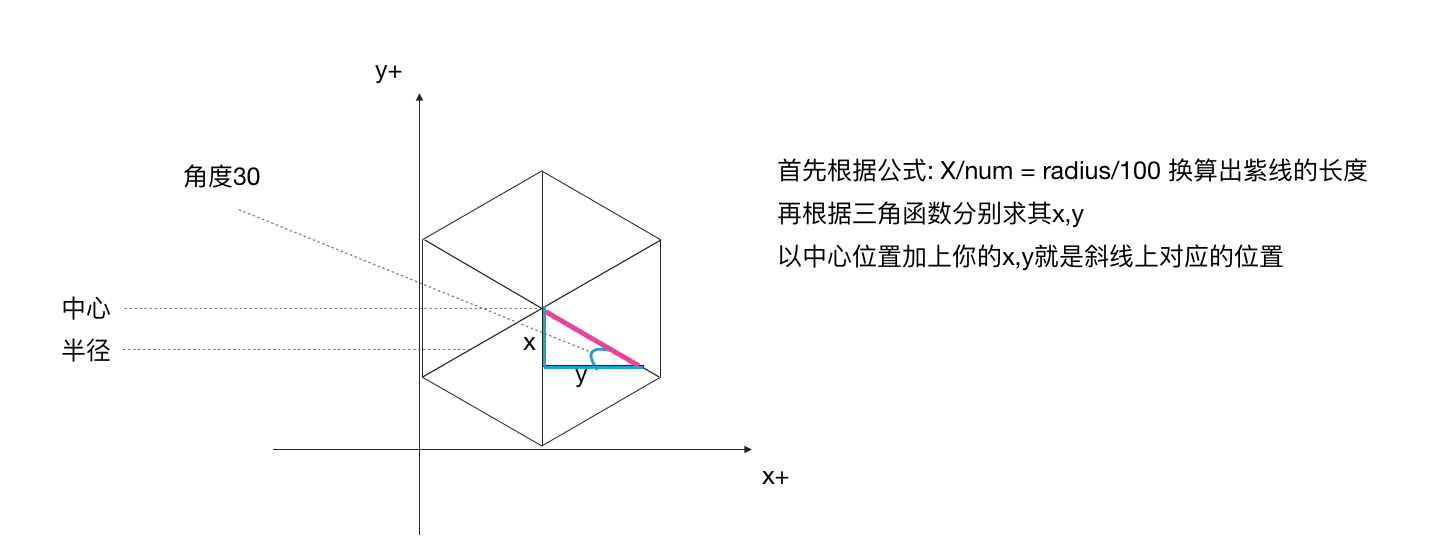
其正六邊形斜線上點的位置計算圖示如下:
其Demo實現程式碼如下:
local winSize = cc.Director:getInstance():getWinSize()local ClipTest = class("ClipTest", function() return cc.Layer:create() end) function ClipTest:ctor() self:creatClipWnd() end function ClipTest:creatClipWnd() -- 新增背景 local bgSprite = cc.Sprite:create("clip_2.png") bgSprite:setPosition(cc.p(winSize.width/2, winSize.height/2)) self:addChild(bgSprite)local bgSize = bgSprite:getContentSize() local bgPosX, bgPosY = bgSprite:getPosition() local center = cc.p(bgPosX,bgPosY) -- 中心點位置 local radius = bgSize.height/2 -- 半徑 local angle = math.rad(30) -- 角度 -- 測試資料 local numList = {70,10,80,90,60,50} local textList = { [1] = {name = "攻擊", pos = cc.p(bgPosX, bgPosY + radius+ 10)}, [2] = {name = "防禦", pos = cc.p(bgPosX+radius*math.cos(angle)+20, bgPosY+radius/2)}, [3] = {name = "生命", pos = cc.p(bgPosX+radius*math.cos(angle)+20, bgPosY-radius/2)}, [4] = {name = "暴擊", pos = cc.p(bgPosX,bgPosY - radius - 10)}, [5] = {name = "閃避", pos = cc.p(bgPosX-radius*math.cos(angle)-20, bgPosY-radius/2)}, [6] = {name = "魅力", pos = cc.p(bgPosX-radius*math.cos(angle)-20, bgPosY+radius/2)}, } -- 屬性文字 for i = 1, 6 do local label = ccui.Text:create(textList[i].name, "Arial", 18) label:setPosition(textList[i].pos) self:addChild(label) end -- 使用DrawNode繪製六邊形,可參考:https://www.cnblogs.com/SkyflyBird/p/10133960.html -- 每條半徑點上的位置要進行等比換算,公式: X/num = radius/100, 求X -- 攻擊 local pos1 = {} pos1.x = center.x pos1.y = center.y + math.floor((numList[1]*radius)/100) -- 防禦 local pos2 = {} local radius2 = math.floor((numList[2]*radius)/100) pos2.x = center.x + math.cos(angle)*radius2 pos2.y = center.y + math.sin(angle)*radius2 -- 生命 local pos3 = {} local radius3 = math.floor((numList[3]*radius)/100) pos3.x = center.x + math.cos(angle)*radius3 pos3.y = center.y - math.sin(angle)*radius3 -- 暴擊 local pos4 = {} pos4.x = center.x pos4.y = center.y - math.floor((numList[4]*radius)/100) -- 閃避 local pos5 = {} local radius5 = math.floor((numList[5]*radius)/100) pos5.x = center.x - math.cos(angle)*radius5 pos5.y = center.y - math.sin(angle)*radius5 -- 魅力 local pos6 = {} local radius6 = math.floor((numList[6]*radius)/100) pos6.x = center.x - math.cos(angle)*radius6 pos6.y = center.y + math.sin(angle)*radius6 -- local drawnode = cc.DrawNode:create() local vertices = {pos1,pos2,pos3,pos4,pos5,pos6} drawnode:drawSolidPoly(vertices, 6, cc.c4b(0,1,0,1)) -- 將繪製的六邊形作為模版,對其clipSprite進行裁切 local clipSprite = cc.Sprite:create("clip_1.png") clipSprite:setPosition(cc.p(bgPosX,bgPosY)) -- local clipnode = cc.ClippingNode:create() clipnode:setPosition(cc.p(0,0)) -- 設定alpha clipnode:setAlphaThreshold(1) -- 新增底板 clipnode:addChild(clipSprite) -- 設定模板 clipnode:setStencil(drawnode) -- true底板可見,false模板可見 clipnode:setInverted(false) self:addChild(clipnode,100) end return ClipTest