Android中SQLite應用詳解
上次我向大家介紹了SQLite的基本資訊和使用過程,相信朋友們對SQLite已經有所瞭解了,那今天呢,我就和大家分享一下在Android中如何使用SQLite。
現在的主流移動裝置像Android、iPhone等都使用SQLite作為複雜資料的儲存引擎,在我們為移動裝置開發應用程式時,也許就要使用到SQLite來儲存我們大量的資料,所以我們就需要掌握移動裝置上的SQLite開發技巧。對於Android平臺來說,系統內建了豐富的API來供開發人員操作SQLite,我們可以輕鬆的完成對資料的存取。
下面就向大家介紹一下SQLite常用的操作方法,為了方便,我將程式碼寫在了Activity的onCreate中:
在執行完上面的程式碼後,系統就會在/data/data/[PACKAGE_NAME]/databases目錄下生成一個“test.db”的資料庫檔案,如圖:@Override protected void onCreate(Bundle savedInstanceState) { super.onCreate(savedInstanceState); //開啟或建立test.db資料庫 SQLiteDatabase db = openOrCreateDatabase("test.db", Context.MODE_PRIVATE, null); db.execSQL("DROP TABLE IF EXISTS person"); //建立person表 db.execSQL("CREATE TABLE person (_id INTEGER PRIMARY KEY AUTOINCREMENT, name VARCHAR, age SMALLINT)"); Person person = new Person(); person.name = "john"; person.age = 30; //插入資料 db.execSQL("INSERT INTO person VALUES (NULL, ?, ?)", new Object[]{person.name, person.age}); person.name = "david"; person.age = 33; //ContentValues以鍵值對的形式存放資料 ContentValues cv = new ContentValues(); cv.put("name", person.name); cv.put("age", person.age); //插入ContentValues中的資料 db.insert("person", null, cv); cv = new ContentValues(); cv.put("age", 35); //更新資料 db.update("person", cv, "name = ?", new String[]{"john"}); Cursor c = db.rawQuery("SELECT * FROM person WHERE age >= ?", new String[]{"33"}); while (c.moveToNext()) { int _id = c.getInt(c.getColumnIndex("_id")); String name = c.getString(c.getColumnIndex("name")); int age = c.getInt(c.getColumnIndex("age")); Log.i("db", "_id=>" + _id + ", name=>" + name + ", age=>" + age); } c.close(); //刪除資料 db.delete("person", "age < ?", new String[]{"35"}); //關閉當前資料庫 db.close(); //刪除test.db資料庫 // deleteDatabase("test.db"); }

上面的程式碼中基本上囊括了大部分的資料庫操作;對於新增、更新和刪除來說,我們都可以使用
db.executeSQL(String sql);
db.executeSQL(String sql, Object[] bindArgs);//sql語句中使用佔位符,然後第二個引數是實際的引數集以上三個方法的第一個引數都是表示要操作的表名;insert中的第二個引數表示如果插入的資料每一列都為空的話,需要指定此行中某一列的名稱,系統將此列設定為NULL,不至於出現錯誤;insert中的第三個引數是ContentValues型別的變數,是鍵值對組成的Map,key代表列名,value代表該列要插入的值;update的第二個引數也很類似,只不過它是更新該欄位key為最新的value值,第三個引數whereClause表示WHERE表示式,比如“age > ? and age < ?”等,最後的whereArgs引數是佔位符的實際引數值;delete方法的引數也是一樣。db.insert(String table, String nullColumnHack, ContentValues values); db.update(String table, Contentvalues values, String whereClause, String whereArgs); db.delete(String table, String whereClause, String whereArgs);
下面來說說查詢操作。查詢操作相對於上面的幾種操作要複雜些,因為我們經常要面對著各種各樣的查詢條件,所以系統也考慮到這種複雜性,為我們提供了較為豐富的查詢形式:
db.rawQuery(String sql, String[] selectionArgs);
db.query(String table, String[] columns, String selection, String[] selectionArgs, String groupBy, String having, String orderBy);
db.query(String table, String[] columns, String selection, String[] selectionArgs, String groupBy, String having, String orderBy, String limit);
db.query(String distinct, String table, String[] columns, String selection, String[] selectionArgs, String groupBy, String having, String orderBy, String limit);最後,他們同時返回一個Cursor物件,代表資料集的遊標,有點類似於JavaSE中的ResultSet。
下面是Cursor物件的常用方法:
c.move(int offset);	//以當前位置為參考,移動到指定行
c.moveToFirst();	//移動到第一行
c.moveToLast();		//移動到最後一行
c.moveToPosition(int position);	//移動到指定行
c.moveToPrevious();	//移動到前一行
c.moveToNext();		//移動到下一行
c.isFirst();		//是否指向第一條
c.isLast();		//是否指向最後一條
c.isBeforeFirst();	//是否指向第一條之前
c.isAfterLast();	//是否指向最後一條之後
c.isNull(int columnIndex);	//指定列是否為空(列基數為0)
c.isClosed();		//遊標是否已關閉
c.getCount();		//總資料項數
c.getPosition();	//返回當前遊標所指向的行數
c.getColumnIndex(String columnName);//返回某列名對應的列索引值
c.getString(int columnIndex);	//返回當前行指定列的值
在上面的程式碼示例中,已經用到了這幾個常用方法中的一些,關於更多的資訊,大家可以參考官方文件中的說明。
最後當我們完成了對資料庫的操作後,記得呼叫SQLiteDatabase的close()方法釋放資料庫連線,否則容易出現SQLiteException。
上面就是SQLite的基本應用,但在實際開發中,為了能夠更好的管理和維護資料庫,我們會封裝一個繼承自SQLiteOpenHelper類的資料庫操作類,然後以這個類為基礎,再封裝我們的業務邏輯方法。
下面,我們就以一個例項來講解具體的用法,我們新建一個名為db的專案,結構如下:

其中DBHelper繼承了SQLiteOpenHelper,作為維護和管理資料庫的基類,DBManager是建立在DBHelper之上,封裝了常用的業務方法,Person是我們的person表對應的JavaBean,MainActivity就是我們顯示的介面。
下面我們先來看一下DBHelper:
package com.scott.db;

import android.content.Context;
import android.database.sqlite.SQLiteDatabase;
import android.database.sqlite.SQLiteOpenHelper;

public class DBHelper extends SQLiteOpenHelper {

	private static final String DATABASE_NAME = "test.db";
	private static final int DATABASE_VERSION = 1;

	public DBHelper(Context context) {
		//CursorFactory設定為null,使用預設值
		super(context, DATABASE_NAME, null, DATABASE_VERSION);
	}

	//資料庫第一次被建立時onCreate會被呼叫
	@Override
	public void onCreate(SQLiteDatabase db) {
		db.execSQL("CREATE TABLE IF NOT EXISTS person" +
				"(_id INTEGER PRIMARY KEY AUTOINCREMENT, name VARCHAR, age INTEGER, info TEXT)");
	}

	//如果DATABASE_VERSION值被改為2,系統發現現有資料庫版本不同,即會呼叫onUpgrade
	@Override
	public void onUpgrade(SQLiteDatabase db, int oldVersion, int newVersion) {
		db.execSQL("ALTER TABLE person ADD COLUMN other STRING");
	}
}
為了方便我們面向物件的使用資料,我們建一個Person類,對應person表中的欄位,如下:
package com.scott.db;

public class Person {
	public int _id;
	public String name;
	public int age;
	public String info;

	public Person() {
	}

	public Person(String name, int age, String info) {
		this.name = name;
		this.age = age;
		this.info = info;
	}
}package com.scott.db;
import java.util.ArrayList;
import java.util.List;
import android.content.ContentValues;
import android.content.Context;
import android.database.Cursor;
import android.database.sqlite.SQLiteDatabase;
public class DBManager {
private DBHelper helper;
private SQLiteDatabase db;
public DBManager(Context context) {
helper = new DBHelper(context);
//因為getWritableDatabase內部呼叫了mContext.openOrCreateDatabase(mName, 0, mFactory);
//所以要確保context已初始化,我們可以把例項化DBManager的步驟放在Activity的onCreate裡
db = helper.getWritableDatabase();
}
/**
* add persons
* @param persons
*/
public void add(List<Person> persons) {
db.beginTransaction(); //開始事務
try {
for (Person person : persons) {
db.execSQL("INSERT INTO person VALUES(null, ?, ?, ?)", new Object[]{person.name, person.age, person.info});
}
db.setTransactionSuccessful(); //設定事務成功完成
} finally {
db.endTransaction(); //結束事務
}
}
/**
* update person's age
* @param person
*/
public void updateAge(Person person) {
ContentValues cv = new ContentValues();
cv.put("age", person.age);
db.update("person", cv, "name = ?", new String[]{person.name});
}
/**
* delete old person
* @param person
*/
public void deleteOldPerson(Person person) {
db.delete("person", "age >= ?", new String[]{String.valueOf(person.age)});
}
/**
* query all persons, return list
* @return List<Person>
*/
public List<Person> query() {
ArrayList<Person> persons = new ArrayList<Person>();
Cursor c = queryTheCursor();
while (c.moveToNext()) {
Person person = new Person();
person._id = c.getInt(c.getColumnIndex("_id"));
person.name = c.getString(c.getColumnIndex("name"));
person.age = c.getInt(c.getColumnIndex("age"));
person.info = c.getString(c.getColumnIndex("info"));
persons.add(person);
}
c.close();
return persons;
}
/**
* query all persons, return cursor
* @return Cursor
*/
public Cursor queryTheCursor() {
Cursor c = db.rawQuery("SELECT * FROM person", null);
return c;
}
/**
* close database
*/
public void closeDB() {
db.close();
}
}
我們獲取資料庫例項時使用了getWritableDatabase()方法,也許朋友們會有疑問,在getWritableDatabase()和getReadableDatabase()中,你為什麼選擇前者作為整個應用的資料庫例項呢?在這裡我想和大家著重分析一下這一點。
我們來看一下SQLiteOpenHelper中的getReadableDatabase()方法:
	public synchronized SQLiteDatabase getReadableDatabase() {
		if (mDatabase != null && mDatabase.isOpen()) {
			// 如果發現mDatabase不為空並且已經開啟則直接返回
			return mDatabase;
		}

		if (mIsInitializing) {
			// 如果正在初始化則丟擲異常
			throw new IllegalStateException("getReadableDatabase called recursively");
		}

		// 開始例項化資料庫mDatabase

		try {
			// 注意這裡是呼叫了getWritableDatabase()方法
			return getWritableDatabase();
		} catch (SQLiteException e) {
			if (mName == null)
				throw e; // Can't open a temp database read-only!
			Log.e(TAG, "Couldn't open " + mName + " for writing (will try read-only):", e);
		}

		// 如果無法以可讀寫模式開啟資料庫 則以只讀方式開啟

		SQLiteDatabase db = null;
		try {
			mIsInitializing = true;
			String path = mContext.getDatabasePath(mName).getPath();// 獲取資料庫路徑
			// 以只讀方式開啟資料庫
			db = SQLiteDatabase.openDatabase(path, mFactory, SQLiteDatabase.OPEN_READONLY);
			if (db.getVersion() != mNewVersion) {
				throw new SQLiteException("Can't upgrade read-only database from version " + db.getVersion() + " to "
						+ mNewVersion + ": " + path);
			}

			onOpen(db);
			Log.w(TAG, "Opened " + mName + " in read-only mode");
			mDatabase = db;// 為mDatabase指定新開啟的資料庫
			return mDatabase;// 返回開啟的資料庫
		} finally {
			mIsInitializing = false;
			if (db != null && db != mDatabase)
				db.close();
		}
} public synchronized SQLiteDatabase getWritableDatabase() {
if (mDatabase != null && mDatabase.isOpen() && !mDatabase.isReadOnly()) {
// 如果mDatabase不為空已開啟並且不是隻讀模式 則返回該例項
return mDatabase;
}
if (mIsInitializing) {
throw new IllegalStateException("getWritableDatabase called recursively");
}
// If we have a read-only database open, someone could be using it
// (though they shouldn't), which would cause a lock to be held on
// the file, and our attempts to open the database read-write would
// fail waiting for the file lock. To prevent that, we acquire the
// lock on the read-only database, which shuts out other users.
boolean success = false;
SQLiteDatabase db = null;
// 如果mDatabase不為空則加鎖 阻止其他的操作
if (mDatabase != null)
mDatabase.lock();
try {
mIsInitializing = true;
if (mName == null) {
db = SQLiteDatabase.create(null);
} else {
// 開啟或建立資料庫
db = mContext.openOrCreateDatabase(mName, 0, mFactory);
}
// 獲取資料庫版本(如果剛建立的資料庫,版本為0)
int version = db.getVersion();
// 比較版本(我們程式碼中的版本mNewVersion為1)
if (version != mNewVersion) {
db.beginTransaction();// 開始事務
try {
if (version == 0) {
// 執行我們的onCreate方法
onCreate(db);
} else {
// 如果我們應用升級了mNewVersion為2,而原版本為1則執行onUpgrade方法
onUpgrade(db, version, mNewVersion);
}
db.setVersion(mNewVersion);// 設定最新版本
db.setTransactionSuccessful();// 設定事務成功
} finally {
db.endTransaction();// 結束事務
}
}
onOpen(db);
success = true;
return db;// 返回可讀寫模式的資料庫例項
} finally {
mIsInitializing = false;
if (success) {
// 開啟成功
if (mDatabase != null) {
// 如果mDatabase有值則先關閉
try {
mDatabase.close();
} catch (Exception e) {
}
mDatabase.unlock();// 解鎖
}
mDatabase = db;// 賦值給mDatabase
} else {
// 開啟失敗的情況:解鎖、關閉
if (mDatabase != null)
mDatabase.unlock();
if (db != null)
db.close();
}
}
}看完上面的過程之後,大家或許就清楚了許多,如果不是在遇到磁碟空間已滿等情況,getReadableDatabase()一般都會返回和getWritableDatabase()一樣的資料庫例項,所以我們在DBManager構造方法中使用getWritableDatabase()獲取整個應用所使用的資料庫例項是可行的。當然如果你真的擔心這種情況會發生,那麼你可以先用getWritableDatabase()獲取資料例項,如果遇到異常,再試圖用getReadableDatabase()獲取例項,當然這個時候你獲取的例項只能讀不能寫了。
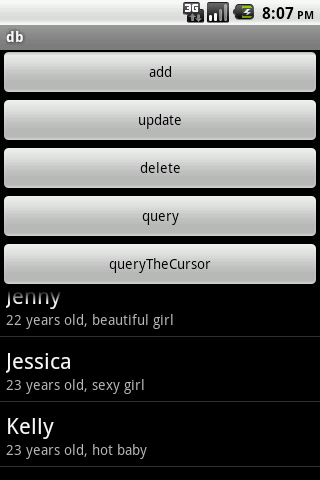
最後,讓我們看一下如何使用這些資料操作方法來顯示資料,下面是MainActivity.java的佈局檔案和程式碼:
<?xml version="1.0" encoding="utf-8"?>
<LinearLayout xmlns:android="http://schemas.android.com/apk/res/android"
    android:orientation="vertical"
    android:layout_width="fill_parent"
    android:layout_height="fill_parent">
	<Button
		android:layout_width="fill_parent"
		android:layout_height="wrap_content"
		android:text="add"
		android:onClick="add"/>
	<Button
		android:layout_width="fill_parent"
		android:layout_height="wrap_content"
		android:text="update"
		android:onClick="update"/>
	<Button
		android:layout_width="fill_parent"
		android:layout_height="wrap_content"
		android:text="delete"
		android:onClick="delete"/>
	<Button
		android:layout_width="fill_parent"
		android:layout_height="wrap_content"
		android:text="query"
		android:onClick="query"/>
	<Button
		android:layout_width="fill_parent"
		android:layout_height="wrap_content"
		android:text="queryTheCursor"
		android:onClick="queryTheCursor"/>
	<ListView
		android:id="@+id/listView"
		android:layout_width="fill_parent"
		android:layout_height="wrap_content"/>
</LinearLayout>
package com.scott.db;
import java.util.ArrayList;
import java.util.HashMap;
import java.util.List;
import java.util.Map;
import android.app.Activity;
import android.database.Cursor;
import android.database.CursorWrapper;
import android.os.Bundle;
import android.view.View;
import android.widget.ListView;
import android.widget.SimpleAdapter;
import android.widget.SimpleCursorAdapter;
public class MainActivity extends Activity {
private DBManager mgr;
private ListView listView;
@Override
public void onCreate(Bundle savedInstanceState) {
super.onCreate(savedInstanceState);
setContentView(R.layout.main);
listView = (ListView) findViewById(R.id.listView);
//初始化DBManager
mgr = new DBManager(this);
}
@Override
protected void onDestroy() {
super.onDestroy();
//應用的最後一個Activity關閉時應釋放DB
mgr.closeDB();
}
public void add(View view) {
ArrayList<Person> persons = new ArrayList<Person>();
Person person1 = new Person("Ella", 22, "lively girl");
Person person2 = new Person("Jenny", 22, "beautiful girl");
Person person3 = new Person("Jessica", 23, "sexy girl");
Person person4 = new Person("Kelly", 23, "hot baby");
Person person5 = new Person("Jane", 25, "a pretty woman");
persons.add(person1);
persons.add(person2);
persons.add(person3);
persons.add(person4);
persons.add(person5);
mgr.add(persons);
}
public void update(View view) {
Person person = new Person();
person.name = "Jane";
person.age = 30;
mgr.updateAge(person);
}
public void delete(View view) {
Person person = new Person();
person.age = 30;
mgr.deleteOldPerson(person);
}
public void query(View view) {
List<Person> persons = mgr.query();
ArrayList<Map<String, String>> list = new ArrayList<Map<String, String>>();
for (Person person : persons) {
HashMap<String, String> map = new HashMap<String, String>();
map.put("name", person.name);
map.put("info", person.age + " years old, " + person.info);
list.add(map);
}
SimpleAdapter adapter = new SimpleAdapter(this, list, android.R.layout.simple_list_item_2,
new String[]{"name", "info"}, new int[]{android.R.id.text1, android.R.id.text2});
listView.setAdapter(adapter);
}
public void queryTheCursor(View view) {
Cursor c = mgr.queryTheCursor();
startManagingCursor(c); //託付給activity根據自己的生命週期去管理Cursor的生命週期
CursorWrapper cursorWrapper = new CursorWrapper(c) {
@Override
public String getString(int columnIndex) {
//將簡介前加上年齡
if (getColumnName(columnIndex).equals("info")) {
int age = getInt(getColumnIndex("age"));
return age + " years old, " + super.getString(columnIndex);
}
return super.getString(columnIndex);
}
};
//確保查詢結果中有"_id"列
SimpleCursorAdapter adapter = new SimpleCursorAdapter(this, android.R.layout.simple_list_item_2,
cursorWrapper, new String[]{"name", "info"}, new int[]{android.R.id.text1, android.R.id.text2});
ListView listView = (ListView) findViewById(R.id.listView);
listView.setAdapter(adapter);
}
}如果手動去管理Cursor的話會非常的麻煩,還有一定的風險,處理不當的話執行期間就會出現異常,幸好Activity為我們提供了startManagingCursor(Cursor cursor)方法,它會根據Activity的生命週期去管理當前的Cursor物件,下面是該方法的說明:
/**
     * This method allows the activity to take care of managing the given
     * {@link Cursor}'s lifecycle for you based on the activity's lifecycle.
     * That is, when the activity is stopped it will automatically call
     * {@link Cursor#deactivate} on the given Cursor, and when it is later restarted
     * it will call {@link Cursor#requery} for you.  When the activity is
     * destroyed, all managed Cursors will be closed automatically.
     *
     * @param c The Cursor to be managed.
     *
     * @see #managedQuery(android.net.Uri , String[], String, String[], String)
     * @see #stopManagingCursor
*/如何包裝Cursor:我們會使用到CursorWrapper物件去包裝我們的Cursor物件,實現我們需要的資料轉換工作,這個CursorWrapper實際上是實現了Cursor介面。我們查詢獲取到的Cursor其實是Cursor的引用,而系統實際返回給我們的必然是Cursor介面的一個實現類的物件例項,我們用CursorWrapper包裝這個例項,然後再使用SimpleCursorAdapter將結果顯示到列表上。
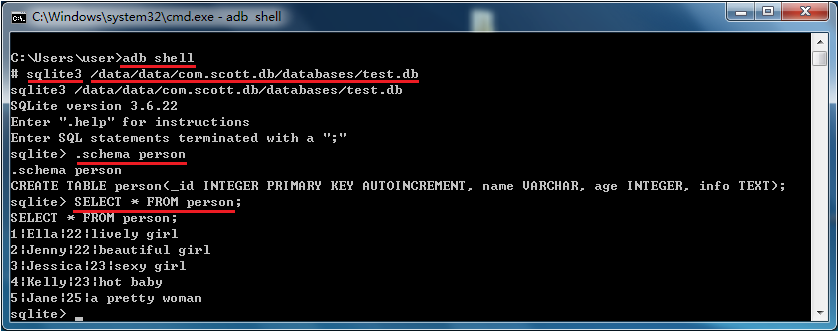
Cursor結果集需要注意些什麼:一個最需要注意的是,在我們的結果集中必須要包含一個“_id”的列,否則SimpleCursorAdapter就會翻臉不認人,為什麼一定要這樣呢?因為這源於SQLite的規範,主鍵以“_id”為標準。解決辦法有三:第一,建表時根據規範去做;第二,查詢時用別名,例如:SELECT id AS _id FROM person;第三,在CursorWrapper裡做文章:
    	CursorWrapper cursorWrapper = new CursorWrapper(c) {
    		@Override
    		public int getColumnIndexOrThrow(String columnName) throws IllegalArgumentException {
    			if (columnName.equals("_id")) {
    				return super.getColumnIndex("id");
    			}
    			return super.getColumnIndexOrThrow(columnName);
    		}
};最後我們來看一下結果如何: