
tensorflow 16:資料讀取(以cifar10_input.py為例)
資料讀取概述
TensorFlow程式讀取資料一共有3種方法:
- 供給資料(Feeding): 在TensorFlow程式執行的每一步, 讓Python程式碼來供給資料。
- 從檔案讀取資料: 在TensorFlow圖的起始, 讓一個輸入管線從檔案中讀取資料。
- 預載入資料: 在TensorFlow圖中定義常量或變數來儲存所有資料(僅適用於資料量比較小的情況)。
目前我用過的主要是第一種,就是提供feed_dict來向計算圖喂資料。第三種比較少用。
本篇部落格主要講第二種。
從檔案讀取的流水線
下圖來自文末的參考資料《tensorflow資料讀取》。
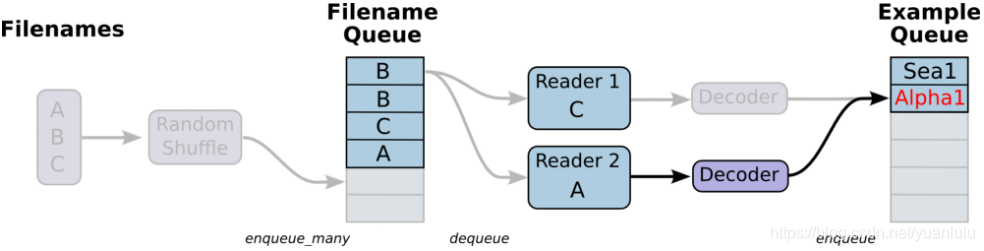
注意這個流水線有兩個佇列。一個是檔案佇列,由檔名生成。生成的時候可以指定亂序,長度可以長於檔案個數(這時佇列內就會有重複)。
第二個佇列是讀出的樣本佇列。
兩個佇列之間的部分由多個讀取執行緒組成,每個執行緒包括reader、decoder、與處理組成。
注意:樣本佇列最終以計算圖節點的形式接入計算圖,計算圖根據依賴自動去獲取資料,不用手動餵了。
程式碼檔案說明
包含以下幾個檔案:
| 檔名 | 說明 |
|---|---|
| 構建計算圖,包括inference、train、loss,同時返回了流水線讀取資料的label和image節點。 | |
| cifar10_input.py | 構建從檔案讀取資料的流水線 |
| cifar10_input_test.py | 測試cifar10_input.py中的reader |
| cifar10_train.py | 訓練程式碼 |
| cifar10_multi_gpu_train.py | 多GPU訓練程式碼 |
| cifar10_eval.py | 評估訓練程式碼 |
cifar10_input.py: inputs分解
cifar10_input.py對外提供了兩個介面:inputs和distorted_inputs。區別就是後者回對影象做一些隨機翻轉、裁剪、亮度調整等處理,相當於資料增廣,前者原樣返回。
def inputs(eval_data, data_dir, batch_size):
if not eval_data:
filenames = [os.path.join(data_dir, 'data_batch_%d.bin' 這個函式可以分為三部分:
- 建立檔名佇列,對上本文開頭圖片左邊的部分
- 建立reader和decoder,增加圖片預處理,對應開頭圖片兩個佇列之間的部分.這裡有呼叫tf.image.per_image_standardization對圖片歸一化。
- 建立佇列,按batch獲取image和label, 對應開頭圖片最右側的佇列
最終要的是兩處函式呼叫,即呼叫read_cifar10()和_generate_image_and_label_batch()
先看read_cifar10(),這個函式用於建立reader和decoder。
def read_cifar10(filename_queue):
  class CIFAR10Record(object):
    pass
  result = CIFAR10Record()

  # 定義圖片格式.
  label_bytes = 1  # 2 for CIFAR-100
  result.height = 32
  result.width = 32
  result.depth = 3
  image_bytes = result.height * result.width * result.depth
  # Every record consists of a label followed by the image, with a
  # fixed number of bytes for each.
  record_bytes = label_bytes + image_bytes

  # Read a record, getting filenames from the filename_queue.  No
  # header or footer in the CIFAR-10 format, so we leave header_bytes
  # and footer_bytes at their default of 0.
  reader = tf.FixedLengthRecordReader(record_bytes=record_bytes)
  result.key, value = reader.read(filename_queue)

  # Convert from a string to a vector of uint8 that is record_bytes long.
  record_bytes = tf.decode_raw(value, tf.uint8)

  # The first bytes represent the label, which we convert from uint8->int32.
  result.label = tf.cast(
      tf.strided_slice(record_bytes, [0], [label_bytes]), tf.int32)

  # The remaining bytes after the label represent the image, which we reshape
  # from [depth * height * width] to [depth, height, width].
  depth_major = tf.reshape(
      tf.strided_slice(record_bytes, [label_bytes],
                       [label_bytes + image_bytes]),
      [result.depth, result.height, result.width])
  # Convert from [depth, height, width] to [height, width, depth].
  result.uint8image = tf.transpose(depth_major, [1, 2, 0])

  return result
注意這裡用的reader是tf.FixedLengthRecordReader,用的decoder是tf.decode_raw。如果是別的格式的檔案(如cvs),需要選擇別的reader和decoder。這裡返回的result各成員都是tensor,不是普通檔案,需要執行計算圖才能獲得實際內容。每次讀取一個樣本,有意cifar10的檔案是多個圖片在一個bin檔案裡,下次會從上次讀取的位置接著讀。
另外一個重要的函式是_generate_image_and_label_batch(),它的任務主要是建立按batch獲取圖片的佇列,需要上面建立好的result作為輸入。
def _generate_image_and_label_batch(image, label, min_queue_examples,
                                    batch_size, shuffle):
  """Construct a queued batch of images and labels.

  Args:
    image: 3-D Tensor of [height, width, 3] of type.float32.
    label: 1-D Tensor of type.int32
    min_queue_examples: int32, minimum number of samples to retain
      in the queue that provides of batches of examples.
    batch_size: Number of images per batch.
    shuffle: boolean indicating whether to use a shuffling queue.

  Returns:
    images: Images. 4D tensor of [batch_size, height, width, 3] size.
    labels: Labels. 1D tensor of [batch_size] size.
  """
  # Create a queue that shuffles the examples, and then
  # read 'batch_size' images + labels from the example queue.
  num_preprocess_threads = 16
  if shuffle:
    images, label_batch = tf.train.shuffle_batch(
        [image, label],
        batch_size=batch_size,
        num_threads=num_preprocess_threads,
        capacity=min_queue_examples + 3 * batch_size,
        min_after_dequeue=min_queue_examples)
  else:
    images, label_batch = tf.train.batch(
        [image, label],
        batch_size=batch_size,
        num_threads=num_preprocess_threads,
        capacity=min_queue_examples + 3 * batch_size)

  # Display the training images in the visualizer.
  tf.summary.image('images', images)

  return images, tf.reshape(label_batch, [batch_size])
根據是否打亂順序,這個函式會選擇呼叫 tf.train.shuffle_batch()還是tf.train.batch() 返回兩個tensor,一個是images和labels,數量就是傳入的batch_size控制的。
cifar10_input.py:distorted_inputs分解
def distorted_inputs(data_dir, batch_size):
  """Construct distorted input for CIFAR training using the Reader ops.

  Args:
    data_dir: Path to the CIFAR-10 data directory.
    batch_size: Number of images per batch.

  Returns:
    images: Images. 4D tensor of [batch_size, IMAGE_SIZE, IMAGE_SIZE, 3] size.
    labels: Labels. 1D tensor of [batch_size] size.
  """
  filenames = [os.path.join(data_dir, 'data_batch_%d.bin' % i)
               for i in xrange(1, 6)]
  for f in filenames:
    if not tf.gfile.Exists(f):
      raise ValueError('Failed to find file: ' + f)

  # 1. 建立檔名佇列.
  filename_queue = tf.train.string_input_producer(filenames)

  with tf.name_scope('data_augmentation'):
    # 2. 建立reader和decoder,增加圖片預處理
    read_input = read_cifar10(filename_queue)
    reshaped_image = tf.cast(read_input.uint8image, tf.float32)

    height = IMAGE_SIZE
    width = IMAGE_SIZE

    # Image processing for training the network. Note the many random
    # distortions applied to the image.

    # 隨機裁剪
    distorted_image = tf.random_crop(reshaped_image, [height, width, 3])

    # 隨機左右翻轉
    distorted_image = tf.image.random_flip_left_right(distorted_image)

    # 隨機調整亮度和對比度
    distorted_image = tf.image.random_brightness(distorted_image,
                                                 max_delta=63)
    distorted_image = tf.image.random_contrast(distorted_image,
                                               lower=0.2, upper=1.8)

    # 標準化(減去均值畫素除以標準差).
    float_image = tf.image.per_image_standardization(distorted_image)

    # Set the shapes of tensors.
    float_image.set_shape([height, width, 3])
    read_input.label.set_shape([1])

    # Ensure that the random shuffling has good mixing properties.
    min_fraction_of_examples_in_queue = 0.4
    min_queue_examples = int(NUM_EXAMPLES_PER_EPOCH_FOR_TRAIN *
                             min_fraction_of_examples_in_queue)
    print ('Filling queue with %d CIFAR images before starting to train. '
           'This will take a few minutes.' % min_queue_examples)

  # 3. 建立佇列,按batch獲取image和label
  return _generate_image_and_label_batch(float_image, read_input.label,
                                         min_queue_examples, batch_size,
                                         shuffle=True)
可以看到,這個函式的整體流程和input基本一致,只是多了在decoder之後的預處理,對影象做了很多轉換,起到資料增廣的目的。