
Android-淺談Glide的原始碼-優雅的圖片載入框架(一)
摘要
網上GLide的原始碼分析文章太多了,以至於我自己看的時候都不知道從哪看,最近正好有時間整理一下文件。首先要肯定的一點是,我必須承認,Glide原始碼我沒讀完,相比較volley等框架的原始碼,Glide的原始碼在我看來更是一個極其複雜的設計,雖然它的使用時很簡單,但背後的工作確實不簡單,我的這篇部落格更多的是展示我自己對Glide這個框架的理解,可能會有問題,希望多多指正。對於Glide原始碼,我更覺得要從使用的那些方法入手,比如常見的這行程式碼
Glide.with(this).load(url).into(imageView);可以從with load into三個方法由淺入深的去學習,而不是一頭扎進去從頭點到尾,那樣只會越看越亂。
原始碼
可以娶github的原始碼下載地址去下載glide的最新原始碼 https://github.com/bumptech/glide 建議直接下載到本地,因為直接下載的話可以做進一步的修改,但說實話,想修改glide的原始碼的話 絕非易事,也不是那麼容易自定義修改的,如果真的能修改,真的很厲害
with()
with方法有好幾個過載我們這邊看下程式碼
 public static RequestManager with(Context context) {
        RequestManagerRetriever retriever = RequestManagerRetriever.get();
        return retriever.get(context);
    }

    public static RequestManager with(Activity activity) {
        RequestManagerRetriever retriever = RequestManagerRetriever.get();
        return retriever.get(activity);
    }

    public static RequestManager with(FragmentActivity activity) {
        RequestManagerRetriever retriever = RequestManagerRetriever.get();
        return retriever.get(activity);
    }

    @TargetApi(Build.VERSION_CODES.HONEYCOMB)
    public static RequestManager with(android.app.Fragment fragment) {
        RequestManagerRetriever retriever = RequestManagerRetriever.get();
        return retriever.get(fragment);
    }

    public static RequestManager with(Fragment fragment) {
        RequestManagerRetriever retriever = RequestManagerRetriever.get();
        return retriever.get(fragment);
    }
每個with方法都可以傳入一個Activity或者fragment,然後通過RequestManagerRetriever 的get方法去返回一個RequestManager物件
我們再看下這個get()方法裡做了什麼
 /**
     * Retrieves and returns the RequestManagerRetriever singleton.
     */
    public static RequestManagerRetriever get() {
        return INSTANCE;
    }

    private RequestManager getApplicationManager(Context context) {
        // Either an application context or we're on a background thread.
        if (applicationManager == null) {
            synchronized (this) {
                if (applicationManager == null) {
                    // Normally pause/resume is taken care of by the fragment we add to the fragment or activity.
                    // However, in this case since the manager attached to the application will not receive lifecycle
                    // events, we must force the manager to start resumed using ApplicationLifecycle.
                    applicationManager = new RequestManager(context.getApplicationContext(),
                            new ApplicationLifecycle(), new EmptyRequestManagerTreeNode());
                }
            }
        }
        return applicationManager;
    }

    public RequestManager get(Context context) {
        if (context == null) {
            throw new IllegalArgumentException("You cannot start a load on a null Context");
        } else if (Util.isOnMainThread() && !(context instanceof Application)) {
            if (context instanceof FragmentActivity) {
                return get((FragmentActivity) context);
            } else if (context instanceof Activity) {
                return get((Activity) context);
            } else if (context instanceof ContextWrapper) {
                return get(((ContextWrapper) context).getBaseContext());
            }
        }
        return getApplicationManager(context);
    }

    public RequestManager get(FragmentActivity activity) {
        if (Util.isOnBackgroundThread()) {
            return get(activity.getApplicationContext());
        } else {
            assertNotDestroyed(activity);
            FragmentManager fm = activity.getSupportFragmentManager();
            return supportFragmentGet(activity, fm);
        }
    }

    public RequestManager get(Fragment fragment) {
        if (fragment.getActivity() == null) {
            throw new IllegalArgumentException("You cannot start a load on a fragment before it is attached");
        }
        if (Util.isOnBackgroundThread()) {
            return get(fragment.getActivity().getApplicationContext());
        } else {
            FragmentManager fm = fragment.getChildFragmentManager();
            return supportFragmentGet(fragment.getActivity(), fm);
        }
    }

    @TargetApi(Build.VERSION_CODES.HONEYCOMB)
    public RequestManager get(Activity activity) {
        if (Util.isOnBackgroundThread() || Build.VERSION.SDK_INT < Build.VERSION_CODES.HONEYCOMB) {
            return get(activity.getApplicationContext());
        } else {
            assertNotDestroyed(activity);
            android.app.FragmentManager fm = activity.getFragmentManager();
            return fragmentGet(activity, fm);
        }
    }

    @TargetApi(Build.VERSION_CODES.JELLY_BEAN_MR1)
    private static void assertNotDestroyed(Activity activity) {
        if (Build.VERSION.SDK_INT >= Build.VERSION_CODES.JELLY_BEAN_MR1 && activity.isDestroyed()) {
            throw new IllegalArgumentException("You cannot start a load for a destroyed activity");
        }
    }

    @TargetApi(Build.VERSION_CODES.JELLY_BEAN_MR1)
    public RequestManager get(android.app.Fragment fragment) {
        if (fragment.getActivity() == null) {
            throw new IllegalArgumentException("You cannot start a load on a fragment before it is attached");
        }
        if (Util.isOnBackgroundThread() || Build.VERSION.SDK_INT < Build.VERSION_CODES.JELLY_BEAN_MR1) {
            return get(fragment.getActivity().getApplicationContext());
        } else {
            android.app.FragmentManager fm = fragment.getChildFragmentManager();
            return fragmentGet(fragment.getActivity(), fm);
        }
    }

    @TargetApi(Build.VERSION_CODES.JELLY_BEAN_MR1)
    RequestManagerFragment getRequestManagerFragment(final android.app.FragmentManager fm) {
        RequestManagerFragment current = (RequestManagerFragment) fm.findFragmentByTag(FRAGMENT_TAG);
        if (current == null) {
            current = pendingRequestManagerFragments.get(fm);
            if (current == null) {
                current = new RequestManagerFragment();
                pendingRequestManagerFragments.put(fm, current);
                fm.beginTransaction().add(current, FRAGMENT_TAG).commitAllowingStateLoss();
                handler.obtainMessage(ID_REMOVE_FRAGMENT_MANAGER, fm).sendToTarget();
            }
        }
        return current;
    }

    @TargetApi(Build.VERSION_CODES.HONEYCOMB)
    RequestManager fragmentGet(Context context, android.app.FragmentManager fm) {
        RequestManagerFragment current = getRequestManagerFragment(fm);
        RequestManager requestManager = current.getRequestManager();
        if (requestManager == null) {
            requestManager = new RequestManager(context, current.getLifecycle(), current.getRequestManagerTreeNode());
            current.setRequestManager(requestManager);
        }
        return requestManager;
    }

    SupportRequestManagerFragment getSupportRequestManagerFragment(final FragmentManager fm) {
        SupportRequestManagerFragment current = (SupportRequestManagerFragment) fm.findFragmentByTag(FRAGMENT_TAG);
        if (current == null) {
            current = pendingSupportRequestManagerFragments.get(fm);
            if (current == null) {
                current = new SupportRequestManagerFragment();
                pendingSupportRequestManagerFragments.put(fm, current);
                fm.beginTransaction().add(current, FRAGMENT_TAG).commitAllowingStateLoss();
                handler.obtainMessage(ID_REMOVE_SUPPORT_FRAGMENT_MANAGER, fm).sendToTarget();
            }
        }
        return current;
    }

    RequestManager supportFragmentGet(Context context, FragmentManager fm) {
        SupportRequestManagerFragment current = getSupportRequestManagerFragment(fm);
        RequestManager requestManager = current.getRequestManager();
        if (requestManager == null) {
            requestManager = new RequestManager(context, current.getLifecycle(), current.getRequestManagerTreeNode());
            current.setRequestManager(requestManager);
        }
        return requestManager;
    }
再get方法中既可以傳入Activity 也可以傳入fragment 其實最終都會走判斷 就是拿傳入的這個上下文去做判斷,當傳入的是一個application物件,那麼直接呼叫getApplicationManager()方法來獲取一個RequestManager物件,即和應用的生命週期同步,不需要做其他的處理,當應用終止,Glide的生命週期也終止。
當傳入的不是一個application物件的時候,glide內部是如何處理的呢?那就是會向當前的Activity當中新增一個隱藏的Fragment,然後會根據v4包還是app包去做判斷,為什麼加這個fragment的呢?其實就是通過這個fragment去獲取主體Activity的生命週期,當Activity生命週期銷燬的時候,fragment是可以捕獲的,glide通過這個fragment即可終止事件處理
load()
因為with方法返回的是RequestManager物件,所以到這個類中去找load方法,因為Glide是支援圖片URL字串、圖片本地路徑等等載入形式的,因此RequestManager中也有很多個load()方法的過載,我們這裡研究的是url字串
 /**
     * Returns a request builder to load the given {@link String}.
     * signature.
     *
     * @see #fromString()
     * @see #load(Object)
     *
     * @param string A file path, or a uri or url handled by {@link com.bumptech.glide.load.model.UriLoader}.
     */
    public DrawableTypeRequest<String> load(String string) {
        return (DrawableTypeRequest<String>) fromString().load(string);
    }

    /**
     * Returns a request builder that loads data from {@link String}s using an empty signature.
     *
     * <p>
     *     Note - this method caches data using only the given String as the cache key. If the data is a Uri outside of
     *     your control, or you otherwise expect the data represented by the given String to change without the String
     *     identifier changing, Consider using
     *     {@link GenericRequestBuilder#signature(Key)} to mixin a signature
     *     you create that identifies the data currently at the given String that will invalidate the cache if that data
     *     changes. Alternatively, using {@link DiskCacheStrategy#NONE} and/or
     *     {@link DrawableRequestBuilder#skipMemoryCache(boolean)} may be appropriate.
     * </p>
     *
     * @see #from(Class)
     * @see #load(String)
     */
    public DrawableTypeRequest<String> fromString() {
        return loadGeneric(String.class);
    }

    private <T> DrawableTypeRequest<T> loadGeneric(Class<T> modelClass) {
        ModelLoader<T, InputStream> streamModelLoader = Glide.buildStreamModelLoader(modelClass, context);
        ModelLoader<T, ParcelFileDescriptor> fileDescriptorModelLoader =
                Glide.buildFileDescriptorModelLoader(modelClass, context);
        if (modelClass != null && streamModelLoader == null && fileDescriptorModelLoader == null) {
            throw new IllegalArgumentException("Unknown type " + modelClass + ". You must provide a Model of a type for"
                    + " which there is a registered ModelLoader, if you are using a custom model, you must first call"
                    + " Glide#register with a ModelLoaderFactory for your custom model class");
        }
        return optionsApplier.apply(
                new DrawableTypeRequest<T>(modelClass, streamModelLoader, fileDescriptorModelLoader, context,
                        glide, requestTracker, lifecycle, optionsApplier));
    }
load()方法,這個方法中就是先呼叫了fromString()方法,再呼叫load()方法,然後把傳入的圖片URL地址傳進去。而fromString()方法也極為簡單,就是呼叫了loadGeneric()方法,並且指定引數為String.class,因為load()方法傳入的是一個字串引數。主要的工作都是在loadGeneric()方法中進行的
loadGeneric()方法分別呼叫了Glide.buildStreamModelLoader()方法和Glide.buildFileDescriptorModelLoader()方法來獲得ModelLoader物件。ModelLoader物件是用於載入圖片的,而我們給load()方法傳入不同型別的引數,這裡也會得到不同的ModelLoader物件。由於我們剛才傳入的引數是String.class,因此最終得到的是StreamStringLoader物件,它是實現了ModelLoader介面的。
最後我們可以看到,loadGeneric()方法是要返回一個DrawableTypeRequest物件的,因此在loadGeneric()方法的最後又去new了一個DrawableTypeRequest物件,然後把剛才獲得的ModelLoader物件,還有其他東西都傳了進去。具體每個引數的含義和作用就不解釋了,我們只看主線流程。
那麼DrawableTypeRequest的作用是什麼呢?
public class DrawableTypeRequest<ModelType> extends DrawableRequestBuilder<ModelType> implements DownloadOptions {
    private final ModelLoader<ModelType, InputStream> streamModelLoader;
    private final ModelLoader<ModelType, ParcelFileDescriptor> fileDescriptorModelLoader;
    private final RequestManager.OptionsApplier optionsApplier;

    private static <A, Z, R> FixedLoadProvider<A, ImageVideoWrapper, Z, R> buildProvider(Glide glide,
            ModelLoader<A, InputStream> streamModelLoader,
            ModelLoader<A, ParcelFileDescriptor> fileDescriptorModelLoader, Class<Z> resourceClass,
            Class<R> transcodedClass,
            ResourceTranscoder<Z, R> transcoder) {
        if (streamModelLoader == null && fileDescriptorModelLoader == null) {
            return null;
        }

        if (transcoder == null) {
            transcoder = glide.buildTranscoder(resourceClass, transcodedClass);
        }
        DataLoadProvider<ImageVideoWrapper, Z> dataLoadProvider = glide.buildDataProvider(ImageVideoWrapper.class,
                resourceClass);
        ImageVideoModelLoader<A> modelLoader = new ImageVideoModelLoader<A>(streamModelLoader,
                fileDescriptorModelLoader);
        return new FixedLoadProvider<A, ImageVideoWrapper, Z, R>(modelLoader, transcoder, dataLoadProvider);
    }

    DrawableTypeRequest(Class<ModelType> modelClass, ModelLoader<ModelType, InputStream> streamModelLoader,
            ModelLoader<ModelType, ParcelFileDescriptor> fileDescriptorModelLoader, Context context, Glide glide,
            RequestTracker requestTracker, Lifecycle lifecycle, RequestManager.OptionsApplier optionsApplier) {
        super(context, modelClass,
                buildProvider(glide, streamModelLoader, fileDescriptorModelLoader, GifBitmapWrapper.class,
                        GlideDrawable.class, null),
                glide, requestTracker, lifecycle);
        this.streamModelLoader = streamModelLoader;
        this.fileDescriptorModelLoader = fileDescriptorModelLoader;
        this.optionsApplier = optionsApplier;
    }

    /**
     * Attempts to always load the resource as a {@link android.graphics.Bitmap}, even if it could actually be animated.
     *
     * @return A new request builder for loading a {@link android.graphics.Bitmap}
     */
    public BitmapTypeRequest<ModelType> asBitmap() {
        return optionsApplier.apply(new BitmapTypeRequest<ModelType>(this, streamModelLoader,
                fileDescriptorModelLoader, optionsApplier));
    }

    /**
     * Attempts to always load the resource as a {@link com.bumptech.glide.load.resource.gif.GifDrawable}.
     * <p>
     *     If the underlying data is not a GIF, this will fail. As a result, this should only be used if the model
     *     represents an animated GIF and the caller wants to interact with the GIfDrawable directly. Normally using
     *     just an {@link DrawableTypeRequest} is sufficient because it will determine whether or
     *     not the given data represents an animated GIF and return the appropriate animated or not animated
     *     {@link android.graphics.drawable.Drawable} automatically.
     * </p>
     *
     * @return A new request builder for loading a {@link com.bumptech.glide.load.resource.gif.GifDrawable}.
     */
    public GifTypeRequest<ModelType> asGif() {
        return optionsApplier.apply(new GifTypeRequest<ModelType>(this, streamModelLoader, optionsApplier));
    }
最主要的就是它提供了asBitmap()和asGif()這兩個方法。分別是用於強制指定載入靜態圖片和動態圖片。而從原始碼中可以看出,它們分別又建立了一個BitmapTypeRequest和GifTypeRequest,如果沒有進行強制指定的話,那預設就是使用DrawableTypeRequest。
現在回到DrawableTypeRequest的父類是DrawableRequestBuilder中去檢視load方法 DrawableRequestBuilder中有很多個方法,這些方法其實就是Glide絕大多數的API了。比如說placeholder()方法、error()方法、diskCacheStrategy()方法、override()方法等。還有很多其他api 這裡就不貼程式碼了有興趣的同學可以自行研究一下
into()
into()方法中並沒有任何邏輯,只有一句super.into(view)。into()方法的具體邏輯都是在DrawableRequestBuilder的父類中了。DrawableRequestBuilder的父類是GenericRequestBuilder,我們來看一下GenericRequestBuilder類中的into()方法
public Target<TranscodeType> into(ImageView view) {
    Util.assertMainThread();
    if (view == null) {
        throw new IllegalArgumentException("You must pass in a non null View");
    }
    if (!isTransformationSet && view.getScaleType() != null) {
        switch (view.getScaleType()) {
            case CENTER_CROP:
                applyCenterCrop();
                break;
            case FIT_CENTER:
            case FIT_START:
            case FIT_END:
                applyFitCenter();
                break;
            //$CASES-OMITTED$
            default:
                // Do nothing.
        }
    }
    return into(glide.buildImageViewTarget(view, transcodeClass));
}
簡單點就是會構建出一個tatget物件 關於這個target物件,我從網上找了一個圖便於更好地去理解
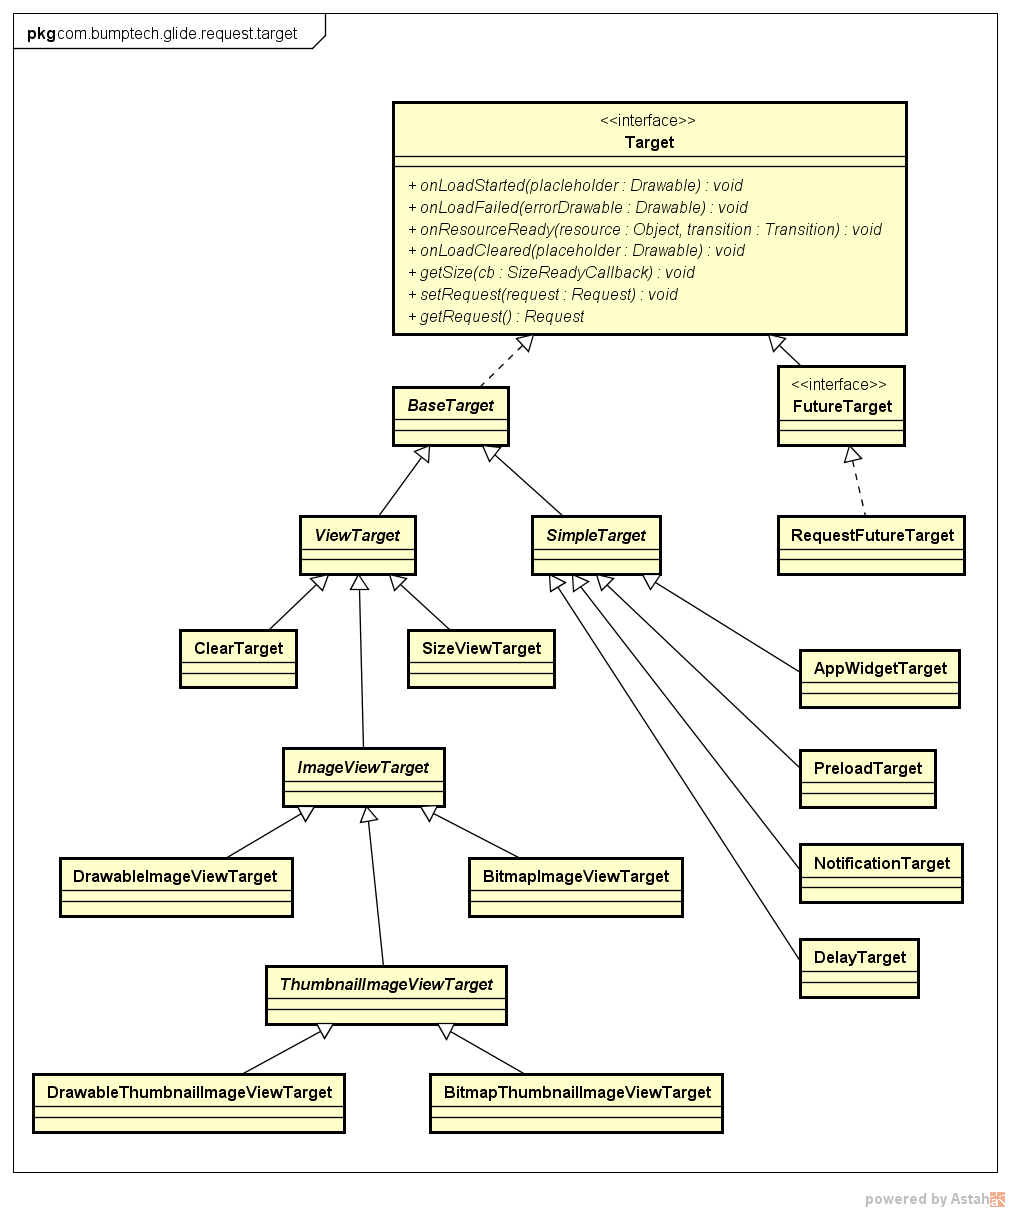
這裡針對ImageView的填充方式做了篩選並對應設定到requestOptions上。最終的是通過ImageView和轉碼型別(transcodeClass)建立不通過的Target(例如Bitmap對應的BitmapImageViewTarget和Drawable對應的DrawableImageViewTarget)
然後看下面程式碼
public <Y extends Target<TranscodeType>> Y into(Y target) {
    Util.assertMainThread();
    if (target == null) {
        throw new IllegalArgumentException("You must pass in a non null Target");
    }
    if (!isModelSet) {
        throw new IllegalArgumentException("You must first set a model (try #load())");
    }
    Request previous = target.getRequest();
    if (previous != null) {
        previous.clear();
        requestTracker.removeRequest(previous);
        previous.recycle();
    }
    Request request = buildRequest(target);
    target.setRequest(request);
    lifecycle.addListener(target);
    requestTracker.runRequest(request);
    return target;
}
呼叫buildRequest()方法構建出了一個Request物件傳入target
private Request obtainRequest(Target<TranscodeType> target,
      BaseRequestOptions<?> requestOptions, RequestCoordinator requestCoordinator,
      TransitionOptions<?, ? super TranscodeType> transitionOptions, Priority priority,
      int overrideWidth, int overrideHeight) {
    requestOptions.lock();

    return SingleRequest.obtain(
        context,
        model,
        transcodeClass,
        requestOptions,
        overrideWidth,
        overrideHeight,
        priority,
        target,
        requestListener,
        requestCoordinator,
        context.getEngine(),
        transitionOptions.getTransitionFactory());
  }
這個obtain()方法需要傳入非常多的引數,而其中很多的引數我們都是比較熟悉的,像什麼placeholderId、errorPlaceholder、diskCacheStrategy等等。剛才在load()方法中呼叫的所有API,其實都是在這裡組裝到Request物件當中的。
還有就是target.setRequest(request)也是一個比較值得注意的地方,如果target是ViewTarget,那麼request會被設定到View的tag上。這樣其實是有一個好處,每一個View有一個自己的Request,如果有重複請求,那麼都會先去拿到上一個已經繫結的Request,並且從RequestManager中清理回收掉。這應該是去重的功能。
目前為止request物件算是建立成功了,下面就是呼叫requestTracker.runRequest()方法來去執行Request
public void runRequest(Request request) {
    requests.add(request);
    if (!isPaused) {
        request.begin();
    } else {
        pendingRequests.add(request);
    }
}
就是先判斷Glide當前是不是處理暫停狀態,如果不是暫停狀態就呼叫Request的begin()方法來執行Request,否則的話就先將Request新增到待執行佇列裡面,等暫停狀態解除了之後再執行 下面來看一下begin方法
@Override
public void begin() {
    startTime = LogTime.getLogTime();
    if (model == null) {
        onException(null);
        return;
    }
    status = Status.WAITING_FOR_SIZE;
    if (Util.isValidDimensions(overrideWidth, overrideHeight)) {
        onSizeReady(overrideWidth, overrideHeight);
    } else {
        target.getSize(this);
    }
    if (!isComplete() && !isFailed() && canNotifyStatusChanged()) {
        target.onLoadStarted(getPlaceholderDrawable());
    }
    if (Log.isLoggable(TAG, Log.VERBOSE)) {
        logV("finished run method in " + LogTime.getElapsedMillis(startTime));
    }
}
如果model等於null,這個時候會呼叫onException()方法。最終會呼叫到一個setErrorPlaceholder(),這個方法中會先去獲取一個error的佔位圖,如果獲取不到的話會再去獲取一個loading佔位圖,然後呼叫target.onLoadFailed()方法並將佔位圖傳入,
public abstract class ImageViewTarget<Z> extends ViewTarget<ImageView, Z> implements GlideAnimation.ViewAdapter {

    ...

    @Override
    public void onLoadStarted(Drawable placeholder) {
        view.setImageDrawable(placeholder);
    }

    @Override
    public void onLoadFailed(Exception e, Drawable errorDrawable) {
        view.setImageDrawable(errorDrawable);
    }

    ...
}
這個很簡單,其實就是將這張error佔位圖顯示到ImageView上而已,因為現在出現了異常,沒辦法展示正常的圖片了。而如果你仔細看下剛才begin()方法的第15行,你會發現它又呼叫了一個target.onLoadStarted()方法,並傳入了一個loading佔位圖,在也就說,在圖片請求開始之前,會先使用這張佔位圖代替最終的圖片顯示。這就是佔位圖的原理。現在繼續回到begin過程中來
一種是你使用了override() API為圖片指定了一個固定的寬高,一種是沒有指定。如果指定了的話 呼叫onSizeReady()方法。如果沒指定的話,呼叫target.getSize()方法。這個target.getSize()方法的內部會根據ImageView的layout_width和layout_height值做一系列的計算,來算出圖片應該的寬高。也就是說,不管是哪種情況,最終都會呼叫到onSizeReady()方法
@Override
public void onSizeReady(int width, int height) {
    if (Log.isLoggable(TAG, Log.VERBOSE)) {
        logV("Got onSizeReady in " + LogTime.getElapsedMillis(startTime));
    }
    if (status != Status.WAITING_FOR_SIZE) {
        return;
    }
    status = Status.RUNNING;
    width = Math.round(sizeMultiplier * width);
    height = Math.round(sizeMultiplier * height);
    ModelLoader<A, T> modelLoader = loadProvider.getModelLoader();
    final DataFetcher<T> dataFetcher = modelLoader.getResourceFetcher(model, width, height);
    if (dataFetcher == null) {
        onException(new Exception("Failed to load model: \'" + model + "\'"));
        return;
    }
    ResourceTranscoder<Z, R> transcoder = loadProvider.getTranscoder();
    if (Log.isLoggable(TAG, Log.VERBOSE)) {
        logV("finished setup for calling load in " + LogTime.getElapsedMillis(startTime));
    }
    loadedFromMemoryCache = true;
    loadStatus = engine.load(signature, width, height, dataFetcher, loadProvider, transformation, transcoder,
            priority, isMemoryCacheable, diskCacheStrategy, this);
    loadedFromMemoryCache = resource != null;
    if (Log.isLoggable(TAG, Log.VERBOSE)) {
        logV("finished onSizeReady in " + LogTime.getElapsedMillis(startTime));
    }
}
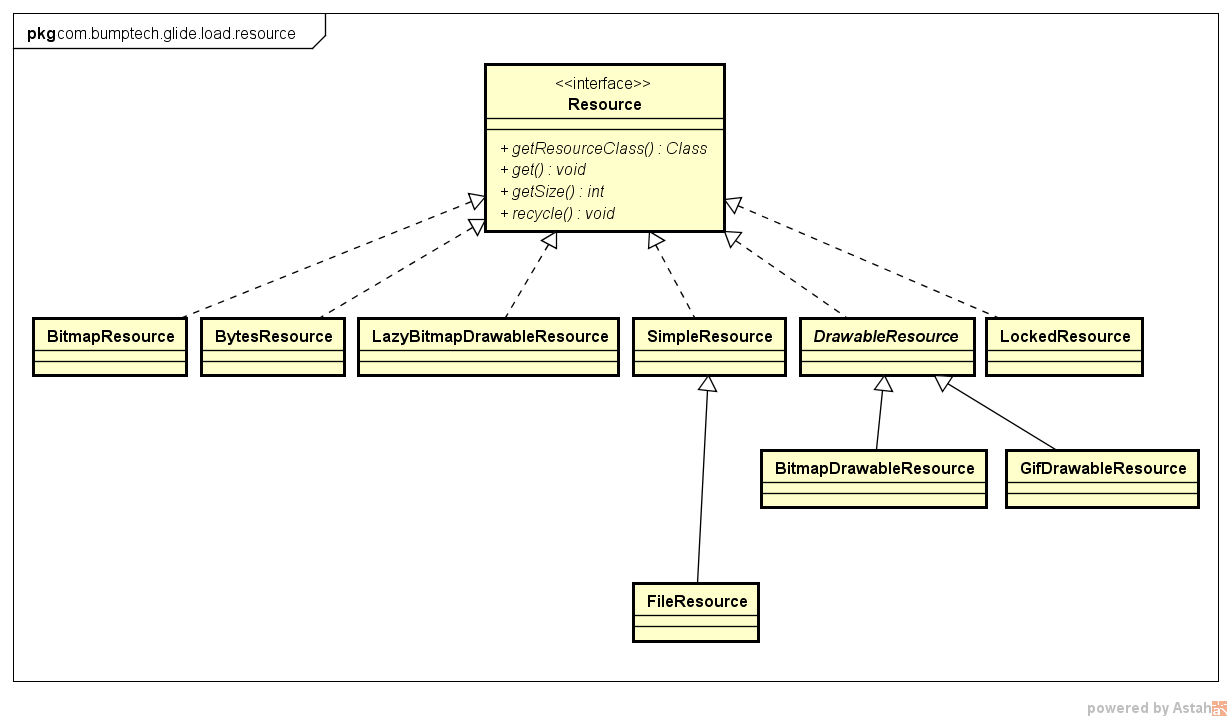
至於接下來的流程 我準備先貼幾張圖 因為我自己都不能確保我自己是已經看懂了,但至少貼的圖不會錯
![]()
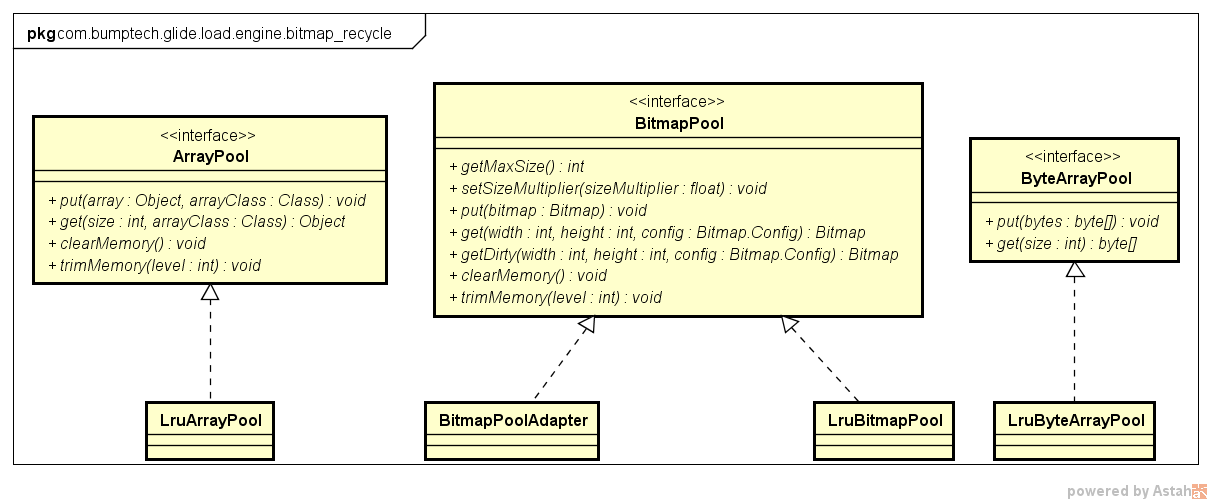
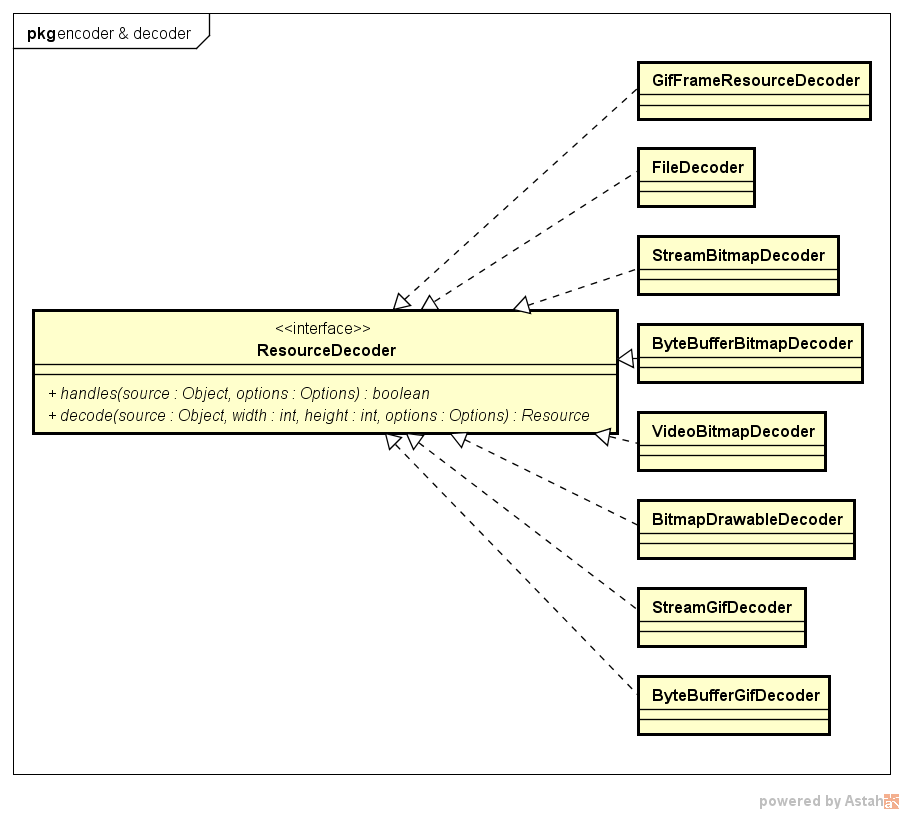
這就是下面比較重要元件的工作流程
後面的程式碼 筆者真的看得懵懵懂懂,也看了不少部落格都是扒著原始碼往裡看,時間也有限,很多東西沒能說的清楚,希望與各位共同學習
- 總體來說程式碼寫的很複雜,但使用方便。
- 原始碼使用了大量的工廠方法來建立物件,就像String.valueof(…)方法一樣
- 對這個庫進行改造的話可能並非易事, 很多地方有Callback這樣的介面