python + requests實現的介面自動化框架
1、首先,我們先來理一下思路。
正常的介面測試流程是什麼?
腦海裡的反應是不是這樣的:
確定測試介面的工具 —> 配置需要的介面引數 —> 進行測試 —> 檢查測試結果(有的需要資料庫輔助) —> 生成測試報告(html報告)
那麼,我們就根據這樣的過程來一步步搭建我們的框架。在這個過程中,我們需要做到業務和資料的分離,這樣才能靈活,達到我們寫框架的目的。只要好好做,一定可以成功。這也是我當初對自己說的。
接下來,我們來進行結構的劃分。
我的結構是這樣的,大家可以參考下:
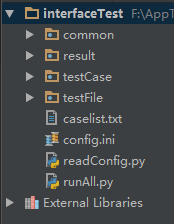
common:存放一些共通的方法
result:執行過程中生成的資料夾,裡面存放每次測試的結果
testCase:用於存放具體的測試case
estFile:存放測試過程中用到的檔案,包括上傳的檔案,測試用例以及 資料庫的sql語句
caselist:txt檔案,配置每次執行的case名稱
config:配置一些常量,例如資料庫的相關資訊,介面的相關資訊等
readConfig: 用於讀取config配置檔案中的內容
runAll:用於執行case
既然整體結構有了劃分,接下來就該一步步的填充整個框架了,首先,我們先來看看config.ini和readConfig.py兩個檔案,從他們入手,個人覺得比較容易走下去噠。
我們來看下檔案的內容是什麼樣子的:
[DATABASE] host = 50.23.190.57 username = xxxxxx password = ****** port = 3306 database = databasename [HTTP] # 介面的url baseurl = http://xx.xxxx.xx port = 8080 timeout = 1.0 [EMAIL] mail_host = smtp.163.com mail_user =[email protected] mail_pass = ********* mail_port = 25 sender = [email protected] receiver = [email protected]/[email protected] subject = python content = "All interface test has been complited\nplease read the report file about the detile of result in the attachment." testuser = Someone on_off = 1
相信大家都知道這樣的配置檔案,沒錯,所有一成不變的東西,我們都可以放到這裡來。哈哈,怎麼樣,不錯吧。
現在,我們已經做好了固定的“倉庫”。來儲存我們平時不動的東西,那麼,我們要怎麼把它拿出來為我所用呢?這時候,readConfig.py檔案出世了,它成功的幫我們解決了這個問題,下面就讓我們來一睹它的廬山真面目吧。
import os
import codecs
import configparser

proDir = os.path.split(os.path.realpath(__file__))[0]
configPath = os.path.join(proDir, "config.ini")

class ReadConfig:
    def __init__(self):
        fd = open(configPath)
        data = fd.read()

        #  remove BOM
        if data[:3] == codecs.BOM_UTF8:
            data = data[3:]
            file = codecs.open(configPath, "w")
            file.write(data)
            file.close()
        fd.close()

        self.cf = configparser.ConfigParser()
        self.cf.read(configPath)

    def get_email(self, name):
        value = self.cf.get("EMAIL", name)
        return value

    def get_http(self, name):
        value = self.cf.get("HTTP", name)
        return value

    def get_db(self, name):
        value = self.cf.get("DATABASE", name)
        return value
話不多說,我們先來看下common到底有哪些東西。
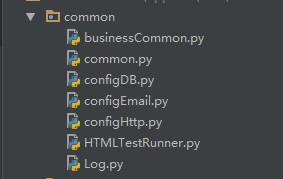
既然配置檔案和讀取配置檔案我們都已經完成了,也看到了common裡的內容,接下來就可以寫common裡的共通方法了,從哪個下手呢?今天,我們就來翻“Log.py”的牌吧,因為它是比較獨立的,我們單獨跟他打交道,也為了以後它能為我們服務打下良好基礎。
這裡呢,我想跟大家多說兩句,對於這個log檔案呢,我給它單獨啟用了一個執行緒,這樣在整個執行過程中,我們在寫log的時候也會比較方便,看名字大家也知道了,這裡就是我們對輸出的日誌的所有操作了,主要是對輸出格式的規定,輸出等級的定義以及其他一些輸出的定義等等。總之,你想對log做的任何事情,都可以放到這裡來。我們來看下程式碼,沒有比這個更直接有效的了。
import logging
from datetime import datetime
import threading
首先,我們要像上面那樣,引入需要的模組,才能進行接下來的操作。
class Log:
    def __init__(self):
        global logPath, resultPath, proDir
        proDir = readConfig.proDir
        resultPath = os.path.join(proDir, "result")
        # create result file if it doesn't exist
        if not os.path.exists(resultPath):
            os.mkdir(resultPath)
        # defined test result file name by localtime
        logPath = os.path.join(resultPath, str(datetime.now().strftime("%Y%m%d%H%M%S")))
        # create test result file if it doesn't exist
        if not os.path.exists(logPath):
            os.mkdir(logPath)
        # defined logger
        self.logger = logging.getLogger()
        # defined log level
        self.logger.setLevel(logging.INFO)

        # defined handler
        handler = logging.FileHandler(os.path.join(logPath, "output.log"))
        # defined formatter
        formatter = logging.Formatter('%(asctime)s - %(name)s - %(levelname)s - %(message)s')
        # defined formatter
        handler.setFormatter(formatter)
        # add handler
        self.logger.addHandler(handler)
現在,我們建立了上面的Log類,在__init__初始化方法中,我們進行了log的相關初始化操作。
class MyLog:
    log = None
    mutex = threading.Lock()

    def __init__(self):
        pass

    @staticmethod
    def get_log():

        if MyLog.log is None:
            MyLog.mutex.acquire()
            MyLog.log = Log()
            MyLog.mutex.release()

        return MyLog.log
我們繼續搭建,這次要做的,是configHttp.py的內容,下面是介面檔案中主要部分的內容,讓我們一起來看看吧。
import requests
import readConfig as readConfig
from common.Log import MyLog as Log

localReadConfig = readConfig.ReadConfig()

class ConfigHttp:
    def __init__(self):
        global host, port, timeout
        host = localReadConfig.get_http("baseurl")
        port = localReadConfig.get_http("port")
        timeout = localReadConfig.get_http("timeout")
        self.log = Log.get_log()
        self.logger = self.log.get_logger()
        self.headers = {}
        self.params = {}
        self.data = {}
        self.url = None
        self.files = {}

    def set_url(self, url):
        self.url = host + url

    def set_headers(self, header):
        self.headers = header

    def set_params(self, param):
        self.params = param

    def set_data(self, data):
        self.data = data

    def set_files(self, file):
        self.files = file

    # defined http get method
    def get(self):
        try:
            response = requests.get(self.url, params=self.params, headers=self.headers, timeout=float(timeout))
            # response.raise_for_status()
            return response
        except TimeoutError:
            self.logger.error("Time out!")
            return None

    # defined http post method
    def post(self):
        try:
            response = requests.post(self.url, headers=self.headers, data=self.data, files=self.files, timeout=float(timeout))
            # response.raise_for_status()
            return response
        except TimeoutError:
            self.logger.error("Time out!")
return None- get方法
介面測試中見到最多的就是get方法和post方法,其中,get方法用於獲取介面的測試,說白了,就是說,使用get的介面,都不會對後臺資料進行更改,而且get方法在傳遞引數後,url的格式是這樣的:http://介面地址?key1=value1&key2=value2
對於requests提供的get方法,有幾個常用的引數:
url:顯而易見,就是介面的地址url啦
headers:定製請求頭(headers),例如:content-type = application/x-www-form-urlencoded
params:用於傳遞測試介面所要用的引數,這裡我們用python中的字典形式(key:value)進行引數的傳遞。
timeout:設定介面連線的最大時間(超過該時間會丟擲超時錯誤)
url=‘http://api.shein.com/v2/member/logout’
header={‘content-type’: application/x-www-form-urlencoded}
param={‘user_id’: 123456,‘email’: [email protected]}
timeout=0.5
requests.get(url, headers=header, params=param, timeout=timeout)- post方法
與get方法類似,只要設定好對應的引數,就可以了。下面就直接舉個栗子,直接上程式碼吧:
url=‘http://api.shein.com/v2/member/login’
header={‘content-type’: application/x-www-form-urlencoded}
data={‘email’: [email protected],‘password’: 123456}
timeout=0.5
requests.post(url, headers=header, data=data, timeout=timeout)
怎麼樣,是不是也很簡單啊。這裡我們需要說明一下,post方法中的引數,我們不在使用params進行傳遞,而是改用data進行傳遞了。
依然只說常用的返回值的操作。
text:獲取介面返回值的文字格式
json():獲取介面返回值的json()格式
status_code:返回狀態碼(成功為:200)
headers:返回完整的請求頭資訊(headers['name']:返回指定的headers內容)
encoding:返回字元編碼格式
url:返回介面的完整url地址
以上這些,就是常用的方法啦,大家可自行取之。
關於失敗請求丟擲異常,我們可以使用“raise_for_status()”來完成,那麼,當我們的請求發生錯誤時,就會丟擲異常。在這裡提醒下各位朋友,如果你的介面,在地址不正確的時候,會有相應的錯誤提示(有時也需要進行測試),這時,千萬不能使用這個方法來丟擲錯誤,因為python自己在連結介面時就已經把錯誤丟擲,那麼,後面你將無法測試期望的內容。而且程式會直接在這裡當掉,以錯誤來計。
common.py裡的內容。
import os
from xlrd import open_workbook
from xml.etree import ElementTree as ElementTree
from common.Log import MyLog as Log

localConfigHttp = configHttp.ConfigHttp()
log = Log.get_log()
logger = log.get_logger()

# 從excel檔案中讀取測試用例
def get_xls(xls_name, sheet_name):
    cls = []
    # get xls file's path
    xlsPath = os.path.join(proDir, "testFile", xls_name)
    # open xls file
    file = open_workbook(xlsPath)
    # get sheet by name
    sheet = file.sheet_by_name(sheet_name)
    # get one sheet's rows
    nrows = sheet.nrows
    for i in range(nrows):
        if sheet.row_values(i)[0] != u'case_name':
            cls.append(sheet.row_values(i))
    return cls

# 從xml檔案中讀取sql語句
database = {}
def set_xml():
    if len(database) == 0:
        sql_path = os.path.join(proDir, "testFile", "SQL.xml")
        tree = ElementTree.parse(sql_path)
        for db in tree.findall("database"):
            db_name = db.get("name")
            # print(db_name)
            table = {}
            for tb in db.getchildren():
                table_name = tb.get("name")
                # print(table_name)
                sql = {}
                for data in tb.getchildren():
                    sql_id = data.get("id")
                    # print(sql_id)
                    sql[sql_id] = data.text
                table[table_name] = sql
            database[db_name] = table

def get_xml_dict(database_name, table_name):
    set_xml()
    database_dict = database.get(database_name).get(table_name)
    return database_dict

def get_sql(database_name, table_name, sql_id):
    db = get_xml_dict(database_name, table_name)
    sql = db.get(sql_id)
    return sql
common的兩大主要內容:
- 我們利用xml.etree.Element來對xml檔案進行操作,然後通過我們自定義的方法,根據傳遞不同的引數取得不(想)同(要)的值。
- 利用xlrd來操作excel檔案,注意啦,我們是用excel檔案來管理測試用例的
excel檔案:
 xml檔案:
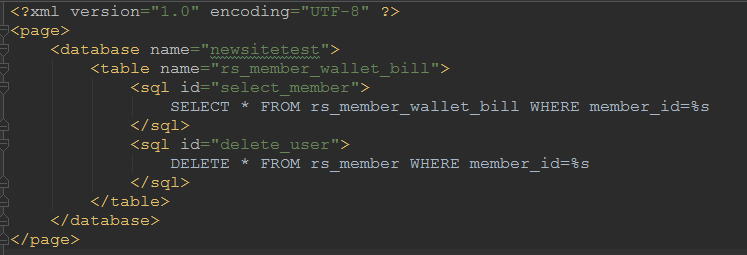
資料庫和傳送郵件(也可根據需要,不寫該部分內容):
import pymysql
import readConfig as readConfig
from common.Log import MyLog as Log

localReadConfig = readConfig.ReadConfig()

class MyDB:
    global host, username, password, port, database, config
    host = localReadConfig.get_db("host")
    username = localReadConfig.get_db("username")
    password = localReadConfig.get_db("password")
    port = localReadConfig.get_db("port")
    database = localReadConfig.get_db("database")
    config = {
        'host': str(host),
        'user': username,
        'passwd': password,
        'port': int(port),
        'db': database
    }

    def __init__(self):
        self.log = Log.get_log()
        self.logger = self.log.get_logger()
        self.db = None
        self.cursor = None

    def connectDB(self):
        try:
            # connect to DB
            self.db = pymysql.connect(**config)
            # create cursor
            self.cursor = self.db.cursor()
            print("Connect DB successfully!")
        except ConnectionError as ex:
            self.logger.error(str(ex))

    def executeSQL(self, sql, params):
        self.connectDB()
        # executing sql
        self.cursor.execute(sql, params)
        # executing by committing to DB
        self.db.commit()
        return self.cursor

    def get_all(self, cursor):
        value = cursor.fetchall()
        return value

    def get_one(self, cursor):
        value = cursor.fetchone()
        return value

    def closeDB(self):
        self.db.close()
        print("Database closed!")
郵件程式碼:
import smtplib
from email.mime.multipart import MIMEMultipart
from email.mime.text import MIMEText
from datetime import datetime
import threading
import readConfig as readConfig
from common.Log import MyLog
import zipfile
import glob

localReadConfig = readConfig.ReadConfig()

class Email:
    def __init__(self):
        global host, user, password, port, sender, title, content
        host = localReadConfig.get_email("mail_host")
        user = localReadConfig.get_email("mail_user")
        password = localReadConfig.get_email("mail_pass")
        port = localReadConfig.get_email("mail_port")
        sender = localReadConfig.get_email("sender")
        title = localReadConfig.get_email("subject")
        content = localReadConfig.get_email("content")
        self.value = localReadConfig.get_email("receiver")
        self.receiver = []
        # get receiver list
        for n in str(self.value).split("/"):
            self.receiver.append(n)
        # defined email subject
        date = datetime.now().strftime("%Y-%m-%d %H:%M:%S")
        self.subject = title + " " + date
        self.log = MyLog.get_log()
        self.logger = self.log.get_logger()
        self.msg = MIMEMultipart('mixed')

    def config_header(self):
        self.msg['subject'] = self.subject
        self.msg['from'] = sender
        self.msg['to'] = ";".join(self.receiver)

    def config_content(self):
        content_plain = MIMEText(content, 'plain', 'utf-8')
        self.msg.attach(content_plain)

    def config_file(self):
        # if the file content is not null, then config the email file
        if self.check_file():

            reportpath = self.log.get_result_path()
            zippath = os.path.join(readConfig.proDir, "result", "test.zip")
            # zip file
            files = glob.glob(reportpath + '\*')
            f = zipfile.ZipFile(zippath, 'w', zipfile.ZIP_DEFLATED)
            for file in files:
                f.write(file)
            f.close()

            reportfile = open(zippath, 'rb').read()
            filehtml = MIMEText(reportfile, 'base64', 'utf-8')
            filehtml['Content-Type'] = 'application/octet-stream'
            filehtml['Content-Disposition'] = 'attachment; filename="test.zip"'
            self.msg.attach(filehtml)

    def check_file(self):
        reportpath = self.log.get_report_path()
        if os.path.isfile(reportpath) and not os.stat(reportpath) == 0:
            return True
        else:
            return False

    def send_email(self):
        self.config_header()
        self.config_content()
        self.config_file()
        try:
            smtp = smtplib.SMTP()
            smtp.connect(host)
            smtp.login(user, password)
            smtp.sendmail(sender, self.receiver, self.msg.as_string())
            smtp.quit()
            self.logger.info("The test report has send to developer by email.")
        except Exception as ex:
            self.logger.error(str(ex))

class MyEmail:
    email = None
    mutex = threading.Lock()

    def __init__(self):
        pass

    @staticmethod
    def get_email():

        if MyEmail.email is None:
            MyEmail.mutex.acquire()
            MyEmail.email = Email()
            MyEmail.mutex.release()
        return MyEmail.email


if __name__ == "__main__":
    email = MyEmail.get_email()
入口程式碼:
import unittest
import HTMLTestRunner
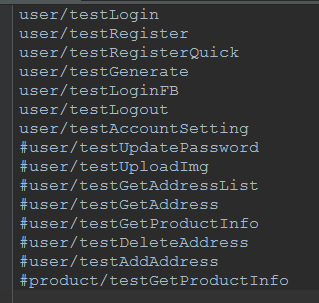
def set_case_list(self):
fb = open(self.caseListFile)
for value in fb.readlines():
data = str(value)
if data != '' and not data.startswith("#"):
self.caseList.append(data.replace("\n", ""))
fb.close()
def set_case_suite(self):
self.set_case_list()
test_suite = unittest.TestSuite()
suite_model = []
for case in self.caseList:
case_file = os.path.join(readConfig.proDir, "testCase")
print(case_file)
case_name = case.split("/")[-1]
print(case_name+".py")
discover = unittest.defaultTestLoader.discover(case_file, pattern=case_name + '.py', top_level_dir=None)
suite_model.append(discover)
if len(suite_model) > 0:
for suite in suite_model:
for test_name in suite:
test_suite.addTest(test_name)
else:
return None
return test_suite
def run(self):
try:
suit = self.set_case_suite()
if suit is not None:
logger.info("********TEST START********")
fp = open(resultPath, 'wb')
runner = HTMLTestRunner.HTMLTestRunner(stream=fp, title='Test Report', description='Test Description')
runner.run(suit)
else:
logger.info("Have no case to test.")
except Exception as ex:
logger.error(str(ex))
finally:
logger.info("*********TEST END*********")
# send test report by email
if int(on_off) == 0:
self.email.send_email()
elif int(on_off) == 1:
logger.info("Doesn't send report email to developer.")
else:
logger.info("Unknow state.")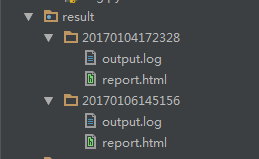
result資料夾會在首次執行case時生成,並且以後的測試結果都會被儲存在該資料夾下,同時每次測試的資料夾都是用系統時間命名,裡面包含了兩個檔案,log檔案和測試報告。
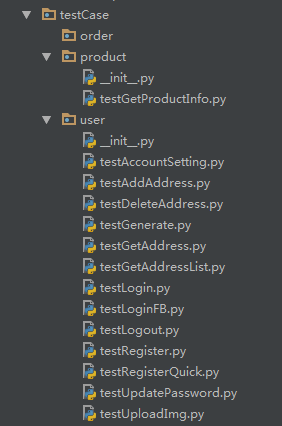
testCase資料夾下,存放我們寫的具體的測試case。所有的case名稱都要以test開頭來命名,這是因為,unittest在進行測試時會自動匹配testCase資料夾下面所有test開頭的.py檔案
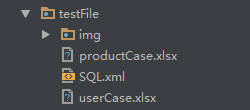
testFile資料夾下,放置我們測試時用來管理測試用例的excel檔案和用於資料庫查詢的sql語句的xml檔案。
最後就是caselist.txt檔案了