
Android 應用開發----7. ViewPager+Fragment一步步打造頂部導航介面滑動效果
ViewPager+Fragment一步步打造頂部導航介面滑動效果
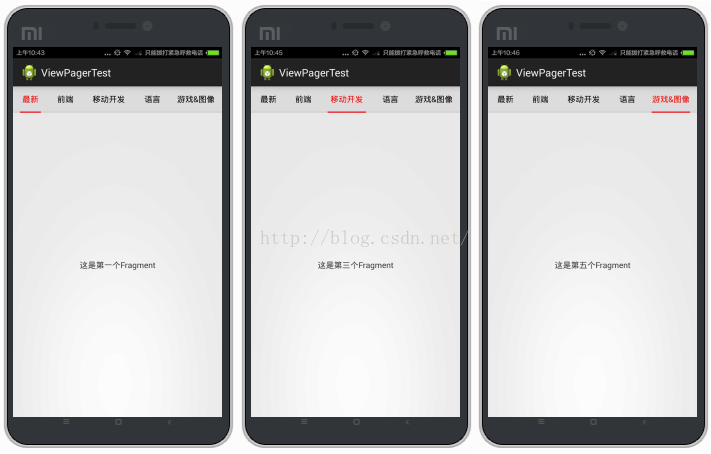
在許多應用中,我們常常用到這麼一個效果:

可以看到,由於現在的應用資料經常需要涉及到多個模組,所以常常需要使用滑動標籤在多個頁面之間跳轉,實現這樣的效果有很多種方式(比如系統自帶的tabhost控制元件),但android-support-v4包中還為我們提供了另外一個專門實現滑動頁面的控制元件——ViewPager,ViewPager中提供了很多介面,能讓我們用很少的程式碼就能實現分屏頁面滑動,本文也將分享如何一步一步實現ViewPager+fragment組合來輕鬆實現分頁滑動效果,先上最終效果圖(由於gif總是錄製失敗,此處使用靜態圖):
實現這樣一個效果,主要分為以下幾步: 1.建立一個FragmentActivity作為主頁面,並設計好對應的佈局檔案 2.建立幾個fragment作為每個子頁面的容器,並建立對應的佈局檔案 3.為ViewPager新增一個Adapter,將所有fragment新增進去 4.實現ViewPager的OnPageChangeListener監聽事件,重寫onPageSelected()方法,實現左右滑動頁面 5.實現每個標題的onClick事件,點選跳轉到相應頁面 6.新增指示標籤塊,也就是標題欄下面那個紅色的指示,計算指示標籤的位移,使其與標題同步變化
工程目錄如下:

接下來我們開始一步一步實現這個效果:
1.建立一個FragmentActivity作為主頁面,並設計好對應的佈局檔案
先來看一下佈局檔案activity_main.xml:
-
<LinearLayout xmlns:android="http://schemas.android.com/apk/res/android" -
xmlns:tools="http://schemas.android.com/tools" -
android:layout_width="match_parent" -
android:layout_height="match_parent" -
android:orientation="vertical" > -
<LinearLayout -
android:id="@+id/bottomlinear" -
android:layout_width="fill_parent" -
android:layout_height="0dp" -
android:layout_weight="1" -
android:orientation="horizontal" -
android:background="#DCDCDC"> -
<Button -
android:id="@+id/btn_first" -
android:layout_width="0dp" -
android:layout_height="fill_parent" -
android:layout_weight="1" -
android:padding="-5dp" -
android:textSize="14sp" -
android:text="最新" -
/> -
<Button -
android:id="@+id/btn_second" -
android:layout_width="0dp" -
android:layout_height="fill_parent" -
android:layout_weight="1" -
android:textSize="14sp" -
android:text="前端"/> -
<Button -
android:id="@+id/btn_third" -
android:layout_width="0dp" -
android:layout_height="fill_parent" -
android:layout_weight="1.5" -
android:textSize="14sp" -
android:text="移動開發"/> -
<Button -
android:id="@+id/btn_four" -
android:layout_width="0dp" -
android:layout_height="fill_parent" -
android:layout_weight="1" -
android:textSize="14sp" -
android:text="語言"/> -
<Button -
android:id="@+id/btn_fifth" -
android:layout_width="0dp" -
android:layout_height="fill_parent" -
android:layout_weight="1.5" -
android:textSize="14sp" -
android:text="遊戲&影象"/> -
</LinearLayout> -
<LinearLayout -
android:id="@+id/cursorarea" -
android:layout_width="fill_parent" -
android:background="#CDCDCD" -
android:orientation="horizontal" -
android:layout_height="2dp"> -
<ImageView -
android:id="@+id/cursor_btn" -
android:layout_width="fill_parent" -
android:layout_height="fill_parent"> -
</ImageView> -
</LinearLayout> -
<android.support.v4.view.ViewPager -
android:id="@+id/myviewpager" -
android:layout_width="fill_parent" -
android:layout_height="0dp" -
android:layout_weight="12"> -
</android.support.v4.view.ViewPager> -
</LinearLayout>
其中,建立了五個按鈕作為標題欄的5個標題,建立一個ImageView作為指示標籤,再匯入一個ViewPager位於標題欄下面
MainActivity.java(注意是繼承自FragmentActivity類):
-
public class MainActivity extends FragmentActivity{ -
private ViewPager myviewpager; -
//選項卡中的按鈕 -
private Button btn_first; -
private Button btn_second; -
private Button btn_third; -
private Button btn_four; -
private Button btn_fifth; -
//作為指示標籤的按鈕 -
private ImageView cursor; -
//標誌指示標籤的橫座標 -
float cursorX = 0; -
//所有按鈕的寬度的陣列 -
private int[] widthArgs; -
//所有標題按鈕的陣列 -
private Button[] btnArgs; -
@Override -
protected void onCreate(Bundle savedInstanceState) { -
super.onCreate(savedInstanceState); -
setContentView(R.layout.activity_main); -
initView(); -
} -
//初始化佈局 -
public void initView(){ -
myviewpager = (ViewPager)this.findViewById(R.id.myviewpager); -
btn_first = (Button)this.findViewById(R.id.btn_first); -
btn_second = (Button)this.findViewById(R.id.btn_second); -
btn_third = (Button)this.findViewById(R.id.btn_third); -
btn_four = (Button)this.findViewById(R.id.btn_four); -
btn_fifth = (Button)this.findViewById(R.id.btn_fifth); -
//初始化按鈕陣列 -
btnArgs = new Button[]{btn_first,btn_second,btn_third,btn_four,btn_fifth}; -
//指示標籤設定為紅色 -
cursor = (ImageView)this.findViewById(R.id.cursor_btn); -
cursor.setBackgroundColor(Color.RED); -
btn_first.setOnClickListener(this); -
btn_second.setOnClickListener(this); -
btn_third.setOnClickListener(this); -
btn_four.setOnClickListener(this); -
btn_fifth.setOnClickListener(this); -
//先重置所有按鈕顏色 -
resetButtonColor(); -
//再將第一個按鈕字型設定為紅色,表示預設選中第一個 -
btn_first.setTextColor(Color.RED); -
} -
//重置所有按鈕的顏色 -
public void resetButtonColor(){ -
btn_first.setBackgroundColor(Color.parseColor("#DCDCDC")); -
btn_second.setBackgroundColor(Color.parseColor("#DCDCDC")); -
btn_third.setBackgroundColor(Color.parseColor("#DCDCDC")); -
btn_four.setBackgroundColor(Color.parseColor("#DCDCDC")); -
btn_fifth.setBackgroundColor(Color.parseColor("#DCDCDC")); -
btn_first.setTextColor(Color.BLACK); -
btn_second.setTextColor(Color.BLACK); -
btn_third.setTextColor(Color.BLACK); -
btn_four.setTextColor(Color.BLACK); -
btn_fifth.setTextColor(Color.BLACK); -
} -
}
2.建立幾個fragment作為每個子頁面的容器,並建立對應的佈局檔案
layout_first.xml:
-
<?xml version="1.0" encoding="utf-8"?> -
<LinearLayout xmlns:android="http://schemas.android.com/apk/res/android" -
android:layout_width="match_parent" -
android:layout_height="match_parent" -
android:orientation="vertical" > -
<TextView -
android:layout_width="fill_parent" -
android:layout_height="fill_parent" -
android:gravity="center" -
android:layout_gravity="center" -
android:text="這是第一個Fragment"/> -
</LinearLayout>
FirstFragment.java:
-
public class FirstFragment extends Fragment{ -
@Override -
public View onCreateView(LayoutInflater inflater,ViewGroup container,Bundle savedInstanceState) { -
// TODO Auto-generated method stub -
View v = inflater.inflate(R.layout.layout_first, container,false); -
return v; -
} -
}
layout_second.xml:
-
<?xml version="1.0" encoding="utf-8"?> -
<LinearLayout xmlns:android="http://schemas.android.com/apk/res/android" -
android:layout_width="match_parent" -
android:layout_height="match_parent" -
android:orientation="vertical" > -
<TextView -
android:layout_width="fill_parent" -
android:layout_height="fill_parent" -
android:gravity="center" -
android:layout_gravity="center" -
android:text="這是第二個Fragment"/> -
</LinearLayout>
SecondFragment.java:
-
public class SecondFragment extends Fragment{ -
@Override -
public View onCreateView(LayoutInflater inflater,ViewGroup container,Bundle savedInstanceState) { -
// TODO Auto-generated method stub -
View v = inflater.inflate(R.layout.layout_second, container,false); -
return v; -
} -
}
layout_thrid.xml:
-
<?xml version="1.0" encoding="utf-8"?> -
<LinearLayout xmlns:android="http://schemas.android.com/apk/res/android" -
android:layout_width="match_parent" -
android:layout_height="match_parent" -
android:orientation="vertical" > -
<TextView -
android:layout_width="fill_parent" -
android:layout_height="fill_parent" -
android:gravity="center" -
android:layout_gravity="center" -
android:text="這是第三個Fragment"/> -
</LinearLayout>
ThridFragment.java:
-
public class ThridFragment extends Fragment{ -
@Override -
public View onCreateView(LayoutInflater inflater,ViewGroup container,Bundle savedInstanceState) { -
// TODO Auto-generated method stub -
View v = inflater.inflate(R.layout.layout_thrid, container,false); -
return v; -
} -
}
layout_four.xml:
-
<?xml version="1.0" encoding="utf-8"?> -
<LinearLayout xmlns:android="http://schemas.android.com/apk/res/android" -
android:layout_width="match_parent" -
android:layout_height="match_parent" -
android:orientation="vertical" > -
<TextView -
android:layout_width="fill_parent" -
android:layout_height="fill_parent" -
android:gravity="center" -
android:layout_gravity="center" -
android:text="這是第四個Fragment"/> -
</LinearLayout>
FourFragment.java:
-
public class FourFragment extends Fragment{ -
@Override -
public View onCreateView(LayoutInflater inflater,ViewGroup container,Bundle savedInstanceState) { -
// TODO Auto-generated method stub -
View v = inflater.inflate(R.layout.layout_four, container,false); -
return v; -
} -
}
layout_fifth.xml:
-
<?xml version="1.0" encoding="utf-8"?> -
<LinearLayout xmlns:android="http://schemas.android.com/apk/res/android" -
android:layout_width="match_parent" -
android:layout_height="match_parent" -
android:orientation="vertical" > -
<TextView -
android:layout_width="fill_parent" -
android:layout_height="fill_parent" -
android:gravity="center" -
android:layout_gravity="center" -
android:text="這是第五個Fragment"/> -
</LinearLayout>
FifthFragment.java:
-
public class FifthFragment extends Fragment{ -
@Override -
public View onCreateView(LayoutInflater inflater,ViewGroup container,Bundle savedInstanceState) { -
// TODO Auto-generated method stub -
View v = inflater.inflate(R.layout.layout_fifth, container,false); -
return v; -
} -
}
每個Fragment的內容佈局基本一致,這裡只是簡單地用一個TextView來表示當前頁面是哪個頁面,在onCreateView中使用inflate載入對應的佈局檔案
3.為ViewPager新增一個Adapter,將所有fragment新增進去
上面已經建立好了每個子頁面對應的fragment,接下來要做的便是將這些fragment裝載到ViewPager中去,android.support.v4.app包為我們提供了一個特別的迭代器——FragmentPagerAdapter,我們重寫它的getItem()和getCount()方法,分別返回第幾個fragment以及fragment的數量,可以這麼理解:此步相當於讓ViewPager能夠控制管理我們的fragment MyFragmentPagerAdapter.java:
-
public class MyFragmentPagerAdapter extends FragmentPagerAdapter{ -
//儲存所有的fragment -
private List<Fragment> list; -
public MyFragmentPagerAdapter(FragmentManager fm, ArrayList<Fragment> list){ -
super(fm); -
this.list = list; -
} -
@Override -
public Fragment getItem(int arg0) { -
// TODO Auto-generated method stub -
return list.get(arg0); -
} -
@Override -
public int getCount() { -
// TODO Auto-generated method stub -
return list.size(); -
} -
}
建立完adapter後,我們還要在MainActivity中將所有fragment新增到一個list並作為構造引數傳到adapter中去:
-
//fragment的集合,對應每個子頁面 -
private ArrayList<Fragment> fragments; -
fragments = new ArrayList<Fragment>(); -
fragments.add(new FirstFragment()); -
fragments.add(new SecondFragment()); -
fragments.add(new ThridFragment()); -
fragments.add(new FourFragment()); -
fragments.add(new FifthFragment()); -
MyFragmentPagerAdapter adapter = new MyFragmentPagerAdapter(getSupportFragmentManager(),fragments);
將裝載了資料的adapter設定給viewpager
myviewpager.setAdapter(adapter);4.實現ViewPager的OnPageChangeListener監聽事件,重寫onPageSelected()方法,實現左右滑動頁面
讓Activity實現監聽介面:

為myviewpager註冊監聽:
myviewpager.setOnPageChangeListener(this);實現三個介面方法,這裡關鍵在於重寫onPageSelected方法,onPageSelected會在每次滑動ViewPager的時候觸發,所以所有滑動時的變化都可以在這裡面定義,比如標題按鈕的顏色隨著滑動的變化等
-
@Override -
public void onPageScrollStateChanged(int arg0) { -
// TODO Auto-generated method stub -
} -
@Override -
public void onPageScrolled(int arg0, float arg1, int arg2) { -
// TODO Auto-generated method stub -
} -
@Override -
public void onPageSelected(int arg0) { -
// TODO Auto-generated method stub -
//每次滑動首先重置所有按鈕的顏色 -
resetButtonColor(); -
//將滑動到的當前按鈕顏色設定為紅色 -
btnArgs[arg0].setTextColor(Color.RED); -
}
5.實現每個標題的onClick事件,點選跳轉到相應頁面
在上一步,已經實現了左右滑動切換頁面效果,但發現點選標題欄並無響應,所以我們需要為每個button新增一個點選事件: 讓Activity實現監聽介面:

為所有標題按鈕註冊監聽:
-
btn_first.setOnClickListener(this); -
btn_second.setOnClickListener(this); -
btn_third.setOnClickListener(this); -
btn_four.setOnClickListener(this); -
btn_fifth.setOnClickListener(this);
重寫onclick:
-
@Override -
public void onClick(View whichbtn) { -
// TODO Auto-generated method stub -
switch (whichbtn.getId()) { -
case R.id.btn_first: -
myviewpager.setCurrentItem(0); -
break; -
case R.id.btn_second: -
myviewpager.setCurrentItem(1); -
break; -
case R.id.btn_third: -
myviewpager.setCurrentItem(2); -
break; -
case R.id.btn_four: -
myviewpager.setCurrentItem(3); -
break; -
case R.id.btn_fifth: -
myviewpager.setCurrentItem(4); -
break; -
} -
}
可以看到,只是一句簡單的setCurrentItem方法的呼叫,就能實現跳轉到對應的子頁面,所以才說ViewPager非常的方便
6.新增指示標籤塊,也就是標題欄下面那個紅色的指示,計算指示標籤的位移,使其與標題同步變化
上面的步驟其實已經實現了大部分功能,但為了讓我們的介面更加友好一些,需要再新增一個指示器,用來指示當前處於哪個頁面,要實現這種功能,要注意以下幾點:【在滑動到某個子頁面時,指示器需要橫向跳到相應的位置】 【在滑動到某個子頁面時,指示器需要變化到與當前標題一樣的大小】 如圖:

首先建立兩個陣列,便於根據下標得到某個按鈕以及對應的寬度:
-
//所有按鈕的寬度的集合 -
private int[] widthArgs; -
//所有按鈕的集合 -
private Button[] btnArgs;
注意兩個陣列例項化的位置不同,btnArgs是像平常一樣在onCreate方法中例項化,而widthArgs在滑動的時候再例項化,因為在onCreate方法中獲取不了所有按鈕的寬度,因為系統還未測量它們的寬度 btnArgs的例項化:
btnArgs = new Button[]{btn_first,btn_second,btn_third,btn_four,btn_fifth};widthArgs的例項化:
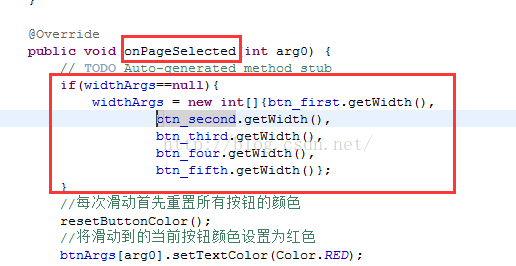
初始化指示器位置和大小:
-
btn_first.post(new Runnable(){ -
@Override -
public void run() { -
LinearLayout.LayoutParams lp = (LinearLayout.LayoutParams)cursor.getLayoutParams(); -
//減去邊距*2,以對齊標題欄文字 -
lp.width = btn_first.getWidth()-btn_first.getPaddingLeft()*2; -
cursor.setLayoutParams(lp); -
cursor.setX(btn_first.getPaddingLeft()); -
} -
});
這裡需要解釋一下,為什麼不直接cursor.setWidth()和cursor.setX()?因為Android系統繪製原理是隻有全部遍歷測量之後才會佈局,只有在整個佈局繪製完畢後,檢視才能得到自身的高和寬。所以在正常情況下,在OnCreate()方法中直接獲取控制元件的寬度和高度取得值是0。而我們此處設定指示器的大小和位置都需要用到第一個按鈕的大小作為參考值,所以可以通過post將一個runnable投遞到訊息佇列的尾部,然後等待UI執行緒Looper呼叫此runnable的時候,view也已經初始化好了。這個時候就能成功獲取控制元件的寬高。
指示器的動態變化方法如下,註釋得已經很清楚:
-
//指示器的跳轉,傳入當前所處的頁面的下標 -
public void cursorAnim(int curItem){ -
//每次呼叫,就將指示器的橫座標設定為0,即開始的位置 -
cursorX = 0; -
//再根據當前的curItem來設定指示器的寬度 -
LinearLayout.LayoutParams lp = (LinearLayout.LayoutParams)cursor.getLayoutParams(); -
//減去邊距*2,以對齊標題欄文字 -
lp.width = widthArgs[curItem]-btnArgs[0].getPaddingLeft()*2; -
cursor.setLayoutParams(lp); -
//迴圈獲取當前頁之前的所有頁面的寬度 -
for(int i=0; i<curItem; i++){ -
cursorX = cursorX + btnArgs[i].getWidth(); -
} -
//再加上當前頁面的左邊距,即為指示器當前應處的位置 -
cursor.setX(cursorX+btnArgs[curItem].getPaddingLeft()); -
}
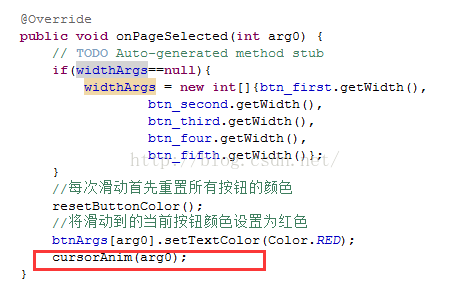
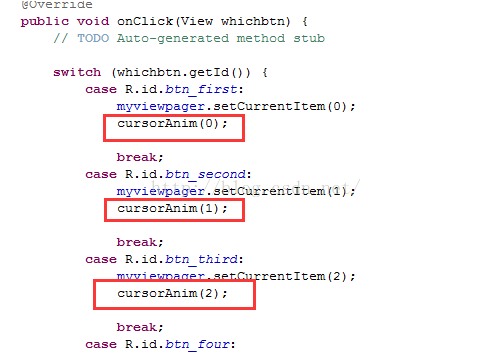
接下來只需要在剛才的那些onClick以及onPageSelected方法中呼叫它就可以了:
好了,總算完成所要的效果,完整的MainActivity程式碼如下:
-
public class MainActivity extends FragmentActivity implements OnClickListener, OnPageChangeListener{ -
private ViewPager myviewpager; -
//fragment的集合,對應每個子頁面 -
private ArrayList<Fragment> fragments; -
//選項卡中的按鈕 -
private Button btn_first; -
private Button btn_second; -
private Button btn_third; -
private Button btn_four; -
private Button btn_fifth; -
//作為指示標籤的按鈕 -
private ImageView cursor; -
//標誌指示標籤的橫座標 -
float cursorX = 0; -
//所有按鈕的寬度的集合 -
private int[] widthArgs; -
//所有按鈕的集合 -
private Button[] btnArgs; -
@Override -
protected void onCreate(Bundle savedInstanceState) { -
super.onCreate(savedInstanceState); -
setContentView(R.layout.activity_main); -
initView(); -
} -
public void initView(){ -
myviewpager = (ViewPager)this.findViewById(R.id.myviewpager); -
btn_first = (Button)this.findViewById(R.id.btn_first); -
btn_second = (Button)this.findViewById(R.id.btn_second); -
btn_third = (Button)this.findViewById(R.id.btn_third); -
btn_four = (Button)this.findViewById(R.id.btn_four); -
btn_fifth = (Button)this.findViewById(R.id.btn_fifth); -
btnArgs = new Button[]{btn_first,btn_second,btn_third,btn_four,btn_fifth}; -
cursor = (ImageView)this.findViewById(R.id.cursor_btn); -
cursor.setBackgroundColor(Color.RED); -
myviewpager.setOnPageChangeListener(this); -
btn_first.setOnClickListener(this); -
btn_second.setOnClickListener(this); -
btn_third.setOnClickListener(this); -
btn_four.setOnClickListener(this); -
btn_fifth.setOnClickListener(this); -
fragments = new ArrayList<Fragment>(); -
fragments.add(new FirstFragment()); -
fragments.add(new SecondFragment()); -
fragments.add(new ThridFragment()); -
fragments.add(new FourFragment()); -
fragments.add(new FifthFragment()); -
MyFragmentPagerAdapter adapter = new MyFragmentPagerAdapter(getSupportFragmentManager(),fragments); -
myviewpager.setAdapter(adapter); -
resetButtonColor(); -
btn_first.setTextColor(Color.RED); -
} -
//重置所有按鈕的顏色 -
public void resetButtonColor(){ -
btn_first.setBackgroundColor(Color.parseColor("#DCDCDC")); -
btn_second.setBackgroundColor(Color.parseColor("#DCDCDC")); -
btn_third.setBackgroundColor(Color.parseColor("#DCDCDC")); -
btn_four.setBackgroundColor(Color.parseColor("#DCDCDC")); -
btn_fifth.setBackgroundColor(Color.parseColor("#DCDCDC")); -
btn_first.setTextColor(Color.BLACK); -
btn_second.setTextColor(Color.BLACK); -
btn_third.setTextColor(Color.BLACK); -
btn_four.setTextColor(Color.BLACK); -
btn_fifth.setTextColor(Color.BLACK); -
} -
@Override -
public void onClick(View whichbtn) { -
// TODO Auto-generated method stub -
switch (whichbtn.getId()) { -
case R.id.btn_first: -
myviewpager.setCurrentItem(0); -
cursorAnim(0); -
break; -
case R.id.btn_second: -
myviewpager.setCurrentItem(1); -
cursorAnim(1); -
break; -
case R.id.btn_third: -
myviewpager.setCurrentItem(2); -
cursorAnim(2); -
break; -
case R.id.btn_four: -
myviewpager.setCurrentItem(3); -
cursorAnim(3); -
break; -
case R.id.btn_fifth: -
myviewpager.setCurrentItem(4); -
cursorAnim(4); -
break; -
} -
} -
@Override -
public void onPageScrollStateChanged(int arg0) { -
// TODO Auto-generated method stub -
} -
@Override -
public void onPageScrolled(int arg0, float arg1, int arg2) { -
// TODO Auto-generated method stub -
} -
@Override -
public void onPageSelected(int arg0) { -
// TODO Auto-generated method stub -
if(widthArgs==null){ -
widthArgs = new int[]{btn_first.getWidth(), -
btn_second.getWidth(), -
btn_third.getWidth(), -
btn_four.getWidth(), -
btn_fifth.getWidth()}; -
} -
//每次滑動首先重置所有按鈕的顏色 -
resetButtonColor(); -
//將滑動到的當前按鈕顏色設定為紅色 -
btnArgs[arg0].setTextColor(Color.RED); -
cursorAnim(arg0); -
} -
//指示器的跳轉,傳入當前所處的頁面的下標 -
public void cursorAnim(int curItem){ -
//每次呼叫,就將指示器的橫座標設定為0,即開始的位置 -
cursorX = 0; -
//再根據當前的curItem來設定指示器的寬度 -
LinearLayout.LayoutParams lp = (LinearLayout.LayoutParams)cursor.getLayoutParams(); -
//減去邊距*2,以對齊標題欄文字 -
lp.width = widthArgs[curItem]-btnArgs[0].getPaddingLeft()*2; -
cursor.setLayoutParams(lp); -
//迴圈獲取當前頁之前的所有頁面的寬度 -
for(int i=0; i<curItem; i++){ -
cursorX = cursorX + btnArgs[i].getWidth(); -
} -
//再加上當前頁面的左邊距,即為指示器當前應處的位置 -
cursor.setX(cursorX+btnArgs[curItem].getPaddingLeft()); -
} -
}