
android中Activity生命週期的詳細過程分析
android中Activity生命週期的詳細過程分析
Activity是安卓中相當重要的一個元件,理解它有利於我們後期更好的進行相關的開發,接下來我將演示一個demo來詳細講述Activity的生命週期過程。
首先寫兩個佈局檔案ks.xml和ks1.xml,用來實現兩個介面的跳轉,上面寫上簡單的button,程式碼如下:
ks.xml:
<RelativeLayout
    android:layout_width="match_parent"
    android:layout_height="45dp"
    android:background="@android:color/holo_red_light"
    android:gravity="center_vertical">
    <ImageView
        android:id="@+id/search"
        android:layout_width="45dp"
        android:layout_height="45dp"
        android:src="@drawable/title_city" />
    <ImageView
        android:id="@+id/division"
        android:layout_width="1dp"
        android:layout_height="40dp"
        android:layout_toRightOf="@+id/search"
        android:background="@android:color/white"/>

    <Button
        android:id="@+id/btn1"
        android:layout_width="wrap_content"
        android:layout_height="wrap_content"
        android:text="跳轉"/>

</RelativeLayout>
ks1.xml:
<?xml version="1.0" encoding="utf-8"?>除了佈局檔案,當然還有兩個Activity,用於控制兩個介面的跳轉,Activity的幾個重要方法也在這裡面體現。<TextView android:id="@+id/afterlogin" android:layout_width="wrap_content" android:layout_height="80dp" android:layout_gravity="center" android:layout_marginBottom="30dp" android:layout_marginTop="50dp" android:textSize="30dp" android:textColor="#000000"/> <Button android:id="@+id/btn2" android:layout_width="wrap_content" android:layout_height="wrap_content" android:text="返回"/>
Activity1:
public class Activity1 extends Activity {
private static final String TAG = “ks”;
private Button btn;
@Override
protected void onCreate(Bundle saveInstanceState) {
    super.onCreate(saveInstanceState);
    Log.i(TAG, "The activity1 state--------onCreate");
    setContentView(R.layout.ks);
    btn = (Button) findViewById(R.id.btn1);
    btn.setOnClickListener(new View.OnClickListener() {
        @Override
        public void onClick(View view) {
            Intent i = new Intent(Activity1.this, Activity2.class);
            startActivity(i);
        }
    });
}
protected void onStart() {
    super.onStart();
    Log.i(TAG, "The activity1 state--------onStart");

}
protected void onRestart() {
    super.onRestart();
    Log.i(TAG, "The activity1 state--------onRestart");
}
//重新開始
protected void onResume() {
    super.onResume();
    Log.i(TAG, "The activity1 state--------onResume");
}
protected void onPause() {
    super.onPause();
    Log.i(TAG, "The activity1 state--------onPause");
    if (isFinishing()) {
        Log.w(TAG, "The activity1 will be destroyed!");
    } else {
        Log.w(TAG, "The activity1 is just pausing!");
    }
}
protected void onStop() {
    super.onStop();
    Log.i(TAG, "The activity1 state--------onStop");
}
protected void onDestroy() {
    super.onDestroy();
    Log.i(TAG, "The activity1 state--------onDestory");
}
}
Activity2的程式碼:
public class Activity2 extends Activity {
private Button btn2;
private static final String TAG = “ks”;
@Override
protected void onCreate(Bundle savedInstanceState) {
    super.onCreate(savedInstanceState);
    Log.i(TAG, "The activity2 state--------onCreate");
    setContentView(R.layout.ks1);

    btn2 = (Button) findViewById(R.id.btn2);
    btn2.setOnClickListener(new View.OnClickListener() {
        @Override
        public void onClick(View view) {
            Intent i = new Intent(Activity2.this, Activity1.class);
            startActivity(i);
        }
    });
}
protected void onStart() {
    super.onStart();
    Log.i(TAG, "The activity2 state--------onStart");

}
protected void onRestart() {
    super.onRestart();
    Log.i(TAG, "The activity2 state--------onRestart");
}
//重新開始
protected void onResume() {
    super.onResume();
    Log.i(TAG, "The activity2 state--------onResume");
}
protected void onPause() {
    super.onPause();
    Log.i(TAG, "The activity2 state--------onPause");
    if (isFinishing()) {
        Log.w(TAG, "The activity2 will be destroyed!");
    } else {
        Log.w(TAG, "The activity2 is just pausing!");
    }
}
protected void onStop() {
    super.onStop();
    Log.i(TAG, "The activity2 state--------onStop");
}
protected void onDestroy() {
    super.onDestroy();
    Log.i(TAG, "The activity2 state--------onDestory");
}
}
下面是執行過程的分析:
當啟動activity1時候,activity1所對應的ks.xml介面開啟
 此時對應的各個方法的順序是
可見啟動介面後,依次執行onCreate,onStart,onResume,
點選跳轉button,介面走到ks1.xml

此時的列印順序為
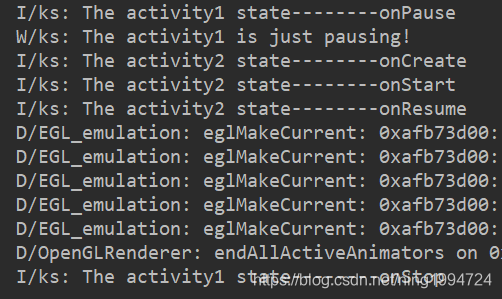 可見,當發生從activity1跳轉到activity2時,activity1先暫停,即onPause,然後activity2依次建立,開始,執行,等到activity2介面出來之後,activity1stop。
我們再點返回button,重新回到第一個介面,此時的執行順序為
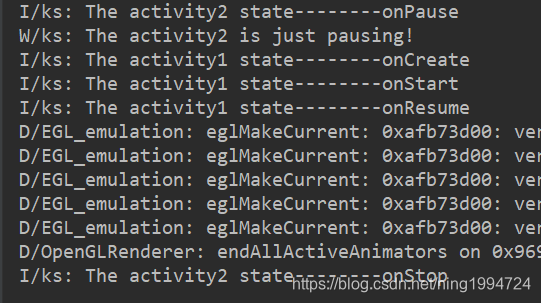
可見,和之前類似,activity2先暫停,activity1再次被建立,進入activity1介面,activity2stop,如此反覆迴圈。
我們發現,這裡並沒有出現activity被銷燬的情況,即並沒有打印出onDestroy的方法。
如果只是在兩個button上相互跳轉,兩個activity只會stop,只有當按下模擬機中的back鍵時候,某一個activity會被銷燬。