
Python之PyQt5視覺化程式設計02——matplotlib動態顯示畫面
matplotlib動態顯示畫面分為直接在figure圖形物件動態顯示畫面和在UI介面動態顯示畫面,但是兩者本質都是使用到了matplotlib中的animation模組,並呼叫其中的FuncAnimation(figure, update, interval......)函式實現動態展示的效果。
在matplotlib作圖中,比較常用的是matplotlib.pyplot模組,這個模組有非常多的屬性和方法,簡要列舉下這次用到的方法: matplotlib.pyplot.subplots(nrows=1, ncols=1, sharex=False, sharey=False, squeeze=True, subplot_kw=None, gridspec_kw=None, **fig_kw)返回fig和ax物件!
下面引用一下其他博友的例項做一個例項展示:
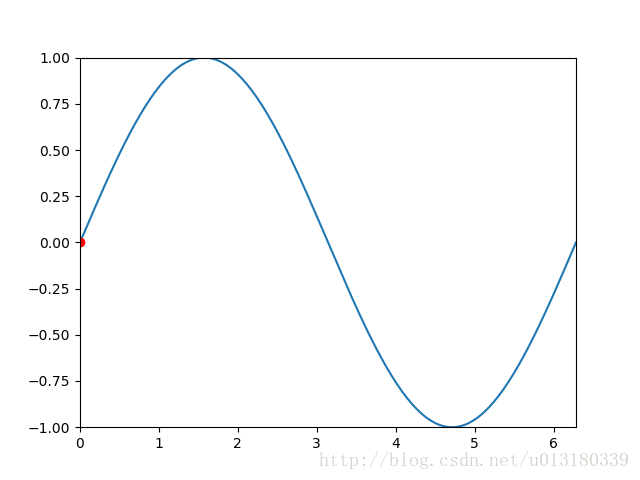
exp1. 動態畫出sin函式曲線
import numpy as np
import matplotlib.pyplot as plt
from matplotlib.animation import FuncAnimation

fig, ax = plt.subplots()
xdata, ydata = [], []
ln, = ax.plot([], [], 'r-', animated=False)

def init():
    ax.set_xlim(0, 2*np.pi)
    ax.set_ylim(-1, 1)
    return ln,

def update(frame):
    xdata.append(frame)
    ydata.append(np.sin(frame))
    ln.set_data(xdata, ydata)
    return ln,

ani = FuncAnimation(fig, update, frames=np.linspace(0, 2*np.pi, 128),
                    init_func=init, blit=True)
plt.show()
畫這類圖的關鍵是要給出不斷更新的函式,這裡就是update 函數了。注意, line, = ax.plot([], [], 'r-', animated=False) 中的, 表示建立tuple型別。迭代更新的資料frame 取值從frames 取得。
exp2. 動態顯示一個動點,它的軌跡是sin函式。
import numpy as np
import matplotlib.pyplot as plt
from matplotlib import animation

"""
animation example 2
author: Kiterun
"""

fig, ax = plt.subplots()
x = np.linspace(0, 2*np.pi, 200)
y = np.sin(x)
l = ax.plot(x, y)
dot, = ax.plot([], [], 'ro')

def init():
    ax.set_xlim(0, 2*np.pi)
    ax.set_ylim(-1, 1)
    return l

def gen_dot():
    for i in np.linspace(0, 2*np.pi, 200):
        newdot = [i, np.sin(i)]
        yield newdot

def update_dot(newd):
    dot.set_data(newd[0], newd[1])
    return dot,

ani = animation.FuncAnimation(fig, update_dot, frames = gen_dot, interval = 100, init_func=init)
ani.save('sin_dot.gif', writer='imagemagick', fps=30)

plt.show()
這裡我們把生成的動態圖儲存為gif圖片,前提要預先安裝imagemagic。
exp3. 單擺(沒阻尼&有阻尼)
無阻尼的單擺力學公式:
d2θdt2+glsinθ=0d2θdt2+glsinθ=0
附加阻尼項:
d2θdt2+bmldθdt+glsinθ=0d2θdt2+bmldθdt+glsinθ=0
這裡需要用到scipy.integrate的odeint模組,具體用法找時間再專門寫一篇blog吧,動態圖程式碼如下:
# -*- coding: utf-8 -*-

from math import sin, cos
import numpy as np
from scipy.integrate import odeint
import matplotlib.pyplot as plt
import matplotlib.animation as animation

g = 9.8
leng = 1.0
b_const = 0.2

# no decay case:
def pendulum_equations1(w, t, l):
    th, v = w
    dth = v
    dv  = - g/l * sin(th)
    return dth, dv

# the decay exist case:
def pendulum_equations2(w, t, l, b):
    th, v = w
    dth = v
    dv = -b/l * v - g/l * sin(th)
    return dth, dv

t = np.arange(0, 20, 0.1)
track = odeint(pendulum_equations1, (1.0, 0), t, args=(leng,))
#track = odeint(pendulum_equations2, (1.0, 0), t, args=(leng, b_const))
xdata = [leng*sin(track[i, 0]) for i in range(len(track))]
ydata = [-leng*cos(track[i, 0]) for i in range(len(track))]

fig, ax = plt.subplots()
ax.grid()
line, = ax.plot([], [], 'o-', lw=2)
time_template = 'time = %.1fs'
time_text = ax.text(0.05, 0.9, '', transform=ax.transAxes)

def init():
    ax.set_xlim(-2, 2)
    ax.set_ylim(-2, 2)
    time_text.set_text('')
    return line, time_text

def update(i):
    newx = [0, xdata[i]]
    newy = [0, ydata[i]]
    line.set_data(newx, newy)
    time_text.set_text(time_template %(0.1*i))
    return line, time_text

ani = animation.FuncAnimation(fig, update, range(1, len(xdata)), init_func=init, interval=50)
#ani.save('single_pendulum_decay.gif', writer='imagemagick', fps=100)
ani.save('single_pendulum_nodecay.gif', writer='imagemagick', fps=100)
plt.show()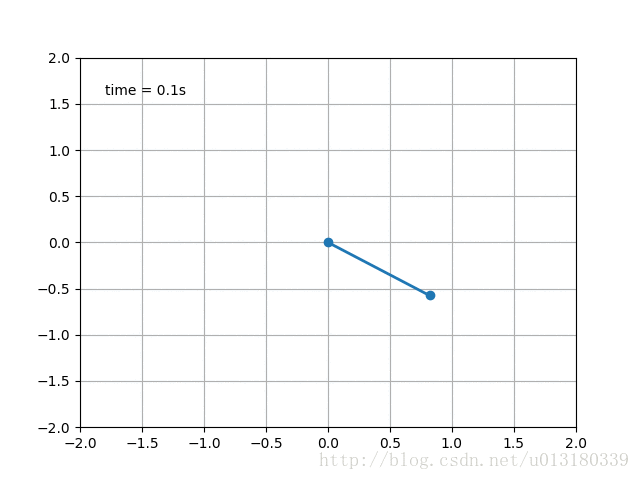

exp4. 滾動的球
import numpy as np
import matplotlib.pyplot as plt
import matplotlib.animation as animation

fig = plt.figure(figsize=(6, 6))
ax = plt.gca()
ax.grid()
ln1, = ax.plot([], [], '-', lw=2)
ln2, = ax.plot([], [], '-', color='r', lw=2)
theta = np.linspace(0, 2*np.pi, 100)
r_out = 1
r_in = 0.5

def init():
    ax.set_xlim(-2, 2)
    ax.set_ylim(-2, 2)
    x_out = [r_out*np.cos(theta[i]) for i in range(len(theta))]
    y_out = [r_out*np.sin(theta[i]) for i in range(len(theta))]
    ln1.set_data(x_out, y_out)
    return ln1,

def update(i):
    x_in = [(r_out-r_in)*np.cos(theta[i])+r_in*np.cos(theta[j]) for j in range(len(theta))]
    y_in = [(r_out-r_in)*np.sin(theta[i])+r_in*np.sin(theta[j]) for j in range(len(theta))]
    ln2.set_data(x_in, y_in)
    return ln2,

ani = animation.FuncAnimation(fig, update, range(len(theta)), init_func=init, interval=30)
ani.save('roll.gif', writer='imagemagick', fps=100)

plt.show()
--------------------- 本文來自 門下平章 的CSDN 部落格 ,全文地址請點選:https://blog.csdn.net/u013180339/article/details/77002254?utm_source=copy