
在前後端分離的SpringBoot專案中整合Shiro許可權框架
目錄
專案背景
公司在幾年前就採用了前後端分離的開發模式,前端所有請求都使用ajax。這樣的專案結構在與CAS單點登入等許可權管理框架整合時遇到了很多問題,使得許可權部分的程式碼冗長醜陋,CAS的各種重定向也使得使用者體驗很差,在前端使用vue-router管理頁面跳轉時,問題更加尖銳。於是我就在尋找一個解決方案,這個方案應該對程式碼的侵入較少,開發速度快,實現優雅。最近無意中看到springboot與shiro框架整合的文章,在瞭解了springboot以及shiro的發展狀況,並學習了使用方法後,開始在網上搜索前後端分離模式下這兩個框架的適應性,在經過測試後發現可行,完全符合個人預期。
解決方案
本文中專案核心包為SpringBoot1.5.9.RELEASE以及shiro-spring 1.4.0,為了加快開發效率,持久化框架使用hibernate-JPA,為增加可靠性,sessionId的管理使用了shiro-redis開源外掛,避免sessionId斷電丟失,同時使得多端可共享session,專案結構為多模組專案,詳見下圖。
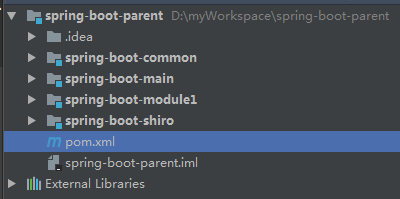
其中spring-boot-shiro模組為本文重點,該模組包含shiro核心配置,shiro資料來源配置以及各種自定義實現,登入相關服務等。該模組在專案中使用時可直接在pom中引用,並在spring-boot-main入口模組中配置相應資料庫連線資訊即可,且該模組可以在多個專案中複用,避免重複開發。spring-boot-module1為模擬真實專案中的業務模組,可能會有多個。spring-boot-common中包含通用工具類,常量,異常等等。多模組專案的搭建在本文中不作贅述。
母模組pom.xml程式碼如下
<?xml version="1.0" encoding="UTF-8"?>
<project xmlns="http://maven.apache.org/POM/4.0.0"
         xmlns:xsi="http://www.w3.org/2001/XMLSchema-instance"
         xsi:schemaLocation="http://maven.apache.org/POM/4.0.0 http://maven.apache.org/xsd/maven-4.0.0.xsd">
    <modelVersion>4.0.0</modelVersion>
    <groupId>com.xxx</groupId>
    <artifactId>spring-boot-parent</artifactId>
    <packaging>pom</packaging>
    <version>1.0-SNAPSHOT</version>
    <modules>
        <module>spring-boot-main</module>
        <module>spring-boot-module1</module>
        <module>spring-boot-shiro</module>
        <module>spring-boot-common</module>
    </modules>

    <properties>
        <project.build.sourceEncoding>UTF-8</project.build.sourceEncoding>
        <project.reporting.outputEncoding>UTF-8</project.reporting.outputEncoding>
        <java.version>1.8</java.version>
        <spring-boot.version>1.5.9.RELEASE</spring-boot.version>
        <shiro.version>1.4.0</shiro.version>
    </properties>

    <dependencies>
        <dependency>
            <groupId>org.springframework.boot</groupId>
            <artifactId>spring-boot-starter-web</artifactId>
            <version>${spring-boot.version}</version>
        </dependency>
        <!--在外部tomcat中釋出故移除內建包-->
        <dependency>
            <groupId>org.springframework.boot</groupId>
            <artifactId>spring-boot-starter-tomcat</artifactId>
            <version>${spring-boot.version}</version>
            <scope>provided</scope>
        </dependency>
        <dependency>
            <groupId>org.springframework.boot</groupId>
            <artifactId>spring-boot-starter-test</artifactId>
            <version>${spring-boot.version}</version>
            <scope>test</scope>
        </dependency>
        <dependency>
            <groupId>org.springframework.boot</groupId>
            <artifactId>spring-boot-devtools</artifactId>
            <version>${spring-boot.version}</version>
            <optional>true</optional>
        </dependency>
        <dependency>
            <groupId>org.springframework.boot</groupId>
            <artifactId>spring-boot-starter-data-jpa</artifactId>
            <version>${spring-boot.version}</version>
        </dependency>
        <dependency>
            <groupId>org.apache.shiro</groupId>
            <artifactId>shiro-spring</artifactId>
            <version>${shiro.version}</version>
        </dependency>
        <dependency>
            <groupId>com.alibaba</groupId>
            <artifactId>fastjson</artifactId>
            <version>1.2.8</version>
        </dependency>
        <dependency>
            <groupId>com.alibaba</groupId>
            <artifactId>druid</artifactId>
            <version>1.0.28</version>
        </dependency>
        <dependency>
            <groupId>mysql</groupId>
            <artifactId>mysql-connector-java</artifactId>
            <version>5.1.39</version>
            <scope>runtime</scope>
        </dependency>
        <!--<dependency>-->
            <!--<groupId>org.springframework.boot</groupId>-->
            <!--<artifactId>spring-boot-starter-thymeleaf</artifactId>-->
            <!--<version>${spring-boot.version}</version>-->
        <!--</dependency>-->
        <!--<dependency>-->
            <!--<groupId>net.sourceforge.nekohtml</groupId>-->
            <!--<artifactId>nekohtml</artifactId>-->
            <!--<version>1.9.22</version>-->
        <!--</dependency>-->
    </dependencies>
</project>
spring-boot-shiro模組介面如下圖
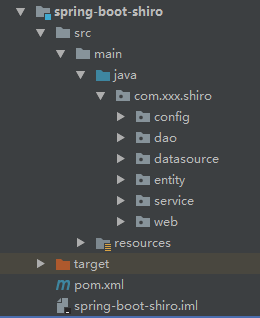
傳統結構專案中,shiro從cookie中讀取sessionId以此來維持會話,在前後端分離的專案中(也可在移動APP專案使用),我們選擇在ajax的請求頭中傳遞sessionId,因此需要重寫shiro獲取sessionId的方式。自定義MySessionManager類繼承DefaultWebSessionManager類,重寫getSessionId方法,程式碼如下
import org.apache.shiro.web.servlet.ShiroHttpServletRequest;
import org.apache.shiro.web.session.mgt.DefaultWebSessionManager;
import org.apache.shiro.web.util.WebUtils;
import org.springframework.util.StringUtils;
import javax.servlet.ServletRequest;
import javax.servlet.ServletResponse;
import java.io.Serializable;

/**
 * Created by Administrator on 2017/12/11.
 * 自定義sessionId獲取
 */
public class MySessionManager extends DefaultWebSessionManager {

    private static final String AUTHORIZATION = "Authorization";

    private static final String REFERENCED_SESSION_ID_SOURCE = "Stateless request";

    public MySessionManager() {
        super();
    }

    @Override
    protected Serializable getSessionId(ServletRequest request, ServletResponse response) {
        String id = WebUtils.toHttp(request).getHeader(AUTHORIZATION);
        //如果請求頭中有 Authorization 則其值為sessionId
        if (!StringUtils.isEmpty(id)) {
            request.setAttribute(ShiroHttpServletRequest.REFERENCED_SESSION_ID_SOURCE, REFERENCED_SESSION_ID_SOURCE);
            request.setAttribute(ShiroHttpServletRequest.REFERENCED_SESSION_ID, id);
            request.setAttribute(ShiroHttpServletRequest.REFERENCED_SESSION_ID_IS_VALID, Boolean.TRUE);
            return id;
        } else {
            //否則按預設規則從cookie取sessionId
            return super.getSessionId(request, response);
        }
    }
}
如何配置讓shiro執行我們的自定義sessionManager呢?下面看ShiroConfig類。
package com.xxx.shiro.config;
import org.apache.shiro.authc.credential.HashedCredentialsMatcher;
import org.apache.shiro.mgt.SecurityManager;
import org.apache.shiro.session.mgt.SessionManager;
import org.apache.shiro.spring.security.interceptor.AuthorizationAttributeSourceAdvisor;
import org.apache.shiro.spring.web.ShiroFilterFactoryBean;
import org.apache.shiro.web.mgt.DefaultWebSecurityManager;
import org.crazycake.shiro.RedisCacheManager;
import org.crazycake.shiro.RedisManager;
import org.crazycake.shiro.RedisSessionDAO;
import org.springframework.beans.factory.annotation.Value;
import org.springframework.context.annotation.Bean;
import org.springframework.context.annotation.Configuration;
import org.springframework.web.servlet.HandlerExceptionResolver;
import java.util.LinkedHashMap;
import java.util.Map;
/**
* Created by Administrator on 2017/12/11.
*/
@Configuration
public class ShiroConfig {
@Value("${spring.redis.shiro.host}")
private String host;
@Value("${spring.redis.shiro.port}")
private int port;
@Value("${spring.redis.shiro.timeout}")
private int timeout;
@Value("${spring.redis.shiro.password}")
private String password;
@Bean
public ShiroFilterFactoryBean shirFilter(SecurityManager securityManager) {
System.out.println("ShiroConfiguration.shirFilter()");
ShiroFilterFactoryBean shiroFilterFactoryBean = new ShiroFilterFactoryBean();
shiroFilterFactoryBean.setSecurityManager(securityManager);
Map<String, String> filterChainDefinitionMap = new LinkedHashMap<String, String>();
//注意過濾器配置順序 不能顛倒
//配置退出 過濾器,其中的具體的退出程式碼Shiro已經替我們實現了,登出後跳轉配置的loginUrl
filterChainDefinitionMap.put("/logout", "logout");
// 配置不會被攔截的連結 順序判斷
filterChainDefinitionMap.put("/static/**", "anon");
filterChainDefinitionMap.put("/ajaxLogin", "anon");
filterChainDefinitionMap.put("/login", "anon");
filterChainDefinitionMap.put("/**", "authc");
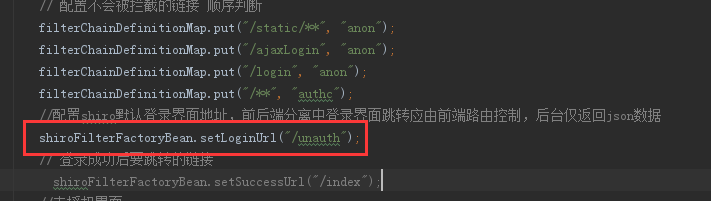
//配置shiro預設登入介面地址,前後端分離中登入介面跳轉應由前端路由控制,後臺僅返回json資料
shiroFilterFactoryBean.setLoginUrl("/unauth");
// 登入成功後要跳轉的連結
// shiroFilterFactoryBean.setSuccessUrl("/index");
//未授權介面;
// shiroFilterFactoryBean.setUnauthorizedUrl("/403");
shiroFilterFactoryBean.setFilterChainDefinitionMap(filterChainDefinitionMap);
return shiroFilterFactoryBean;
}
/**
* 憑證匹配器
* (由於我們的密碼校驗交給Shiro的SimpleAuthenticationInfo進行處理了
* )
*
* @return
*/
@Bean
public HashedCredentialsMatcher hashedCredentialsMatcher() {
HashedCredentialsMatcher hashedCredentialsMatcher = new HashedCredentialsMatcher();
hashedCredentialsMatcher.setHashAlgorithmName("md5");//雜湊演算法:這裡使用MD5演算法;
hashedCredentialsMatcher.setHashIterations(2);//雜湊的次數,比如雜湊兩次,相當於 md5(md5(""));
return hashedCredentialsMatcher;
}
@Bean
public MyShiroRealm myShiroRealm() {
MyShiroRealm myShiroRealm = new MyShiroRealm();
myShiroRealm.setCredentialsMatcher(hashedCredentialsMatcher());
return myShiroRealm;
}
@Bean
public SecurityManager securityManager() {
DefaultWebSecurityManager securityManager = new DefaultWebSecurityManager();
securityManager.setRealm(myShiroRealm());
// 自定義session管理 使用redis
securityManager.setSessionManager(sessionManager());
// 自定義快取實現 使用redis
securityManager.setCacheManager(cacheManager());
return securityManager;
}
//自定義sessionManager
@Bean
public SessionManager sessionManager() {
MySessionManager mySessionManager = new MySessionManager();
mySessionManager.setSessionDAO(redisSessionDAO());
return mySessionManager;
}
/**
* 配置shiro redisManager
* <p>
* 使用的是shiro-redis開源外掛
*
* @return
*/
public RedisManager redisManager() {
RedisManager redisManager = new RedisManager();
redisManager.setHost(host);
redisManager.setPort(port);
redisManager.setExpire(1800);// 配置快取過期時間
redisManager.setTimeout(timeout);
redisManager.setPassword(password);
return redisManager;
}
/**
* cacheManager 快取 redis實現
* <p>
* 使用的是shiro-redis開源外掛
*
* @return
*/
@Bean
public RedisCacheManager cacheManager() {
RedisCacheManager redisCacheManager = new RedisCacheManager();
redisCacheManager.setRedisManager(redisManager());
return redisCacheManager;
}
/**
* RedisSessionDAO shiro sessionDao層的實現 通過redis
* <p>
* 使用的是shiro-redis開源外掛
*/
@Bean
public RedisSessionDAO redisSessionDAO() {
RedisSessionDAO redisSessionDAO = new RedisSessionDAO();
redisSessionDAO.setRedisManager(redisManager());
return redisSessionDAO;
}
/**
* 開啟shiro aop註解支援.
* 使用代理方式;所以需要開啟程式碼支援;
*
* @param securityManager
* @return
*/
@Bean
public AuthorizationAttributeSourceAdvisor authorizationAttributeSourceAdvisor(SecurityManager securityManager) {
AuthorizationAttributeSourceAdvisor authorizationAttributeSourceAdvisor = new AuthorizationAttributeSourceAdvisor();
authorizationAttributeSourceAdvisor.setSecurityManager(securityManager);
return authorizationAttributeSourceAdvisor;
}
/**
* 註冊全域性異常處理
* @return
*/
@Bean(name = "exceptionHandler")
public HandlerExceptionResolver handlerExceptionResolver() {
return new MyExceptionHandler();
}
}
在定義的SessionManager的Bean中返回我們的MySessionManager,然後在SecurityManager的Bean中呼叫setSessionManager(SessionManager sessionManager)方法載入我們的自定義SessionManager。
附上 MyShiroRealm的程式碼
package com.xxx.shiro.config;

import com.xxx.shiro.entity.SysPermission;
import com.xxx.shiro.entity.SysRole;
import com.xxx.shiro.entity.UserInfo;
import com.xxx.shiro.service.UserInfoService;
import org.apache.shiro.authc.*;
import org.apache.shiro.authz.AuthorizationInfo;
import org.apache.shiro.authz.SimpleAuthorizationInfo;
import org.apache.shiro.realm.AuthorizingRealm;
import org.apache.shiro.subject.PrincipalCollection;
import org.apache.shiro.util.ByteSource;

import javax.annotation.Resource;

/**
 * Created by Administrator on 2017/12/11.
 * 自定義許可權匹配和賬號密碼匹配
 */
public class MyShiroRealm extends AuthorizingRealm {
    @Resource
    private UserInfoService userInfoService;

    @Override
    protected AuthorizationInfo doGetAuthorizationInfo(PrincipalCollection principals) {
//        System.out.println("許可權配置-->MyShiroRealm.doGetAuthorizationInfo()");
        SimpleAuthorizationInfo authorizationInfo = new SimpleAuthorizationInfo();
        UserInfo userInfo = (UserInfo) principals.getPrimaryPrincipal();
        for (SysRole role : userInfo.getRoleList()) {
            authorizationInfo.addRole(role.getRole());
            for (SysPermission p : role.getPermissions()) {
                authorizationInfo.addStringPermission(p.getPermission());
            }
        }
        return authorizationInfo;
    }

    /*主要是用來進行身份認證的,也就是說驗證使用者輸入的賬號和密碼是否正確。*/
    @Override
    protected AuthenticationInfo doGetAuthenticationInfo(AuthenticationToken token)
            throws AuthenticationException {
//        System.out.println("MyShiroRealm.doGetAuthenticationInfo()");
        //獲取使用者的輸入的賬號.
        String username = (String) token.getPrincipal();
//        System.out.println(token.getCredentials());
        //通過username從資料庫中查詢 User物件,如果找到,沒找到.
        //實際專案中,這裡可以根據實際情況做快取,如果不做,Shiro自己也是有時間間隔機制,2分鐘內不會重複執行該方法
        UserInfo userInfo = userInfoService.findByUsername(username);
//        System.out.println("----->>userInfo="+userInfo);
        if (userInfo == null) {
            return null;
        }
        if (userInfo.getState() == 1) { //賬戶凍結
            throw new LockedAccountException();
        }
        SimpleAuthenticationInfo authenticationInfo = new SimpleAuthenticationInfo(
                userInfo, //使用者名稱
                userInfo.getPassword(), //密碼
                ByteSource.Util.bytes(userInfo.getCredentialsSalt()),//salt=username+salt
                getName()  //realm name
        );
        return authenticationInfo;
    }

}
傳統專案中,登入成功後應該重定向請求,但在前後端分離專案中,通過ajax登入後應該返回登入狀態標誌以及相關資訊。Web層登入方法程式碼如下
    /**
     * 登入方法
     * @param userInfo
     * @return
     */
    @RequestMapping(value = "/ajaxLogin", method = RequestMethod.POST)
    @ResponseBody
    public String ajaxLogin(UserInfo userInfo) {
        JSONObject jsonObject = new JSONObject();
        Subject subject = SecurityUtils.getSubject();
        UsernamePasswordToken token = new UsernamePasswordToken(userInfo.getUsername(), userInfo.getPassword());
        try {
            subject.login(token);
            jsonObject.put("token", subject.getSession().getId());
            jsonObject.put("msg", "登入成功");
        } catch (IncorrectCredentialsException e) {
            jsonObject.put("msg", "密碼錯誤");
        } catch (LockedAccountException e) {
            jsonObject.put("msg", "登入失敗,該使用者已被凍結");
        } catch (AuthenticationException e) {
            jsonObject.put("msg", "該使用者不存在");
        } catch (Exception e) {
            e.printStackTrace();
        }
        return jsonObject.toString();
    }
本專案使用SpringMVC框架,可以自行修改使用其他MVC框架。登入成功則返回sessionId作為token給前端儲存,前端請求時將該token放入請求頭,以Authorization為key,以此來鑑權。如果出現賬號或密碼錯誤等異常則返回錯誤資訊。
傳統專案中,登出後應重定向請求,到登入介面或其他指定介面,在前後端分離的專案中,我們應該返回json資訊。在上面提到的ShiroConfig中配置了預設登入路由
在Web層加入方法
/**
     * 未登入,shiro應重定向到登入介面,此處返回未登入狀態資訊由前端控制跳轉頁面
     * @return
     */
    @RequestMapping(value = "/unauth")
    @ResponseBody
    public Object unauth() {
        Map<String, Object> map = new HashMap<String, Object>();
        map.put("code", "1000000");
        map.put("msg", "未登入");
        return map;
    }
此處簡單提示未登入返回狀態碼,也可自行定義資訊。
在專案中,許可權相關表可能不在業務庫中,因此有必要單獨配置許可權相關表的資料來源。詳細配置可以參見《Spring Boot多資料來源配置與使用》一文。
Shiro資料來源配置程式碼
package com.xxx.shiro.datasource;

import java.util.Map;
import javax.persistence.EntityManager;
import javax.sql.DataSource;
import org.springframework.beans.factory.annotation.Autowired;
import org.springframework.beans.factory.annotation.Qualifier;
import org.springframework.boot.autoconfigure.orm.jpa.JpaProperties;
import org.springframework.boot.orm.jpa.EntityManagerFactoryBuilder;
import org.springframework.context.annotation.Bean;
import org.springframework.context.annotation.Configuration;
import org.springframework.data.jpa.repository.config.EnableJpaRepositories;
import org.springframework.orm.jpa.JpaTransactionManager;
import org.springframework.orm.jpa.LocalContainerEntityManagerFactoryBean;
import org.springframework.transaction.PlatformTransactionManager;
import org.springframework.transaction.annotation.EnableTransactionManagement;

/**
 * Created by Administrator on 2017/12/11.
 */
@Configuration
@EnableTransactionManagement
@EnableJpaRepositories(
        entityManagerFactoryRef="shiroEntityManagerFactory",
        transactionManagerRef="shiroTransactionManager",
        basePackages= { "com.xxx.shiro.dao" })
public class ShiroDataSourceConfig {
    @Autowired
    private JpaProperties jpaProperties;

    @Autowired
    @Qualifier("shiroDataSource")
    private DataSource shiroDataSource;

    @Bean(name = "shiroEntityManager")
    public EntityManager shiroEntityManager(EntityManagerFactoryBuilder builder) {
        return shiroEntityManagerFactory(builder).getObject().createEntityManager();
    }

    @Bean(name = "shiroEntityManagerFactory")
    public LocalContainerEntityManagerFactoryBean shiroEntityManagerFactory (EntityManagerFactoryBuilder builder) {
        return builder
                .dataSource(shiroDataSource)
                .properties(getVendorProperties(shiroDataSource))
                .packages("com.xxx.shiro.entity")
                .persistenceUnit("shiroPersistenceUnit")
                .build();
    }

    private Map<String, String> getVendorProperties(DataSource dataSource) {
        return jpaProperties.getHibernateProperties(dataSource);
    }

    @Bean(name = "shiroTransactionManager")
    PlatformTransactionManager shiroTransactionManager(EntityManagerFactoryBuilder builder) {
        return new JpaTransactionManager(shiroEntityManagerFactory(builder).getObject());
    }
}
IDEA下JpaProperties可能會報錯,可以忽略。
入口模組結構如下圖
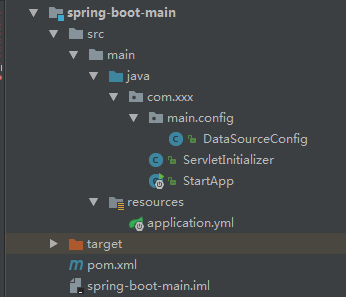
DataSourceConfig中配置了多個數據源的Bean,其中shiro資料來源Bean程式碼
    /**
     * shiro資料來源
     * @return
     */
    @Bean(name = "shiroDataSource")
    @Qualifier("shiroDataSource")
    @ConfigurationProperties(prefix="spring.datasource.shiro")
    public DataSource shiroDataSource() {
        return DataSourceBuilder.create().build();
    }
ServletInitializer和StartApp為SpringBoot在外部tomcat啟動配置,不贅述。
SpringBoot的相關配置在application.yml中,shiro配置程式碼如下圖
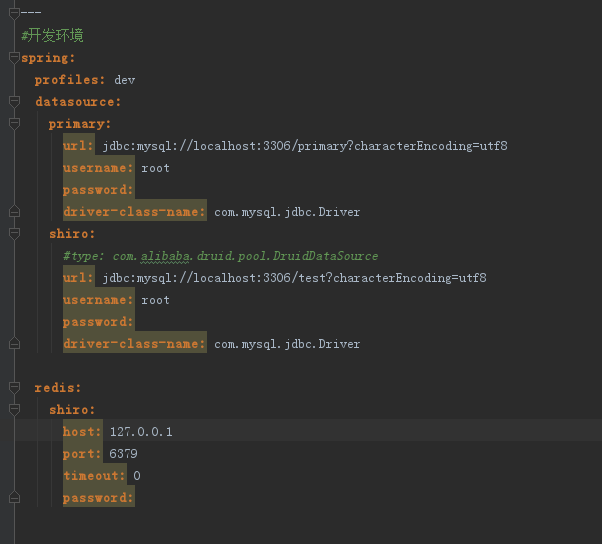
Primary為主庫配置。當在某個專案中引入spring-boot-shiro模組時,只需要在配置檔案中加入shiro資料來源及redis的相關配置,並在DataSourceConfig加入shiro資料來源Bean即可。
Shiro框架會根據使用者登入及許可權狀態丟擲異常,建議使用SpringMVC的全域性異常捕獲來處理異常,避免重複程式碼。該專案中程式碼如下
package com.xxx.shiro.config;

import com.alibaba.fastjson.support.spring.FastJsonJsonView;
import org.apache.shiro.authz.UnauthenticatedException;
import org.apache.shiro.authz.UnauthorizedException;
import org.springframework.web.servlet.HandlerExceptionResolver;
import org.springframework.web.servlet.ModelAndView;
import javax.servlet.http.HttpServletRequest;
import javax.servlet.http.HttpServletResponse;
import java.util.HashMap;
import java.util.Map;

/**
 * Created by Administrator on 2017/12/11.
 * 全域性異常處理
 */
public class MyExceptionHandler implements HandlerExceptionResolver {

    public ModelAndView resolveException(HttpServletRequest httpServletRequest, HttpServletResponse httpServletResponse, Object o, Exception ex) {
        ModelAndView mv = new ModelAndView();
        FastJsonJsonView view = new FastJsonJsonView();
        Map<String, Object> attributes = new HashMap<String, Object>();
        if (ex instanceof UnauthenticatedException) {
            attributes.put("code", "1000001");
            attributes.put("msg", "token錯誤");
        } else if (ex instanceof UnauthorizedException) {
            attributes.put("code", "1000002");
            attributes.put("msg", "使用者無許可權");
        } else {
            attributes.put("code", "1000003");
            attributes.put("msg", ex.getMessage());
        }

        view.setAttributesMap(attributes);
        mv.setView(view);
        return mv;
    }
}
該Bean在ShiroConfig中已有註冊程式碼。
至此,shiro框架的整合就結束了。至於shiro框架的使用細節,可以自行查閱相關資料。專案程式碼本人測試可正常工作,未應用到生產環境,僅供學習交流使用。