
分散式事務之——基於訊息中介軟體實現
環境需求:假如某人有5個女朋友(有點複雜),每天晚上都會給他的女朋友打電話說晚安,那麼每給一個女朋友打電話,其他女朋友都要進入等待狀態。一個一個打下去。。。等打到最後一個已經是凌晨了,對方都睡了。那麼有什麼辦法可以解決呢?此時這個人可以利用微信公眾號將自己甜言蜜語放進公眾號中,讓他女朋友訂閱公眾號,則這些女朋友不用依次等待又可收到訊息。此原理就是訊息佇列。
一、什麼是中介軟體
非底層作業系統軟體,非業務應用軟體,不是直接給終端使用者使用,不能直接給客戶帶來價值的軟體統稱為中介軟體。
二、什麼是訊息中介軟體
關注於資料的傳送和接受,利用高效可靠的非同步訊息傳遞機制整合分散式系統。
那什麼是分散式事務呢
分散式事務是指事務的參與者、支援事務的伺服器、資源伺服器以及事務管理器分別位於不同的分散式系統的不同節點上
三、如何增強併發能力高併發鍵壯性
1、負載均衡:預防單點故障,提升鍵壯性 2、快取:各種快取,功蓋天下 3、非同步:提高併發,提升使用者體驗 4、讀寫分離:積微成著,提高吞吐量
四、訊息中介軟體帶來的好處
1、解耦:傳統模式的缺點:系統間耦合性太強;中介軟體模式的的優點:將訊息寫入訊息佇列,需要訊息的系統自己從訊息佇列中訂閱
2、非同步:傳統模式的缺點:一些非必要的業務邏輯以同步的方式執行,太耗費時間;中介軟體模式的的優點:將訊息寫入訊息佇列,非必要的業務邏輯以非同步的方式執行,加快響應速度
3、橫向擴充套件 4、安全可靠 5、順序保證
五、常用的訊息中介軟體
1) ActiveMQ
2) RubbitMQ
3) Kafka
4) RocketMQ
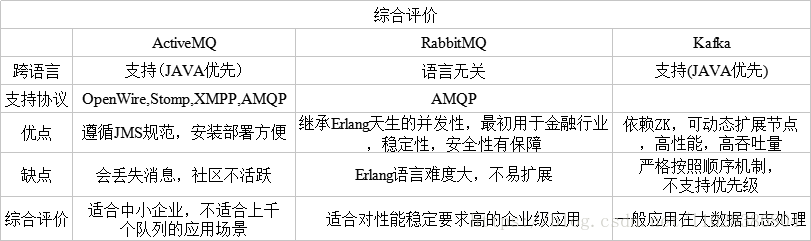
圖:三個訊息中介軟體對比
這裡我只演示前兩者,目前只會前兩種(比較流行),至於Kafka是基於日誌形式,嚴格意義上他作於訊息中介軟體角色不是很突出。
六、ActiveMQ
1、什麼是JMS規範
Java訊息服務(Java Message Service)即JMS,是一個Java平臺中面向訊息中介軟體的API,用於在兩個應用程式之間或分散式系統中傳送/接收訊息,進行非同步通訊。
2、JMS相關概念
1)、消費者/訂閱者:接收並處理訊息的客戶端
2)、訊息:應用程式之間傳遞的資料內容
3)、訊息模式:在客戶端之間傳遞訊息的方式,JMS中定義了主題和佇列兩種模式
3、ActiveMQ安裝
Window下安裝ActiveMQ 1)、下載:ActiveMQ下載
2)、進入bin/win64目錄
3)、啟動(演示方式一)
方式一:以管理員身份執行activemq.bat(直接可以執行)
方式二: installService.bat是以服務方式啟動的,用超級管理員身份執行後還需到服務中啟動該服務
4)、根據客戶端顯示的地址用瀏覽器進行訪問:127.0.0.1:8161
5)、利用預設使用者密碼為admin admin即可進入管理平臺
Linux下載 1)、下載
[[email protected] bin]# wget https://archive.apache.org/dist/activemq/5.14.0/apache-activemq-5.14.0-bin.tar.gz
[[email protected] java]# tar -zxvf apache-activemq-5.14.0-bin.tar.gz
2)、執行
[[email protected] java]# cd apache-activemq-5.14.0/
[[email protected] apache-activemq-5.14.0]# cd bin/
[[email protected] bin]# ./activemq start
[[email protected] bin]# ps -ef | grep activemq
3)、防火牆開啟埠號
#activemq
-A INPUT -p tcp --dport 8161 -j ACCEPT
-A INPUT -p tcp --dport 61616 -j ACCEPT
4)、瀏覽器訪問管理平臺:activemq的埠號為8161 預設使用者名稱為admin 密碼為admin 訪問域名:http://Ip:8161
5)、關閉服務
[[email protected] bin]# ./activemq stop4、實戰入門
佇列模式
1) 匯入依賴
<dependencies>
    <dependency>
        <groupId>org.apache.activemq</groupId>
        <artifactId>activemq-all</artifactId>
        <version>5.14.0</version>
    </dependency>
</dependencies>
2) 生產者:定義一個生產者類
**
 * 定義生產者
 */
public class AppProducer {
    //61616為activemq預設埠
    private static final String URL="tcp://192.168.174.133:61616";
    private static final String queueName="queue-test";
    public static void main(String[] args) throws JMSException {
        //1.建立ConnectionFactory
        ConnectionFactory connectionFactory=new ActiveMQConnectionFactory(URL);
        //2.建立Connection
        Connection connection=connectionFactory.createConnection();
        //3.啟動連線
        connection.start();
        //4.建立會話
        //第一個引數為是否支援事務
        //第二個引數為自動確認,客戶端傳送和接收訊息不需要做額外的工作。哪怕是接收端發生異常,也會被當作正常傳送成功
        Session session=connection.createSession(false, Session.AUTO_ACKNOWLEDGE);
        //5.建立一個目標
        Destination destination=session.createQueue(queueName);
        //6.建立一個生產者
        MessageProducer producer=session.createProducer(destination);
        for(int i=0;i<100;i++){
            //7.建立訊息
            TextMessage textMessage=session.createTextMessage("text"+i);
            //8.釋出訊息
            producer.send(textMessage);
            System.out.println("傳送訊息"+textMessage.getText());
        }
        //9.關閉連線
        connection.close();
    }
}
執行程式碼 訪問http://192.168.174.133:8161/admin/ ,點選queues,此時可以看出生產了100條訊息,0個被消費
3) 消費者:定義一個消費者類
**
 * 定義消費者
 */
public class AppConsumer {
    //61616為activemq預設埠
    private static final String URL="tcp://192.168.174.133:61616";
    private static final String queueName="queue-test";
    public static void main(String[] args) throws JMSException {
        //1.建立ConnectionFactory
        ConnectionFactory connectionFactory=new ActiveMQConnectionFactory(URL);
        //2.建立Connection
        Connection connection=connectionFactory.createConnection();
        //3.啟動連線
        connection.start();
        //4.建立會話
        //第一個引數為是否支援事務
        //第二個引數為自動確認,客戶端傳送和接收訊息不需要做額外的工作。哪怕是接收端發生異常,也會被當作正常傳送成功
        Session session=connection.createSession(false, Session.AUTO_ACKNOWLEDGE);
        //5.建立一個目標
        Destination destination=session.createQueue(queueName);
        //6.建立一個消費者
        MessageConsumer consumer=session.createConsumer(destination);
        //7.建立一個監聽器
        consumer.setMessageListener(new MessageListener() {
            public void onMessage(Message message) {
                TextMessage textMessage= (TextMessage) message;
                try {
                    System.out.println("接收訊息:"+textMessage.getText());
                } catch (JMSException e) {
                    e.printStackTrace();
                }
            }
        });
        //8.關閉連線
        //connection.close();
    }
}
此時執行消費者,可以消費訊息,在管理平臺也可以看到被消費的訊息通知
主題模式
1) 生產者
/**
 * 主題模式
 * 定義生產者
 */
public class AppProducer {
    //61616為activemq預設埠
    private static final String URL="tcp://192.168.174.133:61616";
    private static final String topicName="topic-test";
    public static void main(String[] args) throws JMSException {
        //1.建立ConnectionFactory
        ConnectionFactory connectionFactory=new ActiveMQConnectionFactory(URL);
        //2.建立Connection
        Connection connection=connectionFactory.createConnection();
        //3.啟動連線
        connection.start();
        //4.建立會話
        //第一個引數為是否支援事務
        //第二個引數為自動確認,客戶端傳送和接收訊息不需要做額外的工作。哪怕是接收端發生異常,也會被當作正常傳送成功
        Session session=connection.createSession(false, Session.AUTO_ACKNOWLEDGE);
        //5.建立一個目標
        Destination destination=session.createTopic(topicName);
        //6.建立一個生產者
        MessageProducer producer=session.createProducer(destination);
        for(int i=0;i<100;i++){
            //7.建立訊息
            TextMessage textMessage=session.createTextMessage("text"+i);
            //8.釋出訊息
            producer.send(textMessage);
            System.out.println("傳送訊息"+textMessage.getText());
        }
        //9.關閉連線
        connection.close();
    }
}
2) 消費者
/**
 * 主題模式
 * 定義消費者
 */
public class AppConsumer {
    //61616為activemq預設埠
    private static final String URL="tcp://192.168.174.133:61616";
    private static final String topicName="topic-test";
    public static void main(String[] args) throws JMSException {
        //1.建立ConnectionFactory
        ConnectionFactory connectionFactory=new ActiveMQConnectionFactory(URL);
        //2.建立Connection
        Connection connection=connectionFactory.createConnection();
        //3.啟動連線
        connection.start();
        //4.建立會話
        //第一個引數為是否支援事務
        //第二個引數為自動確認,客戶端傳送和接收訊息不需要做額外的工作。哪怕是接收端發生異常,也會被當作正常傳送成功
        Session session=connection.createSession(false, Session.AUTO_ACKNOWLEDGE);
        //5.建立一個目標
        Destination destination=session.createTopic(topicName);
        //6.建立一個消費者
        MessageConsumer consumer=session.createConsumer(destination);
        //7.建立一個監聽器
        consumer.setMessageListener(new MessageListener() {
            public void onMessage(Message message) {
                TextMessage textMessage= (TextMessage) message;
                try {
                    System.out.println("接收訊息:"+textMessage.getText());
                } catch (JMSException e) {
                    e.printStackTrace();
                }
            }
        });
        //8.關閉連線
        //connection.close();
    }
}
注意:主題模式需要先訂閱才能收到訊息,所以程式碼啟動順序十分重要,先啟動生產者,再啟動消費者進行訂閱,再次啟動生產者生產訊息
5、ActiveMQ繼承Spring
1) 使用Spring繼承JMS連線ActiveMQ
ConnectionFactory:用於管理連線的連線工廠
一個Spring為我們提供的連線池
JmsTemplate每次傳送訊息都會重新建立連線,會話和productor
Spring中提供了SingleConnectionFactory和CachingConnectionFactory
JmsTemplate: 用於傳送和接收訊息的模板類
是Spring提供的,只需向Spring容器內註冊這個類就可以使用JmsTemplate方便的操作Jms
JmsTemplate類是執行緒安全的,可以在整個應用範圍使用
MessageListerner: 訊息監聽器
實現一個onMessage方法,該方法只接收一個Message引數
2) 整個spring程式碼實戰
2.1) 先引入依賴
<!--定義一個變數指定spring版本號-->
<properties>
    <spring.version>4.2.5.RELEASE</spring.version>
</properties>
<dependencies>
     <dependency>
        <groupId>junit</groupId>
        <artifactId>junit</artifactId>
        <version>4.11</version>
        <scope>test</scope>
    </dependency>
    <dependency>
        <groupId>org.springframework</groupId>
        <artifactId>spring-context</artifactId>
        <version>${spring.version}</version>
    </dependency>
    <dependency>
        <groupId>org.springframework</groupId>
        <artifactId>spring-jms</artifactId>
        <version>${spring.version}</version>
    </dependency>
    <dependency>
        <groupId>org.springframework</groupId>
        <artifactId>spring-test</artifactId>
        <version>${spring.version}</version>
    </dependency>
    <dependency>
        <groupId>org.apache.activemq</groupId>
        <artifactId>activemq-core</artifactId>
        <version>5.7.0</version>
        <exclusions>
            <exclusion>
                <artifactId>spring-contxt</artifactId>
                <groupId>org.springframework</groupId>
            </exclusion>
        </exclusions>
    </dependency>
</dependencies>
2.2) 生產者
2.2.1) 定義介面
/**
 * spring整合acitivemq
 * 定義生產者
 */
public interface ProducerService {
    void sendMessage(String message);
}
2.2.2) 定義實現類
/**
 * 定義生產者實現類
 */
public class ProducerServiceImpl implements ProducerService {
    @Autowired
    JmsTemplate jmsTemplate;
    @Resource(name = "queueDestination")
    //@Resource(name="topicDestination")
    Destination destination;

    public void sendMessage(final String message) {
        //使用JmsTemplate傳送訊息
        jmsTemplate.send(destination, new MessageCreator() {
            //建立一個訊息
            public Message createMessage(Session session) throws JMSException {
                TextMessage textMessage = session.createTextMessage(message);
                return textMessage;
            }
        });
        System.out.println("傳送訊息:" + message);
    }
}
2.2.3) 定義呼叫者
/**
 * 建立生產呼叫者
 */
public class ProducerClient {
    public static void main(String[] args) {
        ClassPathXmlApplicationContext context=new ClassPathXmlApplicationContext("producer.xml");
        ProducerService service=context.getBean(ProducerService.class);
        for(int i=0;i<100;i++) {
            service.sendMessage("test" + i);
        }
        context.close();
    }
}
2.2.4) 定義公共配置檔案
此檔案因為生產者和消費者都需要一些公共配置,最後將公共的部分抽取出來
<?xml version="1.0" encoding="UTF-8"?>
<beans xmlns="http://www.springframework.org/schema/beans"
       xmlns:xsi="http://www.w3.org/2001/XMLSchema-instance"
       xmlns:context="http://www.springframework.org/schema/context"
       xsi:schemaLocation="http://www.springframework.org/schema/beans http://www.springframework.org/schema/beans/spring-beans.xsd http://www.springframework.org/schema/context http://www.springframework.org/schema/context/spring-context.xsd">
    <context:annotation-config/>
    <!--ActiveMQ為我們提供的ConnectionFactory-->
    <bean id="targetConnectionFactory" class="org.apache.activemq.ActiveMQConnectionFactory">
        <property name="brokerURL" value="tcp://192.168.174.133:61616"/>
    </bean>
    <!--Spring jms為我們提供的連線池-->
    <bean id="connectionFactory" class="org.springframework.jms.connection.SingleConnectionFactory">
        <property name="targetConnectionFactory" ref="targetConnectionFactory"/>
    </bean>
    <!--一個佇列目的地,點對點的-->
    <bean id="queueDestination" class="org.apache.activemq.command.ActiveMQQueue">
        <constructor-arg value="queue"/>
    </bean>
    <!--配置主題目的地,釋出訂閱模式-->
    <bean id="topicDestination" class="org.apache.activemq.command.ActiveMQTopic">
        <constructor-arg value="topic"/>
    </bean>
</beans>
2.2.5) 定義生產者配置檔案
<?xml version="1.0" encoding="UTF-8"?>
<beans xmlns="http://www.springframework.org/schema/beans"
       xmlns:xsi="http://www.w3.org/2001/XMLSchema-instance"
       xmlns:context="http://www.springframework.org/schema/context"
       xsi:schemaLocation="http://www.springframework.org/schema/beans http://www.springframework.org/schema/beans/spring-beans.xsd http://www.springframework.org/schema/context http://www.springframework.org/schema/context/spring-context.xsd">
    <!--引入公共配置檔案-->
    <import resource="common.xml"/>
    <!--配置JmsTemplate,用於傳送訊息-->
    <bean id="jmsTemplate" class="org.springframework.jms.core.JmsTemplate">
        <property name="connectionFactory" ref="connectionFactory"/>
    </bean>
    <bean class="com.jms_spring.producer.ProducerServiceImpl"></bean>
</beans>
2.3) 消費者
2.3.1) 定義監聽者類
/**
 * 建立訊息監聽者
 */
public class ConsumerMessageListener implements MessageListener{
    public void onMessage(Message message) {
        TextMessage textMessage= (TextMessage) message;
        try {
            System.out.println("接受訊息"+textMessage.getText());
        } catch (JMSException e) {
            e.printStackTrace();
        }
    }
}
2.3.2) 定義呼叫者
**
 * 消費者呼叫者
 */
public class ConsumerClient {
    public static void main(String[] args) {
        ApplicationContext applicationContext=new ClassPathXmlApplicationContext("consumer.xml");

    }
}
2.3.3) 定義消費者配置檔案
<?xml version="1.0" encoding="UTF-8"?>
<beans xmlns="http://www.springframework.org/schema/beans"
       xmlns:xsi="http://www.w3.org/2001/XMLSchema-instance"
       xsi:schemaLocation="http://www.springframework.org/schema/beans
    http://www.springframework.org/schema/beans/spring-beans.xsd">
      <!--匯入公共配置-->
      <import resource="common.xml"/>
      <!--配置訊息監聽器-->
      <bean id="consumerMessageListener" class="com.jms_spring.consumer.ConsumerMessageListener"/>
      <!--配置訊息容器-->
      <bean id="jmsContainer" class="org.springframework.jms.listener.DefaultMessageListenerContainer">
          <property name="connectionFactory" ref="connectionFactory"/>
          <property name="destination" ref="queueDestination"/>
          <!-- <property name="destination" ref="topicDestination"/>-->
           <property name="messageListener" ref="consumerMessageListener"/>
       </bean>
 </beans>
2.4) 擴充套件:訂閱模式
生產者採用訂閱模式
@Resource(name="topicDestination")
Destination destination;
消費者配置檔案中引入訂閱模式
<property name="destination" ref="topicDestination"/>6、ActiveMQ叢集
1) 為什麼要對訊息中介軟體叢集
實現高可用,以排除單點故障引起的服務中斷
實現負載均衡,以提升效率為更多客戶提供服務
2) 叢集方式
客戶端模式:讓多個消費者消費同一個佇列
Broker clusters:多個Broker之間同步訊息
Master Slave:實現高可用
3) ActiveMQ失效轉移(failover)
允許當其中一臺訊息伺服器宕機,客戶端在傳輸層上重新連線到其他訊息伺服器
transportOptions引數說明
randomize預設true,表示在URI列表中選擇URI連線時是否採用隨機策略
initialReconnectDelay:預設為10,單位毫秒,表示第一次嘗試重連之間等待的時間
maxReconnetDelay:預設30000,單位毫秒,最長重連的時間間隔
4) ActiveMQ中的NetworkConnector
網路聯結器主要配置ActiveMQ伺服器與伺服器之間的網路通訊方式,用於伺服器傳遞訊息
網路聯結器分為靜態聯結器和動態聯結器
靜態聯結器
<networkConnectors>
    <networkConnetor uri="static:(tcp://127.0.0.1:61617,tcp://127.0.0.1:61618)"/>
</networkConnectors>
動態聯結器
<networkConnectors>
    <networkConnector uri="multicast://default"/>
</networkConnectors>
<transportConnectors>
    <transportConnector uri=tco://localhost:0" discoveryUri="multicast://default"/>
</transportConnectors>
5) 關於ActiveMQ Master Slave叢集方案
Shared storage master/slave 共享儲存
Replicated LevelDB Store 基於複製的LevelDB Store
7) 實戰
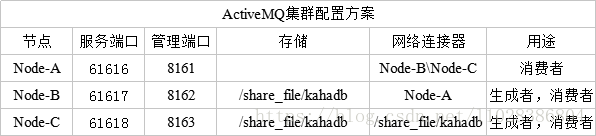
7.1) 構建叢集環境
[[email protected] java]# mkdir activemq_colony
[[email protected] java]# cp -rf apache-activemq-5.14.0 activemq_colony/activemq-a
[[email protected] java]# cp -rf apache-activemq-5.14.0 activemq_colony/activemq-b
[[email protected] java]# cp -rf apache-activemq-5.14.0 activemq_colony/activemq-c
7.2) 建立一個共享目錄用來做master、slave叢集使用的共享儲存資料夾
[[email protected] java]# cd activemq_colony/
[[email protected] activemq_colony]# mkdir kahadb
7.3) 配置節點
a節點:
[[email protected] activemq_colony]# cd activemq-a
[[email protected] activemq-a]# cd conf
[[email protected] conf]# vim activemq.xml
(1) 先找到網路提供服務的地方,a節點預設使用61616埠,其他埠也不需要,所以可以直接註釋掉
<!-- <transportConnector name="amqp" uri="amqp://0.0.0.0:5672?maximumConnections=1000&wireFormat.maxFrameSize=104857600"/>
<transportConnector name="stomp" uri="stomp://0.0.0.0:61613?maximumConnections=1000&wireFormat.maxFrameSize=104857600"/>
<transportConnector name="mqtt" uri="mqtt://0.0.0.0:1883?maximumConnections=1000&wireFormat.maxFrameSize=104857600"/>
<transportConnector name="ws" uri="ws://0.0.0.0:61614?maximumConnections=1000&wireFormat.maxFrameSize=104857600"/>-->(2) 給a節點新增網路聯結器的配置項
 <networkConnectors>
           <networkConnector name="local_network" uri="static:(tcp://127.0.0.1:61617,tcp://127.0.0.1:61618)"/>
 </networkConnectors>
(3) 給a節點配置後端提供管理地址的jetty伺服器埠,注意a節點使用的是預設配置,所以這裡無須改動,直接退出
<property name="port" value="8161"/>a節點配置完畢
b節點
(1) 註釋網路服務
<!-- <transportConnector name="amqp" uri="amqp://0.0.0.0:5672?maximumConnections=1000&wireFormat.maxFrameSize=104857600"/>
<transportConnector name="stomp" uri="stomp://0.0.0.0:61613?maximumConnections=1000&wireFormat.maxFrameSize=104857600"/>
<transportConnector name="mqtt" uri="mqtt://0.0.0.0:1883?maximumConnections=1000&wireFormat.maxFrameSize=104857600"/>
<transportConnector name="ws" uri="ws://0.0.0.0:61614?maximumConnections=1000&wireFormat.maxFrameSize=104857600"/>-->(2) 給b節點新增網路聯結器的配置項
<networkConnectors>
    <networkConnector name="network_a" uri="static:(tcp://127.0.0.1:61616)"/>
</networkConnectors>
(3) 因為b節點和c節點需要配置成master和slave,我們採用的是共享資料夾的方式,所以需要配置節點儲存方案,位置配置指定的自定義儲存的目錄
<persistenceAdapter>
         <kahaDB directory="/usr/java/activemq_colony/kahadb"/>
  </persistenceAdapter>
(4) 修改對外提供服務的埠號,改為61617
<transportConnector name="openwire" uri="tcp://0.0.0.0:61617?maximumConnections=1000&wireFormat.maxFrameSize=104857600"/>(5) 為b節點配置jetty提供的服務地址,也就是管理埠
<property name="port" value="8162"/>c節點
(1) 因為b節點和c節點配置檔案差不多,可以講b配置檔案複製給c
[[email protected] conf]# cp activemq.xml ../../activemq-c/conf/
cp:是否覆蓋"../../activemq-c/conf/activemq.xml"? y
(2) 編輯c配置檔案
[[email protected] conf]# cd ../../activemq-c/conf
[[email protected] conf]# vim activemq.xml
<transportConnector name="openwire" uri="tcp://0.0.0.0:61618?maximumConnections=1000&wireFormat.maxFrameSize=104857600"/>(3) 為c節點配置管理埠
<property name="port" value="8163"/>7.4) 一次啟動三臺ActiveMQ
[[email protected] activemq_colony]# ./activemq-a/bin/activemq start
[[email protected] activemq_colony]# ./activemq-b/bin/activemq start
[[email protected] activemq_colony]# ./activemq-c/bin/activemq start
#檢視是否啟動成功
[[email protected] activemq_colony]# ps -ef | grep activemq
#檢視各節點對外提供的埠號
[[email protected] activemq_colony]# netstat -anp|grep 61616
tcp        0      0 :::61616                    :::*                        LISTEN      7073/java
tcp        0      0 ::ffff:127.0.0.1:61616      ::ffff:127.0.0.1:53838      ESTABLISHED 7073/java
tcp        0      0 ::ffff:127.0.0.1:53838      ::ffff:127.0.0.1:61616      ESTABLISHED 7164/java
[[email protected] activemq_colony]# netstat -anp|grep 61617
tcp        0      0 :::61617                    :::*                        LISTEN      7164/java
tcp        0      0 ::ffff:127.0.0.1:34096      ::ffff:127.0.0.1:61617      ESTABLISHED 7073/java
tcp        0      0 ::ffff:127.0.0.1:61617      ::ffff:127.0.0.1:34096      ESTABLISHED 7164/java
[[email protected] activemq_colony]# netstat -anp|grep 61618
#c節點看不到對外提供服務的資訊,但是程序啟動成功,是因為b節點和c節點配置的是master和slave,現,b節點獲取到了共享資料夾的主動權,c節點正在等待獲得資源,並且提供服務
#此時關掉b節點
[[email protected] activemq_colony]# ./activemq-b/bin/activemq stop
#再檢視c節點
[[email protected] activemq_colony]# netstat -anp|grep 61618
tcp        0      0 :::61618                    :::*                        LISTEN      7225/java
tcp        0      0 ::ffff:127.0.0.1:47052      ::ffff:127.0.0.1:61618      ESTABLISHED 7073/java
tcp        0      0 ::ffff:127.0.0.1:61618      ::ffff:127.0.0.1:47052      ESTABLISHED 7225/java
#此時c節點可以看到對外提供服務的資訊,c節點成為了master
#再次啟動b節點
[[email protected] activemq_colony]# ./activemq-b/bin/activemq start
#檢視b節點對外服務
[[email protected] activemq_colony]# netstat -anp|grep 61617
#此時b節點成為slave,所以看不到服務資訊,只有c節點掛失才能重新成為master獲得主動權
測試(這裡利用之前queue程式碼)
生成者
注意url需要配置狀態轉移failover,此作用是當前一個配置的節點掛失後直接轉到第二個配置的節點
/**
 * 叢集環境
 * 定義生產者
 */
public class AppProducer {
    //61616為activemq預設埠
    private static final String URL="failover:(tcp://192.168.174.133:61617,tcp://192.168.174.133:61618)?randomize=true";
    private static final String queueName="test1";
    public static void main(String[] args) throws JMSException {
        //1.建立ConnectionFactory
        ConnectionFactory connectionFactory=new ActiveMQConnectionFactory(URL);
        //2.建立Connection
        Connection connection=connectionFactory.createConnection();
        //3.啟動連線
        connection.start();
        //4.建立會話
        //第一個引數為是否支援事務
        //第二個引數為自動確認,客戶端傳送和接收訊息不需要做額外的工作。哪怕是接收端發生異常,也會被當作正常傳送成功
        Session session=connection.createSession(false, Session.AUTO_ACKNOWLEDGE);
        //5.建立一個目標
        Destination destination=session.createQueue(queueName);
        //6.建立一個生產者
        MessageProducer producer=session.createProducer(destination);
        for(int i=0;i<100;i++){
            //7.建立訊息
            TextMessage textMessage=session.createTextMessage("text"+i);
            //8.釋出訊息
            producer.send(textMessage);
            System.out.println("傳送訊息"+textMessage.getText());
        }
        //9.關閉連線
        connection.close();
消費者
消費者需要配置三臺域名
/**
 * 叢集環境
 * 定義消費者
 */
public class AppConsumer {
    //61616為activemq預設埠
    private static final String URL="failover:(tcp://192.168.174.133:61616,tcp://192.168.174.133:61617,tcp://192.168.174.133:61618)?randomize=true";
    private static final String queueName="test1";
    public static void main(String[] args) throws JMSException {
        //1.建立ConnectionFactory
        ConnectionFactory connectionFactory=new ActiveMQConnectionFactory(URL);
        //2.建立Connection
        Connection connection=connectionFactory.createConnection();
        //3.啟動連線
        connection.start();
        //4.建立會話
        //第一個引數為是否支援事務
        //第二個引數為自動確認,客戶端傳送和接收訊息不需要做額外的工作。哪怕是接收端發生異常,也會被當作正常傳送成功
        Session session=connection.createSession(false, Session.AUTO_ACKNOWLEDGE);
        //5.建立一個目標
        Destination destination=session.createQueue(queueName);
        //6.建立一個消費者
        MessageConsumer consumer=session.createConsumer(destination);
        //7.建立一個監聽器
        consumer.setMessageListener(new MessageListener() {
            public void onMessage(Message message) {
                TextMessage textMessage= (TextMessage) message;
                try {
                    System.out.println("接收訊息:"+textMessage.getText());
                } catch (JMSException e) {
                    e.printStackTrace();
                }
            }
        });
        //8.關閉連線
        //connection.close();
    }
}
7.5) 瀏覽器輸入域名訪問管理平臺
執行生成者,檢視佇列中的訊息
注意此時b節點為slave,他不對外提供服務
http://192.168.174.133:8161/admin/
http://192.168.174.133:8163/admin
此時是在c節點生成的訊息,掛失c節點,模擬c機器故障
[[email protected] activemq_colony]# ./activemq-c/bin/activemq stop執行消費者
訪問域名b
http://192.168.174.133:8162/admin/
檢視各個節點連線情況以及消費情況,注意防火牆需要開通8162和8163埠號
七、RabbitMQ
1、RabbitMQ初識
使用Erlang語言開發的基於AMQP協議的開源訊息佇列
生產者:釋出訊息到rabbotmq中
消費者:訊息佇列中的訊息
Exchange:訊息交換機制
Bind:佇列和交換機的路由關係
Queue:訊息存放的地方
2、RabbitMQ安裝(Linux)
1)安裝GCC GCC-C++ Openssl等模組(安裝過請忽略)
yum -y install make gcc gcc-c++ kernel-devel m4 ncurses-devel openssl-devel 2) 安裝ncurses
yum -y install ncurses-devel 3) 安裝erlang環境
#安裝rabbitmq時 提示錯誤: erlang >= 19.3 is needed by rabbitmq-server-3.7.4-1.el7.noarch
yum 安裝了 erlang但是版本不對 只能解除安裝
yum remove erlang
#首先安裝Erlang
 wget http://erlang.org/download/otp_src_20.3.tar.gz
#如果提示找不到命令的話可以執行 yum -y install wget 安裝一下
tar -xf otp_src_20.3.tar.gz
#安裝相關依賴項
yum -y install make gcc gcc-c++ kernel-devel m4 ncurses-devel openssl-devel unixODBC-devel libtool libtool-ltdl-devel
#依次執行以下命令:
cd otp_src_20.3
./otp_build autoconf
./configure
#出現如下 資訊。

*********************************************************************
**********************  APPLICATIONS DISABLED  **********************
*********************************************************************

jinterface     : No Java compiler found
*********************************************************************
*********************************************************************
**********************  APPLICATIONS INFORMATION  *******************
*********************************************************************

wx             : wxWidgets not found, wx will NOT be usable
*********************************************************************
*********************************************************************
**********************  DOCUMENTATION INFORMATION  ******************
*********************************************************************

documentation  :
                 fop is missing.
                 Using fakefop to generate placeholder PDF files.
*********************************************************************
#繼續 執行 :
make
make install
#安裝成功後
#Erlang 預設安裝路徑可以用whereis erlang 檢視
erlang: /usr/lib64/erlang /usr/local/lib/erlang
#Erlang 預設安裝路徑為  /usr/local/lib/erlang
 export ERLANG_HOME=/usr/local/lib/erlang
 export PATH=$PATH:$ERLANG_HOME/bin
    #改完之後重新載入環境變數:
  source /etc/profile
    #出現結果:
  erl
  Erlang/OTP 20 [erts-9.3] [source] [64-bit] [smp:2:2] [ds:2:2:10] [async-threads:10] [hipe] [kernel-poll:false]
   #安裝erlang成功!
4) 安裝RabbitMQ
4.1) 下載rabbitmq-server的jar包
wget https://dl.bintray.com/rabbitmq/all/rabbitmq-server/3.7.4/rabbitmq-server-3.7.4-1.el7.noarch.rpm4.2) 下載好之後:
rpm -ivh rabbitmq-server-3.7.4-1.el7.noarch.rpm或者
  rpm --import https://www.rabbitmq.com/rabbitmq-release-signing-key.asc
  yum install rabbitmq-server-3.7.4-1.el7.noarch.rpm
  報錯!如下:
  error: Failed dependencies:
  erlang >= 19.3 is needed by rabbitmq-server-3.7.4-1.el7.noarch
  socat is needed by rabbitmq-server-3.7.4-1.el7.noarch
  那是因為之前用whereis erlang 查詢 有2個版本
  現在我們刪除 一個老版本:rm -rf /usr/lib64/erlang
  rpm -ivh --nodeps rabbitmq-server-3.7.4-1.el7.noarch.rpm
  nodeps表示不檢查依賴關係。
  然後執行以下命令:
  chkconfig rabbitmq-server on (開機自啟動)
  /sbin/service rabbitmq-server start
  /sbin/service rabbitmq-server stop
  安裝的路徑 預設cd /usr/lib/rabbitmq/
  #開啟遠端訪問
  vi /etc/rabbitmq/rabbit.conf
  ##新增一個內容
  {[{rabbit,[{loopback_users,[]}]}].
4.3) 隨後移動至/usr/local/下 改名rabbitmq
cp -r rabbitmq_server-3.6.9 /usr/local/rabbitmq 4.4) 這種下載的方式解壓後直接可以使用,無需再編譯安裝
#進入到rabbit檔案內,其命令檔案存在於sbin資料夾下,因此需要將sbin資料夾的路徑新增到PATH中:修改/etc/profile
export PATH=/usr/lib/rabbitmq/sbin:$PATH
exprot PATH=/usr/local/erlang/bin      #注意也要引入erlang環境
#執行source /etc/profile使得PATH路徑更新,rabbitMQ安裝成功。
4.5) 開啟防火牆埠號15672
4.6) 新增使用者
方式一:通過程式碼形式
[[email protected] sbin]# pwd
/usr/lib/rabbitmq/bin
[[email protected] sbin]#./rubbitmq-server start    #開啟rabbitmq服務
#這裡可能會報Applying plugin configuration to [email protected] failed.
#我忽略了
[[email protected] sbin]# rabbitmqctl add_user admin 12345678    #新增新使用者和密碼
Creating user "admin" ...
[[email protected] sbin]# rabbitmqctl set_user_tags admin administrator  #設定新賬號為超級管理員
Setting tags for user "admin" to [administrator] ...
[[email protected] sbin]# rabbitmqctl set_permissions -p "/" admin ".*" ".*" ".*"  #設定使用者許可權
Setting permissions for user "admin" in vhost "/" ...
[[email protected] sbin]# rabbitmq-plugins enable rabbitmq_management #開啟web介面管理工具
Plugin configuration unchanged.

Applying plugin configuration to [email protected] nothing to do.
方式二:通過管理平臺的方式
1) 啟動
[[email protected] bin]# cd /usr/lib/rabbitmq/bin
[[email protected] bin]# ./rabbitmq-server start
  ##  ##
  ##  ##      RabbitMQ 3.7.4. Copyright (C) 2007-2018 Pivotal Software, Inc.
  ##########  Licensed under the MPL.  See http://www.rabbitmq.com/
  ######  ##
  ##########  Logs: /var/log/rabbitmq/[email protected]
                    /var/log/rabbitmq/[email protected]_upgrade.log

              Starting broker...
 completed with 3 plugins.
2) 通過guest使用者進入管理平臺
#輸入域名,預設使用者名稱和密碼為guest guest
http://192.168.174.133:15672
3) 進入管理平臺後點擊新增使用者
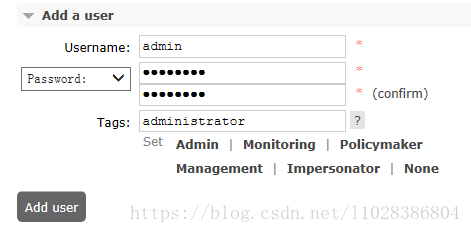
4) Add new virtual host

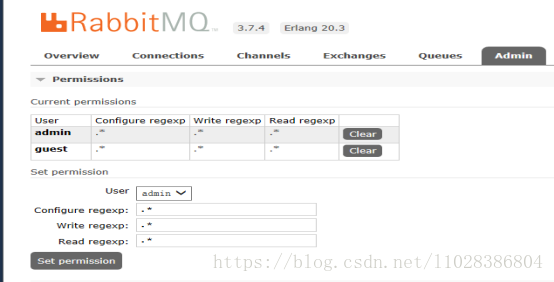
5) 授權
3、RabbitMQ入門之Hello篇
1) 引入約束
<dependencies>
<!-- https://mvnrepository.com/artifact/com.rabbitmq/amqp-client -->
        <dependency>
            <groupId>com.rabbitmq</groupId>
            <artifactId>amqp-client</artifactId>
            <version>5.1.2</version>
        </dependency>
    <dependency>
        <groupId>org.slf4j</groupId>
        <artifactId>slf4j-log4j12</artifactId>
        <version>1.7.25</version>
    </dependency>
    <dependency>
        <groupId>org.apache.commons</groupId>
        <artifactId>commons-lang3</artifactId>
        <version>3.3.2</version>
    </dependency>
    <dependency>
      <groupId>org.glassfish.web</groupId>
      <artifactId>javax.servlet.jsp.jstl</artifactId>
      <version>1.2.2</version>
    </dependency>
  </dependencies>
2) 定義工具類連線RabbitMQ
/**
 * 用於建立連線的工具類
 *
 */
public class ConnectUtil {
    public static Connection getConnection() throws Exception{
        ConnectionFactory connection=new ConnectionFactory();
        connection.setHost("192.168.174.133");//設定server地址
        connection.setPort(5672);//設定埠號,注意區分於瀏覽器中的輸入的埠為15672
        connection.setUsername("admin");
        connection.setPassword("12345678");
        connection.setVirtualHost("/admin");
        return connection.newConnection();//建立一個新的連線

    }
}
3) 定義生產者
/**
 * 測試之一:定義一個生產者
 *
 */
public class Sender {
    private final static String QUEUE="testHello";//定義佇列的名字
    public static void main(String[] args) throws Exception {
        //獲取連線
        Connection connection = ConnectUtil.getConnection();
        //建立通道
        Channel channel = connection.createChannel();
        //申明佇列
        /**
         * 申明佇列,如果佇列存在則什麼都不做,如果不存在才建立
         * 引數1:佇列名字
         * 引數2:是否持久化佇列,我們的佇列模式是在記憶體中的,如果rabbimq重啟會丟失,如果設定為true則會儲存到erlang自帶的資料庫中,重啟會重新讀取資料
         * 引數3:是否排外,有兩個作用,第一個當我們的連線關閉後是否會自動刪除佇列,作用二:私有當前佇列,如果私有了其他通道不可以訪問當前佇列,如果為true,一般是一個佇列只適用於一個消費者使用
         * 引數4:是否自動刪除
         * 引數5:我們的一些其他引數
         */
        channel.queueDeclare(QUEUE,false,false,false,null);
        //傳送佇列
        /**
         * 第一個引數:exchange交換機
         * 第二個引數:佇列名
         */
        channel.basicPublish("", QUEUE, null, "傳送的訊息".getBytes());
        //關閉連線
        channel.close();
        connection.close();
    }
}
4) 定義消費者
/**
 * 定義一個消費者
 *
 */
public class Recev {
    private final static String QUEUE = "testHello";

    public static void main(String[] args) throws Exception {
        Connection connection = ConnectUtil.getConnection();
        Channel channel = connection.createChannel();
        channel.queueDeclare(QUEUE, false, false, false, null);
        QueueingConsumer consumer = new QueueingConsumer(channel);
        //接受訊息,引數2:自動確認
        channel.basicConsume(QUEUE,true,consumer);
        //獲取訊息
        while(true){
            Delivery delivery=consumer.nextDelivery();
            String message=new String(delivery.getBody());
            System.out.println(message);
        }


    }
}
4、work模式
將訊息發給兩個消費者(將訊息傳送至訊息佇列,由兩個消費者接收),但是每次只能一個消費者接收到,一種叢集模式
1) 生產者程式碼與上保持不變
/**
 * 測試之一:定義一個生產者
 *
 */
public class Sender {
    private final static String QUEUE="testwork";//定義佇列的名字
    public static void main(String[] args) throws Exception {
        //獲取連線
        Connection connection = ConnectUtil.getConnection();
        //建立通道
        Channel channel = connection.createChannel();
        //申明佇列
        /**
         * 申明佇列,如果佇列存在則什麼都不做,如果不存在才建立
         * 引數1:佇列名字
         * 引數2:是否持久化佇列,我們的佇列模式是在記憶體中的,如果rabbimq重啟會丟失,如果設定為true則會儲存到erlang自帶的資料庫中,重啟會重新讀取資料
         * 引數3:是否排外,有兩個作用,第一個當我們的連線關閉後是否會自動刪除佇列,作用二:私有當前佇列,如果私有了其他通道不可以訪問當前佇列,如果為true,一般是一個佇列只適用於一個消費者使用
         * 引數4:是否自動刪除
         * 引數5:我們的一些其他引數
         */
        channel.queueDeclare(QUEUE,false,false,false,null);
        //傳送佇列
        /**
         * 第一個引數:exchange交換機
         * 第二個引數:佇列名
         */
        for(int i=0;i<100;i++){
            channel.basicPublish("", QUEUE, null, ("傳送的訊息"+i).getBytes());
        }
        //關閉連線
        channel.close();
        connection.close();
    }
}
2) 消費者有兩個
消費者1:
public class Recver1 {
    private final static String QUEUE="testwork";//定義佇列的名字
    public static void main(String[] args) throws Exception {
        Connection connection = ConnectUtil.getConnection();
        final Channel channel = connection.createChannel();
        channel.queueDeclare(QUEUE, false, false, false, null);

        Consumer consumer=new DefaultConsumer(channel){
            @Override
            public void handleDelivery(String consumerTag, Envelope envelope, BasicProperties properties, byte[] body)
                    throws IOException {
                //當我們收到訊息的時候呼叫
                System.out.println("消費者2收到的內容是:"+new String(body));
                try {
                    Thread.sleep(10);//模擬耗時
                } catch (InterruptedException e) {
                    // TODO Auto-generated catch block
                    e.printStackTrace();
                }
                //手動確認
                //引數2:false為確認收到訊息,true為拒絕收到訊息
                channel.basicAck(envelope.getDeliveryTag(),false);
            }

        };
        //註冊消費者,引數2為手動確認,代表我們收到訊息後需要手動告訴伺服器,我收到訊息了
        channel.basicConsume(QUEUE, false,consumer);

    }
}
消費者2
public class Recver2 {
    private final static String QUEUE="testwork";//定義佇列的名字
    public static void main(String[] args) throws Exception {
        Connection connection = ConnectUtil.getConnection();
        final Channel channel = connection.createChannel();
        channel.queueDeclare(QUEUE, false, false, false, null);
        channel.basicQos(1);//告訴伺服器,在我們沒有確認當前訊息完成之前,不要給我發新的訊息
        Consumer consumer=new DefaultConsumer(channel){
            @Override
            public void handleDelivery(String consumerTag, Envelope envelope, BasicProperties properties, byte[] body)
                    throws IOException {
                //當我們收到訊息的時候呼叫
                System.out.println("消費者1收到的內容是:"+new String(body));
                try {
                    Thread.sleep(300);//模擬機器耗時,它比第一臺接受者接收的慢
                } catch (InterruptedException e) {
                    // TODO Auto-generated catch block
                    e.printStackTrace();
                }
                //手動確認
                //引數2:false為確認收到訊息,true為拒絕收到訊息
                channel.basicAck(envelope.getDeliveryTag(),false);
            }

        };
        //註冊消費者,引數2為手動確認,代表我們收到訊息後需要手動告訴伺服器,我收到訊息了
        channel.basicConsume(QUEUE, false,consumer);

    }
}
啟動順序:先啟動兩個消費者,再啟動生產者
1)、值得注意的是:傳送者傳送100條訊息,兩個消費者接受,雖然兩個消費者都能接收到訊息,但是接收的是不同內容,可能是消費者1接受的是偶數,消費2接收的是奇數等。這裡模擬了兩臺機器處理事務效率不同(利用睡眠進行耗時操作),針對於耗時多的機器,說明其處理事務效能不強,可以利用channel.basicQos(1);設定給他分配少點的事務處理
2)、work模式用於叢集環境下,如電商下訂單處理,可以由多個伺服器接受業務,只要能接收到處理事務就行
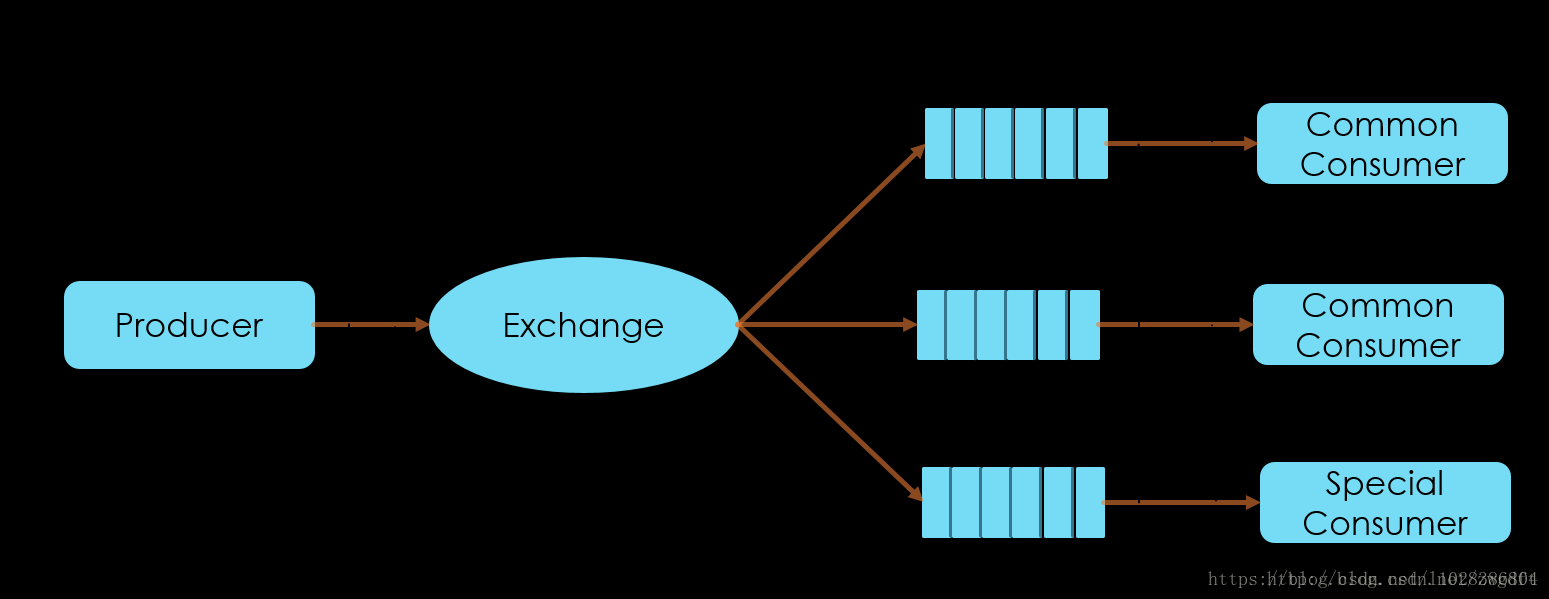
5、Publish_Subscribe釋出訂閱
生產者將訊息不再直接傳送到佇列,而是傳送到交換機,此時有不同的佇列註冊到交換機上,不同消費者註冊到不同的佇列上。此時生產者傳送的訊息,所有在交換機上註冊的消費者都能收的到
1) 生產者
public class Sender {
    private final static String EXCHANGE_NAME="testexchange";//定義交換機的名稱
    public static void main(String[] args) throws Exception{
        Connection connection = ConnectUtil.getConnection();
        Channel channel = connection.createChannel();
        //申明一個交換機
        channel.exchangeDeclare(EXCHANGE_NAME, "fanout");//定義一個交換機,型別時fanout,也就是釋出訂閱模式
        //釋出訂閱模式,因為訊息是先發送到交換機中,而交換機沒有儲存功能的,所以沒有消費者,訊息會丟失
        channel.basicPublish(EXCHANGE_NAME, "",null,"釋出訂閱模式的訊息".getBytes());
        channel.close();
        connection.close();
    }
}
2) 消費者1
public class Recve1 {
    private final static String EXCHANGE_NAME="testexchange";//定義交換機的名稱
    public static void main(String[] args) throws Exception {
        Connection connection = ConnectUtil.getConnection();
        final Channel channel = connection.createChannel();
        //申明佇列
        channel.queueDeclare("testpubqueue1",false,false,false,null);
        //繫結佇列到交換機中
        channel.queueBind("testpubqueue1", EXCHANGE_NAME, "");
        channel.basicQos(1);

        Consumer consumer=new DefaultConsumer(channel){
            @Override
            public void handleDelivery(String consumerTag, Envelope envelope, BasicProperties properties, byte[] body)
                    throws IOException {
                System.out.println("消費者1:"+new String(body));
                channel.basicAck(envelope.getDeliveryTag(), false);
            }

        };
        channel.basicConsume("testpubqueue1", false,consumer);
    }
}
3) 消費者2
public class Recve2 {
    private final static String EXCHANGE_NAME="testexchange";//定義交換機的名稱
    public static void main(String[] args) throws Exception {
        Connection connection = ConnectUtil.getConnection();
        final Channel channel = connection.createChannel();
        //申明佇列
        channel.queueDeclare("testpubqueue2",false,false,false,null);
        //繫結佇列到交換機中
        channel.queueBind("testpubqueue2", EXCHANGE_NAME, "");
        channel.basicQos(1);

        Consumer consumer=new DefaultConsumer(channel){
            @Override
            public void handleDelivery(String consumerTag, Envelope envelope, BasicProperties properties, byte[] body)
                    throws IOException {
                System.out.println("消費者2:"+new String(body));
                channel.basicAck(envelope.getDeliveryTag(), false);
            }

        };
        channel.basicConsume("testpubqueue1", false,consumer);
    }
}
第一次啟動如果報交換機不存在,說明得先啟動生產者註冊交換機,再啟動兩個消費者,啟動生成者傳送訊息應用:用於給多個機器傳送訊息,需要多方收到訊息
5、路由模式
配置交換機通過路由模式指定傳送訊息到不同的佇列
1) 傳送者
public class Sender {
    private final static String EXCHANGE_NAME="testrouter";//定義交換機的名稱
    public static void main(String[] args) throws Exception {
        Connection connection = ConnectUtil.getConnection();
        Channel channel = connection.createChannel();
        channel.exchangeDeclare(EXCHANGE_NAME, "direct");//定義路由形式的交換機
        channel.basicPublish(EXCHANGE_NAME, "Key2", null, "路由訊息".getBytes());
        channel.close();
        connection.close();
    }
}
2) 消費者1
public class Recve1 {
    private final static String EXCHANGE_NAME="testrouter";//定義交換機的名稱
    public static void main(String[] args) throws Exception {
        Connection connection = ConnectUtil.getConnection();
        final Channel channel = connection.createChannel();
        //申明佇列
        channel.queueDeclare("testrouterqueue1",false,false,false,null);
        //繫結佇列到交換機中
        //引數3:標記,繫結到交換機的時候會指定一個標記。只有和他一樣的標記的訊息才會被當前消費者收到
        channel.queueBind("testrouterqueue1", EXCHANGE_NAME, "Key1");
        //如果要接受多個標記,只需要再執行一次即可
        channel.queueBind("testrouterqueue1", EXCHANGE_NAME, "Key2");
        channel.basicQos(1);

        Consumer consumer=new DefaultConsumer(channel){
            @Override
            public void handleDelivery(String consumerTag, Envelope envelope, BasicProperties properties, byte[] body)
                    throws IOException {
                System.out.println("消費者1:"+new String(body));
                channel.basicAck(envelope.getDeliveryTag(), false);
            }

        };
        channel.basicConsume("testrouterqueue1", false,consumer);
    }
}
3) 消費者2
public class Recve2 {
    private final static String EXCHANGE_NAME="testrouter";//定義交換機的名稱
    public static void main(String[] args) throws Exception {
        Connection connection = ConnectUtil.getConnection();
        final Channel channel = connection.createChannel();
        //申明佇列
        channel.queueDeclare("testrouterqueue2",false,false,false,null);
        //繫結佇列到交換機中
        //引數3:標記,繫結到交換機的時候會指定一個標記。只有和他一樣的標記的訊息才會被當前消費者收到
        channel.queueBind("testrouterqueue2", EXCHANGE_NAME, "Key1");
        //如果要接受多個標記,只需要再執行一次即可
        channel.queueBind("testrouterqueue2", EXCHANGE_NAME, "Key3");
        channel.basicQos(1);

        Consumer consumer=new DefaultConsumer(channel){
            @Override
            public void handleDelivery(String consumerTag, Envelope envelope, BasicProperties properties, byte[] body)
                    throws IOException {
                System.out.println("消費者2:"+new String(body));
                channel.basicAck(envelope.getDeliveryTag(), false);
            }

        };
        channel.basicConsume("testrouterqueue2", false,consumer);
    }
}
原理:傳送者繫結埠號,如這裡繫結Key1,會去匹配哪個消費者綁定了該鍵,如果繫結就可以收到訊息,這裡消費者1和2都綁定了,所以都可收的到
6、topic模式
Router模式弊端:生成者必須根