
kmeans+cnn教務系統驗證碼識別
在學生成績管理的應用設計中經常會有需求場景,需要使用教務系統提供的服務,為了節約使用者的時間,有時候會提供賬號繫結的服務,即使用者提供賬號和密碼,開發者登陸教務系統,獲取其中的資訊,這個時候就需要識別驗證碼的功能。
首先第一步,獲取驗證碼資料集
從檢查元素中,我們可以得知,二維碼的連結為http://210.42.121.241/servlet/GenImg
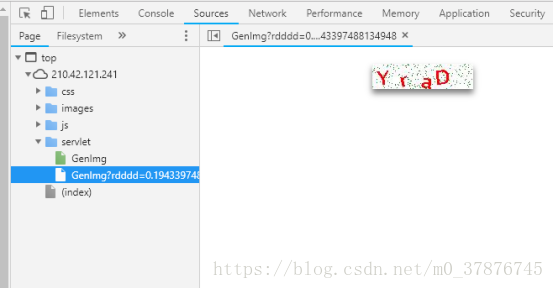
利用一個簡單的爬蟲小程式,我們就可以獲得大量的二維碼資料,見spider.py
程式碼如下
import re
import requests
import os
from bs4 import BeautifulSoup
url = 'http://210.42.121.241/servlet/GenImg'
#html = requests.get(url).text #獲取網頁內容
if not os.path.exists('image'):
os.makedirs('image')
i = 1719
for i in range(100000):
#img = requests.get(url,timeout=5)
try:
pic = requests.get(url,timeout=5) #超時異常判斷 5秒超時
except requests.exceptions.ConnectionError:
print('當前圖片無法下載')
continue
file_name = "F:/hacker/image/"+str(i)+".jpg" #拼接圖片名
print(file_name)
#將圖片存入本地
fp = open(file_name,"wb")
fp.write(pic.content) #寫入圖片
fp.close()
i+=1
執行之後可以獲取10w張的圖片
影象由四個符合組成,因此我們可以以某種方式將影象分割開以令每張影象只有一個符號。這樣的話我們只需訓練神經網路識別單個字元就行了。我們並不能手動地用 Photoshop 等影象軟體將它們分割開,因為訓練影象總共有 10萬張。此外,我們也不能將影象切分為四個等大小的影象塊,因為驗證碼生成程式會隨機地將這些不同的字元放置在不同的水平線上。
幸運的是,我們能使用已有的方法自動完成這一部分。在影象處理中,我們經常需要檢測有相同色彩的畫素塊,這些連續畫素塊的邊界可以稱之為輪廓。而 OpenCV 有一個內建的 findContours ( ) 函式可以檢測這些輪廓的區域。
然後我們將該影象轉換為純淨的黑白畫素點(即採用色彩閾值的方法),因此我們將很容易尋找到連續的輪廓邊界:
使用 OpenCV 的 findContours ( ) 函式以檢測包含連續相同畫素塊的分離部分,當然也不乏會有一些圖片出現了字元重疊在了一起,這種情況下,分離出來的圖片數目不是4個,比較容易選出來,可以直接丟棄,或者採取另外一種選擇辦法(因為驗證的時候也會遇到這種問題)
如果字元輪廓的寬要比高長一些,那麼很有可能這一個切分內就包含了兩個字元。因此我們可以將這種連體的字元拆分為兩半,並將它們視為單獨的字元。如果連的實在太緊密了,那就放棄吧,資料集還有很多
程式碼如下:
import os
import os.path
import cv2
import glob
import imutils
IMAGE_FOLDER = "F:/hacker/image2"
OUTPUT_FOLDER = "F:/hacker/letter2"
# Get a list of all the images we need to process
image_files = glob.glob(os.path.join(IMAGE_FOLDER, "*"))
counts = {}
count = 0
# loop over the image paths
for (i, image_file) in enumerate(image_files):
print("[INFO] processing image {}/{}".format(i + 1, len(image_files)))
# Since the filename contains the text (i.e. "2A2X.png" has the text "2A2X"),
# grab the base filename as the text
filename = os.path.basename(image_file)
correct_text = os.path.splitext(filename)[0]
# Load the image and convert it to grayscale
image = cv2.imread(image_file)
gray = cv2.cvtColor(image, cv2.COLOR_BGR2GRAY)
# Add some extra padding around the image
gray = cv2.copyMakeBorder(gray, 8, 8, 8, 8, cv2.BORDER_REPLICATE)
# threshold the image (convert it to pure black and white)
thresh = cv2.threshold(gray, 0, 255, cv2.THRESH_BINARY_INV | cv2.THRESH_OTSU)[1]
# find the contours (continuous blobs of pixels) the image
contours = cv2.findContours(thresh.copy(), cv2.RETR_EXTERNAL, cv2.CHAIN_APPROX_SIMPLE)
# Hack for compatibility with different OpenCV versions
contours = contours[0] if imutils.is_cv2() else contours[1]
letter_image_regions = []
# Now we can loop through each of the four contours and extract the letter
# inside of each one
for contour in contours:
# Get the rectangle that contains the contour
(x, y, w, h) = cv2.boundingRect(contour)
# Compare the width and height of the contour to detect letters that
# are conjoined into one chunk
if w / h > 1.25:
# This contour is too wide to be a single letter!
# Split it in half into two letter regions!
half_width = int(w / 2)
letter_image_regions.append((x, y, half_width, h))
letter_image_regions.append((x + half_width, y, half_width, h))
else:
# This is a normal letter by itself
letter_image_regions.append((x, y, w, h))
# If we found more or less than 4 letters in the , our letter extraction
# didn't work correcly. Skip the image instead of saving bad training data!
if len(letter_image_regions) != 4:
continue
# Sort the detected letter images based on the x coordinate to make sure
# we are processing them from left-to-right so we match the right image
# with the right letter
letter_image_regions = sorted(letter_image_regions, key=lambda x: x[0])
# Save out each letter as a single image
for letter_bounding_box, letter_text in zip(letter_image_regions, correct_text):
# Grab the coordinates of the letter in the image
x, y, w, h = letter_bounding_box
# Extract the letter from the original image with a 2-pixel margin around the edge
letter_image = gray[y - 2:y + h + 2, x - 2:x + w + 2]
# Get the folder to save the image in
save_path = os.path.join(OUTPUT_FOLDER)
# if the output directory does not exist, create it
if not os.path.exists(save_path):
os.makedirs(save_path)
# write the letter image to a file
#count = counts.get(letter_text, 1)
p = os.path.join(save_path, "{}.png".format(str(count).zfill(6)))
cv2.imwrite(p, letter_image)
# increment the count for the current key
# counts[letter_text] = count + 1
count = count+1
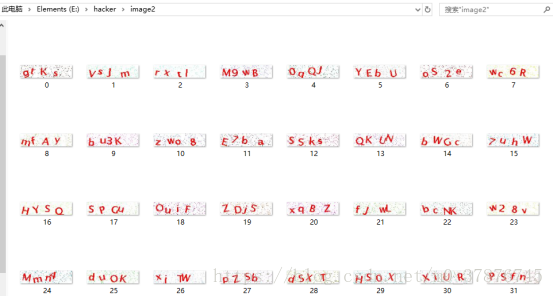
獲得的字母圖片(灰度圖)如下所示

從獲取的資料集來看,分詞效果比較不錯,接下來要面臨的是訓練以及驗證問題。
因為我們獲取到的資料是缺少label的,我們沒有辦法直接執行監督學習圖片分類。
作為無監督學習,我第一想到的方法就是kmeans分類,利用kmeans進行圖片分類
然而進行分類的效果並不是很好,其實比較好理解,在執行的時候把二維的圖片資料抽成了一列,然後每個資料樣本一列,一共分成了數字10類,大寫字母26類,小寫字母(去除了c,i,l,o,p,s,u,v,w,x,y,z)一共50種
下面的是程式碼:
import os
from imutils import paths
import numpy as np
import matplotlib.pyplot as plt
import pandas as pd
import cv2
from PIL import Image
#images = os.listdir('F://hacker//letter')
FOLOER = "E:\hacker\letter"
data = []
#num = len(images)
#digits_test = pd.read_csv('https://archive.ics.uci.edu/ml/machine-learning-databases/optdigits/optdigits.tes',header=None)
for imagefile in paths.list_images("E:\\hacker\\letter"):
#img = Image.open(imagefile)
try:
img = Image.open(imagefile) #超時異常判斷 5秒超時
except IOError:
print('當前圖片開啟失敗')
continue
img = img.resize((20,20))
img = img.convert('L')
#img = np.expand_dims(img,axis=0)
img = np.array(img).reshape(400)
data.append(img)
print(len(data))
from sklearn.cluster import KMeans
from sklearn.decomposition import PCA
kmeans = KMeans(n_clusters=50)
#pca = PCA(n_components=3) #輸出兩維
#newData = pca.fit_transform(data) #載入N維
kmeans.fit(data)
print(kmeans.labels_)
for i in range(3615) :
p = os.path.join('E://hacker//kinds//'+str(kmeans.labels_[i])+"//{}.png".format(str(i).zfill(6)))
cv2.imwrite(p, data[i].reshape(20,20))
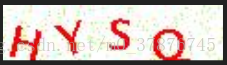
但是這種粗略簡單的方法並不是很理想,如s和5分不出來,d和p以及b分不出來,D和O分不出來,這些都是問題,因此寄希望於一個簡單的模型解決問題是不現實的
這是kmeans分出的其中一類,可以看出分類效果是很不好的

解決這個問題,我想得到了兩種解決方案,其中一個方案,利用自學習式的神經網路對資料進行降維,如SOM網路,這個後面我會繼續跟進。
另外一個方法就是進行手工的資料標註,從網路上獲取的資料可知,對字母進行學習,需要的樣本資料並不大,因此可以對資料進行標註,之後再進行有監督的學習。
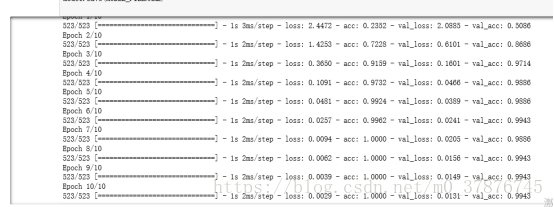
於是我從中抽取了0-9以及選取了幾種出現概率較高的圖片,每種抽取了大約50-100張的資料,利用keras構建了cnn卷積神經網路,因為我們一次只需要識別單個字元,所以並不需要一個複雜的神經網路架構,且識別這種字母與數字的任務要比其它識別複雜影象的任務簡單地多。因此我們使用了一個簡單的卷積神經網路,它一共包含兩個卷積層與兩個全連線層。

我們可以看出在僅在一共500多個訓練資料的情況下,資料的準確率能達到99.7%,因此可以說明我們得到了比較高的準確率

驗證
首先執行分詞程式,cut.py,獲取四張圖片,然後執行model.test(img)觀察結果即可
後續的工作主要集中在資料的無標籤分類上,首先的思路是使用SOM自組織網路進行特徵學習以及資料降維分類,其次是比較SVM和CNN網路的效果對比,觀察彼此的優劣,以及重構程式碼,API化,便於使用和呼叫