
Flask的上下文管理機制
前引
在瞭解flask上下文管理機制之前,先來一波必知必會的知識點。
面向物件雙下方法
首先,先來聊一聊面向物件中的一些特殊的雙下劃線方法,比如__call__、__getattr__系列、__getitem__系列。
__call__
這個方法相信大家並不陌生,在單例模式中,我們可能用到過,除此之外,還想就沒有在什麼特殊場景中用到了。我們往往忽視了它一個很特殊的用法:物件object+()或者類Foo()+()這種很特殊的用法。在Flask上下文管理中,入口就是使用了這種方式。
__getitem__系列
使用這個系列的方法時,我們最大的印象就是呼叫物件的屬性可以像字典取值一樣使用中括號([])。使用中括號對物件中的屬性進行取值、賦值或者刪除時,會自動觸發對應的__getitem__、__setitem__、__delitem__方法。


class Foo(object): def __init__(self): self.name = "boo" def __getitem__(self, item): print("呼叫__getitem__了") if item in self.__dict__: return self.__dict__[item] def __setitem__(self, key, value): print("呼叫__setitem__方法了__item__系列") self.__dict__[key] = value def __delitem__(self, key): print("呼叫__delitem__") del self.__dict__[key] foo = Foo() ret = foo["name"] # print(ret) # 輸出 呼叫__getitem__了 boo foo["age"] = 18 # print(foo["age"]) # 輸出 呼叫__setitem__方法了 呼叫__getitem__了 18del foo["age"] # 輸出 呼叫__delitem__
__getattr__系列
使用物件取值、賦值或者刪除時,會預設的呼叫對應的__getattr__、__setattr__、__delattr__方法。
物件取值時,取值的順序為:先從__getattribute__中找,第二步從物件的屬性中找,第三步從當前類中找,第四步從父類中找,第五步從__getattr__中找,如果沒有,直接丟擲異常。
class Foo(object):

    def __init__(self):
        self.name = "boo"

    def __getattr__(self, item):
        print("呼叫__getattr__了")

    def __setattr__(self, key, value):
        print("呼叫__setattr__方法了")

    def __delattr__(self, item):
        print("呼叫__delattr__")


foo = Foo()
ret = foo.xxx    # 輸出     呼叫__getattr__了
foo.age = 18    # 呼叫__setattr__方法了
del foo.age   #  輸出  呼叫__delattr__
__attr__系列
偏函式
再來說說Python中的偏函式
python中有一個小工具包functools,這個包中包含了幾個在很有用的小功能,比如:wraps:在使用裝飾器時,使用這個方法可以保護函式的元資訊。reduce:一個合併序列項為一個單一值的小方法。還有一個就是偏函式: partial
一句話來總結partial的作用,固定函式中的一些引數,返回一個新的函式,方便呼叫
from functools import partial

class Foo(object):

    def __init__(self):
        self.request = "request"
        self.session = "session"

foo = Foo()

def func(args):
    return getattr(foo,args)

re_func = partial(func,'request')
se_func = partial(func,'session')

print(re_func())
來一個複雜點的偏函式的用法
仿照flask來實現一個更復雜的
from functools import partial


class HttpRequest(object):

    def __init__(self):
        self.method = "GET"
        self.body = b"[email protected]=123"


class Foo(object):

    def __init__(self):
        self.request = HttpRequest()
        self.session = {"login":True,"is_super":False}

foo = Foo()

def func(args):
    return getattr(foo,args)

re_func = partial(func,'request')
se_func = partial(func,'session')


class LocalProxy(object):

    def __init__(self,local):
        self._local = local

    def _get_current_object(self):
        return self._local()

    def __getitem__(self, item):
        return getattr(self._get_current_object(),item)

request = LocalProxy(re_func)
ret = request._get_current_object().method
print(ret)

ret = request['method']
print(ret)

session = LocalProxy(se_func)
print(session._get_current_object())
仿flask版
threading.local
再來說一說threading.local方法
在多執行緒中,同一個程序中的多個執行緒是共享一個記憶體地址的,多個執行緒操作資料時,就會造成資料的不安全,所以我們就要加鎖。但是,對於一些變數,如果僅僅只在本執行緒中使用,怎麼辦?
方法一,可以通過全域性的字典,key為當前執行緒的執行緒ID,value為具體的值。
方法二,使用threading.local方法
threading.local 在多執行緒操作時,為每一個執行緒建立一個值,使得執行緒之間各自操作自己 的值,互不影響。
import time
import threading

local = threading.local()

def func(n):
    local.val = n
    time.sleep(5)
    print(n)

for i in range(10):
    t = threading.Thread(target=func,args=(i,))
    t.start()

# 結果輸出    0--9
threading.local示例
自定義使用threading.local的功能
import time
import threading
# from threading import current_thread as getcurrent
from greenlet import getcurrent

class Local(object):

    def __init__(self):
        object.__setattr__(self,"_storage",{})

    def __setattr__(self, key, value):

        # ident = threading.get_ident()
        ident = getcurrent()   # 定製粒度更細的
        if ident in self._storage:
            self._storage[ident][key] = value
        else:
            self._storage[ident] = {key:value}

    def __getattr__(self, item):
        # ident = threading.get_ident()
        ident = getcurrent()
        return self._storage[ident][item]

local = Local()

def func(n):
    local.val = n
    time.sleep(2)
    print(local.val)

for i in range(10):
    t = threading.Thread(target=func,args=(i,))
    t.start()
自定製更細粒度的threadinglocal
仿照flask用棧來實現自定義threading.local的存取
from greenlet import getcurrent

class Local(object):

    def __init__(self):
        object.__setattr__(self,"_storage",{})

    def __setattr__(self, key, value):

        # ident = threading.get_ident()
        ident = getcurrent()   # 定製粒度更細的
        if ident in self._storage:
            self._storage[ident][key] = value
        else:
            self._storage[ident] = {key:value}

    def __getattr__(self, item):
        # ident = threading.get_ident()
        ident = getcurrent()
        return self._storage[ident][item]


class LocalStack(object):

    def __init__(self):
        self.local = Local()

    def push(self,item):
        self.local.stack = []
        self.local.stack.append(item)

    def pop(self):
        return self.local.stack.pop()

    def top(self):
        return self.local.stack[-1]

_local_stack = LocalStack()
_local_stack.push(55)
print(_local_stack.top())  # 取棧頂元素
利用棧
預熱完畢,來一波真正的操作,不過在正戲上演之前,先來提一嘴,flask與其他python框架比如(Django、tornado)在整個請求生命週期中對於資料的管理機制的不同。django、tornado是通過傳參的形式傳遞資料,而flask是通過其特有的上下文管理機制來管理資料的。
下面進入我們今天的正題----flask的上下文管理機制。在flask中,上下文管理機制分為兩個大的部分:請求上下文和應用上下文。
flask的上下文管理機制
接下來,從以下三個大的方面分別探討flask的兩大上下文管理機制。
- 方面一:請求進來時
- 方面二:檢視函式
- 方面三:請求結束前
先來一個最簡單的flask版的Hello World
from flask import Flask

app = Flask(__name__)

@app.route('/')
def index():
    return "Hello World"

if __name__ == '__main__':
    app.run()
Flask版Hello World
啟動一個flask專案時,會先執行app.run()方法,這是整個專案的入口,執行run方法時,接著執行werkzeug模組中的run_simple

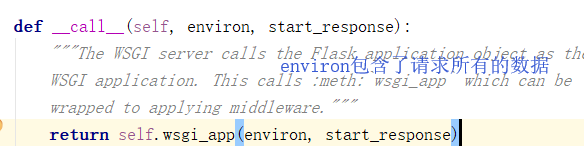
werkzeug中觸發呼叫了Flask的__call__方法
請求進來時
觸發執行__call__方法,__call__方法的邏輯很簡單,直接執行wsgi_app方法,將包含所有請求相關資料和一個響應函式傳進去。
def application(environ, start_response):
    start_response('200 OK', [('Content-Type', 'text/html')])
    return '<h1>Hello, web!</h1>'

上面的application()函式就是符合WSGI標準的一個HTTP處理函式,它接收兩個引數:

    environ:一個包含所有HTTP請求資訊的dict物件;

    start_response:一個傳送HTTP響應的函式。

在application()函式中,呼叫:

start_response('200 OK', [('Content-Type', 'text/html')])
符合wsgi協議標準的函式
備註:__call__是一個符合wsgi標準的函式
執行wsgi_app方法
def wsgi_app(self, environ, start_response):

        ctx = self.request_context(environ)
        error = None
        try:
            try:
                ctx.push()
                response = self.full_dispatch_request()
            except Exception as e:
                error = e
                response = self.handle_exception(e)
            except:
                error = sys.exc_info()[1]
                raise
            return response(environ, start_response)
        finally:
            if self.should_ignore_error(error):
                error = None
            ctx.auto_pop(error)
wsgi_app
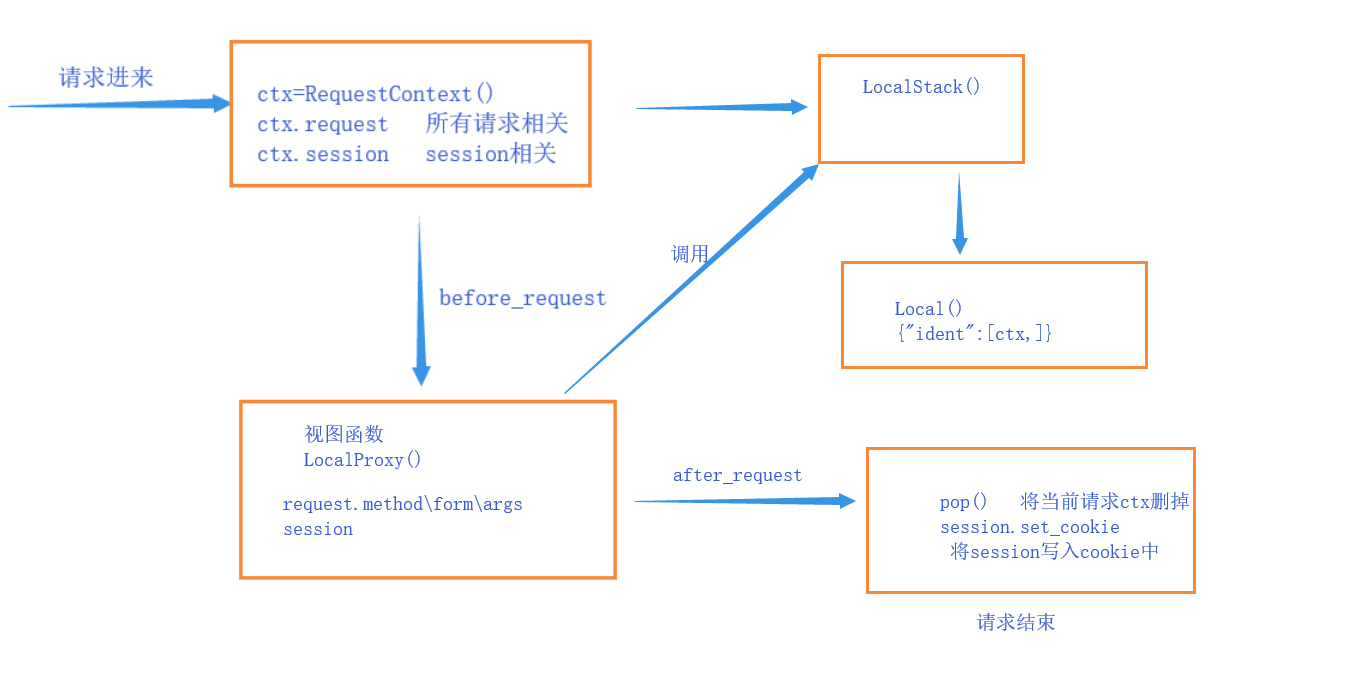
第一步先執行了一個request_context的方法,將environ傳進去,最後返回一個RequestContext類的物件,被ctx的變數接收(ctx=request_context(environ))
 def request_context(self, environ):
        """Create a :class:`~flask.ctx.RequestContext` representing a
        WSGI environment. Use a ``with`` block to push the context,
        which will make :data:`request` point at this request.

        See :doc:`/reqcontext`.

        Typically you should not call this from your own code. A request
        context is automatically pushed by the :meth:`wsgi_app` when
        handling a request. Use :meth:`test_request_context` to create
        an environment and context instead of this method.

        :param environ: a WSGI environment
        """
        return RequestContext(self, environ)
request_context方法
這個ctx物件在初始化時,賦了兩個非常有用的屬性,一個是request,一個是session
def __init__(self, app, environ, request=None):
    self.app = app
    if request is None:
        request = app.request_class(environ)
    self.request = request
    self.url_adapter = app.create_url_adapter(self.request)
    self.flashes = None
    self.session = None
這兩個屬性中request是一個Request()物件,這個物件就是我們在flask中使用的request物件,為我們提供了很多便捷的屬性和方法,比如:request.method、request.form、request.args等等,另一個屬性是session,初始為None。
緊接著執行ctx.push()方法,這個方法中,在執行請求上下文物件ctx之前先例項化了一個app_context物件,先執行了app_context的push方法,然後才執行_request_ctx_stack物件中的top和_request_ctx_stack.push(self),最後對ctx中的session進行處理。
所以,flask中的應用上下文發生在請求上下文之前。
def push(self):

        top = _request_ctx_stack.top
        if top is not None and top.preserved:
            top.pop(top._preserved_exc)

        # 在執行request_context請求上下文的push方法時,先執行了app_context應用上下文的push方法
        app_ctx = _app_ctx_stack.top
        if app_ctx is None or app_ctx.app != self.app:
            app_ctx = self.app.app_context()
            app_ctx.push()
            self._implicit_app_ctx_stack.append(app_ctx)
        else:
            self._implicit_app_ctx_stack.append(None)

        if hasattr(sys, 'exc_clear'):
            sys.exc_clear()

        # 然後執行請求上下文物件中LocalStack物件的push方法
        _request_ctx_stack.push(self)

        # 最後處理session
        if self.session is None:
            session_interface = self.app.session_interface
            self.session = session_interface.open_session(
                self.app, self.request
            )

            if self.session is None:
                self.session = session_interface.make_null_session(self.app)
在ctx.push方法的執行邏輯
但是我們先說請求上下文,在處理完應用上下文的push方法後,緊接著執行了_request_ctx_stack物件的兩個方法。
而這個_request_ctx_stack是LocalStack這個類的物件。_request_ctx_stack = LocalStack()
LocalStack有沒有很眼熟,沒錯,flask內部使用的機制就是類似於我們上文中自定義的LocalStack的機制,例項化過程中使用了面向物件中的組合概念,self._local = Local(),然後在自身又實現了push、pop、top方法,這三個方法中都是通過反射從Local類的例項化物件中對一個stack屬性進行append、pop、[-1]的操作,所以,Local物件中的stack屬性對應的值一定是一個類似於列表的東西。通過對列表的操作,實現一個類似於棧的存取。
接著聊聊這個Local類,在例項化時,會對每個物件生成一個storage的空字典。我們翻遍整個Local類的原始碼,發現內部並沒有實現一個叫stack的方法或者屬性,但是上面我們提到了LocalStack物件會對Local物件中的一個叫stack的東西進行一系列操作。找不到不會報錯嗎?
這就是flask的巧妙之處,通過類的一些魔法方法巧妙的實現了相應的處理。在前引中,提到如果物件中沒有某個屬性,取值時,最終會執行類中的__getattr__方法,然後再做後續的異常處理,flask將所有的對應邏輯都實現在了類的__getattr__方法中,將每一個執行緒儲存到字典中,在請求進來時,將每一個對應的請求ctx存在一個列表中,使用時直接呼叫,而不是通過傳參的形式,更體現出了flask框架的輕量級。
處理完_request_ctx_stack後,就該處理session了。
在flask中,處理session時,非常的巧妙,完美的遵循了開閉原則,會先執行session_interface物件的open_session方法,在這個方法中,會先從使用者請求的cookie中獲取sessionid,獲取該使用者之前設定的session值,然後將值賦值到ctx.session中。
處理完session後,ctx.push方法就執行完了,返回到最開始的app.wsgi_app方法中,執行完push方法後,接著執行full_dispatch_request方法,從這個名字中我們也能猜到,這個方法只要是負責請求的分發。
def full_dispatch_request(self):

            self.try_trigger_before_first_request_functions()
            try:
                request_started.send(self)
                rv = self.preprocess_request()
                if rv is None:
                    rv = self.dispatch_request()
            except Exception as e:
                rv = self.handle_user_exception(e)
            return self.finalize_request(rv)
full_dispath_request方法
在full_dispatch_request方法中先執行preprocess_request方法,這個方法,會先執行所有被before_request裝飾器裝飾的函式,然後就通過路由的分發執行檢視函數了(dispatch_request)
執行檢視函式時
在執行檢視函式之前,先執行了before_request,在執行我們的檢視函式。
檢視函式主要處理業務邏輯。在檢視函式中可以呼叫request物件,進行取值,也可以呼叫session物件對session的存取。
在整個request的請求生命週期中,獲取請求的資料直接呼叫request即可,對session進行操作直接呼叫session即可。request和session都是LocalProxy物件,藉助偏函式的概念將對應的值傳入_lookup_req_object函式。先從_request_ctx_stack(LocalStack)物件中獲取ctx(請求上下文物件),再通過反射分別獲取request和session屬性。整個過程中LocalStack扮演了一個全域性倉庫的角色,請求進來將資料存取,需要時即去即用。所以,flask實現了在整個請求的生命週期中哪兒需要就直接呼叫的特色。
request = LocalProxy(partial(_lookup_req_object, 'request'))
session = LocalProxy(partial(_lookup_req_object, 'session'))
請求結束前
檢視函式執行完後,dispatch_request執行結束,執行full_dispatch_request方法的返回值finalize_request方法。這個方法中,同樣的,在返回響應之前,先執行所有被after_request裝飾器裝飾的函式。
---->finalize_request ------> process_response
 def process_response(self, response):

        ctx = _request_ctx_stack.top
        bp = ctx.request.blueprint
        funcs = ctx._after_request_functions
        if bp is not None and bp in self.after_request_funcs:
            funcs = chain(funcs, reversed(self.after_request_funcs[bp]))
        if None in self.after_request_funcs:
            funcs = chain(funcs, reversed(self.after_request_funcs[None]))
        for handler in funcs:
            response = handler(response)
        if not self.session_interface.is_null_session(ctx.session):
            self.session_interface.save_session(self, ctx.session, response)
        return response
process_response
執行process_response過程中,執行完after_request後,然後,執行session的save_session方法。將記憶體中儲存在ctx.session的值取到後,json.dumps()序列化後,寫入響應的cookie中(set_cookie),最後返回響應。
    def save_session(self, app, session, response):
        domain = self.get_cookie_domain(app)
        path = self.get_cookie_path(app)

        # If the session is modified to be empty, remove the cookie.
        # If the session is empty, return without setting the cookie.
        if not session:
            if session.modified:
                response.delete_cookie(
                    app.session_cookie_name,
                    domain=domain,
                    path=path
                )

            return

        # Add a "Vary: Cookie" header if the session was accessed at all.
        if session.accessed:
            response.vary.add('Cookie')

        if not self.should_set_cookie(app, session):
            return

        httponly = self.get_cookie_httponly(app)
        secure = self.get_cookie_secure(app)
        samesite = self.get_cookie_samesite(app)
        expires = self.get_expiration_time(app, session)
        val = self.get_signing_serializer(app).dumps(dict(session))
        # set_cookie將session寫入響應的cookie中
        response.set_cookie(
            app.session_cookie_name,
            val,
            expires=expires,
            httponly=httponly,
            domain=domain,
            path=path,
            secure=secure,
            samesite=samesite
        )
save_session
返回響應後,自動的呼叫ctx.auto_pop(error),將Local中儲存的ctx物件pop掉,整個請求結束。
請求上下文的執行流程:
應用上下文
與請求上下文類似,當請求進來時,先例項化一個AppContext物件app_ctx,在例項化的過程中,提供了兩個有用的屬性,一個是app,一個是g。self.app就是傳入的全域性的app物件,self.g是一個全域性的儲存值的物件。接著將這個app_ctx存放到LocalStack()。
class AppContext(object):
def __init__(self, app):
self.app = app
self.url_adapter = app.create_url_adapter(None)
self.g = app.app_ctx_globals_class()
檢視函式中,我們就可以呼叫app物件和g物件,如果我們使用藍圖構建我們的專案時,在每一個直接引用app就會造成迴圈引用的異常,這時,應用上下文就會顯得非常有用,我們可以直接呼叫current_app就可以在整個生命週期中使用我們的app物件了。比如使用我們的配置項:current_app.config
current_app = LocalProxy(_find_app)
最後,當檢視函式執行結束後,從storage中pop掉app_ctx物件。
from flask import Flask,request,session,g

app = Flask(__name__)  # type:Flask

@app.before_request
def auth_demo():
    g.val = 123

@app.route('/')
def index():
    print(g.val)
    return "Hello World"

if __name__ == '__main__':
    app.run()
g的簡單使用示例
總結:flask中的上下文管理機制分為請求上下文和應用上下文兩大方面,通過上下文的管理機制,實現了即去即用的一個特色。