MHA-Atlas-MySQL高可用 上(6)
阿新 • • 發佈:2018-11-25
1.簡介
1.1 軟體介紹
- MHA(Master High Availability)目前在MySQL高可用方面是一個相對成熟的解決方案,作為MySQL高可用性環境下故障切換和主從提升的高可用軟體。在MySQL故障切換過程中,MHA能做到0~30秒之內欄位完成資料庫的故障切換,並且在進行故障切換過程中MHA能最大程度保證資料庫的一致性,以達到真正意義上的高可用。
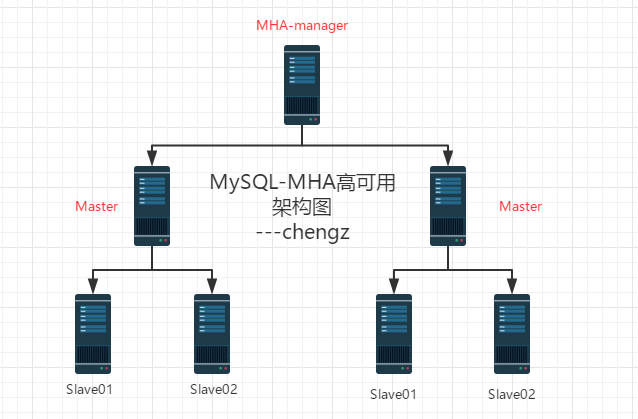
- MHA由兩部分組成:MHA Manager(管理節點)和MHA Node(資料節點)。
MHA Manager可以獨立部署在一臺獨立的機器上管理多個Master-Slave叢集,也可以部署在一臺Slave上。當Master出現故障時,它可以自動將最新資料的Slave提升為新的Master,然後將所有其他的Slave重新指向新的Master。整個故障轉移過程對應程式是完全透明的。
1.2 工作流程
-
從宕機崩潰的master儲存二進位制日誌事件(binlog events);
-
識別含有最新更新的slave;
-
應用差異的中繼日誌(relay log)到其他的slave;
-
應用從master儲存的二進位制日誌事件(binlog events);
-
提升一個slave為新的master;
-
使其他的slave連線新的master進行復制;
1.複製主庫binlog日誌出來
2.找出relaylog日誌最全的從庫
3.將最全的relaylog日誌在所有從庫中同步(第一次資料同步)
4.將之前最全的那個從庫提升為主庫
5.將複製出來的binlog日誌,放到新提升的主庫裡
6.其他所有從庫重新指向新提升的主庫,繼續主從複製
1.3 MHA工具介紹
MHA軟體由兩部分組成,Manager工具包和Node工具包,如下:
#Manager工具包主要包括以下幾個工具:masterha_check_ssh #檢查MHA的SSH配置狀況masterha_check_repl #檢查MySQL複製狀況masterha_check_status #檢測當前MHA執行狀態masterha_master_monitor #檢測master是否宕機masterha_manger #啟動MHAmasterha_master_switch #控制故障轉移(自動或者手動)masterha_conf_host #新增或刪除配置的server資訊masterha_secondary_check #試圖建立TCP連線從遠端伺服器masterha_stop #停止MHA#Node工具包主要包括以下幾個工具:save_binary_logs #儲存和複製master的二進位制日誌apply_diff_relay_logs #識別差異的中繼日誌事件filter_mysqlbinlog #去除不必要的ROLLBACK事件purge_relay_logs #清除中繼日誌
1.4 MHA架構圖

2.MySQL-MHA準備工作
2.1 實驗環境:
| 主機名 | IP地址(NAT) | 描述 |
|---|---|---|
| mysql-master | eth0:192.168.200.131 | 系統:CentOS6.5(6.x都可以) 安裝:mysql5.6 |
| mysql-slaveA | eth0:192.168.200.145 | 系統:CentOS6.5(6.x都可以) 安裝:mysql5.6 |
| mysql-slaveB | eth0:192.168.200.146 | 系統:CentOS6.5(6.x都可以) 安裝:mysql5.6 |
2.2 準備軟體包
(1)mha管理節點安裝包:
mha4mysql-manager-0.56-0.el6.noarch.rpm
mha4mysql-manager-0.56.tar.gz
(2)mha node節點安裝包:
mha4mysql-node-0.56-0.el6.noarch.rpm
mha4mysql-node-0.56.tar.gz
(3) mysql中介軟體:
Atlas-2.2.1.el6.x86_64.rpm
(4) mysql原始碼安裝包
mysql-5.6.17-linux-glibc2.5-x86_64.tar
2.3 主機名對映
[[email protected] etc]# cat /etc/hosts127.0.0.1 localhost localhost.localdomain localhost4 localhost4.localdomain4::1 localhost localhost.localdomain localhost6 localhost6.localdomain6192.168.200.131 MySQL-Master192.168.200.145 MySQL-SlaveA192.168.200.146 MySQL-SlaveB
2.4 關閉selinux和iptables
[[email protected] ~]# vim /etc/sysconfig/selinux[[email protected] ~]# cat /etc/sysconfig/selinux | grep -v "#"SELINUX=disabledSELINUXTYPE=targeted[[email protected] ~]# setenforce 0[[email protected] ~]# service iptables stopiptables: Setting chains to policy ACCEPT: filter [ OK ]iptables: Flushing firewall rules: [ OK ]iptables: Unloading modules: [ OK ][[email protected] ~]# chkconfig iptables off
3.Mysql環境搭建
3.1 環境檢查
mysql-master
#系統版本[[email protected] bin]# cat /etc/redhat-releaseCentOS release 6.5 (Final)[[email protected] bin]# uname -r2.6.32-431.el6.x86_64[[email protected] bin]# hostname -I192.168.0.51
mysql-slaveA
#系統版本[[email protected] ~]# cat /etc/redhat-releaseCentOS release 6.5 (Final)[[email protected] ~]# uname -r2.6.32-431.el6.x86_64[[email protected] ~]# hostname -I192.168.0.52
mysql-slaveB
#系統版本[[email protected] ~]# cat /etc/redhat-releaseCentOS release 6.5 (Final)[[email protected] ~]# uname -r2.6.32-431.el6.x86_64[[email protected] ~]# hostname -I192.168.0.53
3.2 安裝mysql
3.2.1 安裝3臺
[[email protected] ~]# yum -y install ncurses-devel libaio[[email protected] ~]# tar xf mysql-5.6.17-linux-glibc2.5-x86_64.tar.gz -C /usr/local/[[email protected] ~]# ln -s /usr/local/mysql-5.6.17-linux-glibc2.5-x86_64 /usr/local/mysql[[email protected] ~]# useradd mysql -s /sbin/nologin -M[[email protected] ~]# /usr/local/mysql/scripts/mysql_install_db --user=mysql --basedir=/usr/local/mysql --datadir=/usr/local/mysql/data/[[email protected] ~]# /bin/cp /usr/local/mysql/support-files/my-default.cnf /etc/my.cnf[[email protected] ~]# /bin/cp /usr/local/mysql/support-files/mysql.server /etc/init.d/mysqld[[email protected] ~]# ln -s /usr/local/mysql/bin/* /usr/local/bin/[[email protected] ~]# which mysqladmin/usr/local/bin/mysqladmin
3.2.2 加入開啟自啟動mysql
[[email protected] ~]# chkconfig mysqld on[[email protected] ~]# chkconfig mysqld --listmysqld 0:off 1:off 2:on 3:on 4:on 5:on 6:off[[email protected] ~]# /etc/init.d/mysqld startStarting MySQL. SUCCESS!
3.2.3 配置密碼
[[email protected] ~]# mysqladmin -uroot password '111111'
4.配置基於FTID的主從複製
4.1 先決條件
- 主庫和從庫都要開啟binlog
- 主庫和從庫server-id不同
- 要有主從複製使用者
4.2 主庫操作(mysql-master)
4.2.1 修改配置檔案
#修改主庫配置檔案/etc/my.cnf[[email protected] mysql]# cat /etc/my.cnf[client]socket = /usr/local/mysql/data/mysql.sock[mysqld]lower_case_table_names = 1default-storage-engine = InnoDBport = 3306datadir = /usr/local/mysql/datacharacter-set-server = utf8socket = /usr/local/mysql/data/mysql.socklog_bin = mysql-bin #開啟binlog日誌server_id = 1 #設定server_idinnodb_buffer_pool_size = 200Mslave-parallel-workers = 8thread_cache_size = 600back_log = 600slave_net_timeout = 60max_binlog_size = 512Mkey_buffer_size = 8Mquery_cache_size = 64Mjoin_buffer_size = 2Msort_buffer_size = 2Mquery_cache_type = 1thread_stack = 192K#重啟動MySQL服務[[email protected] mysql]# /etc/init.d/mysqld restartShutting down MySQL.. SUCCESS!Starting MySQL. SUCCESS!
4.2.2 登陸MySQL刪除不必要的使用者並建立主從複製使用者
(1)刪除不必要的使用者
mysql> select user,host from mysql.user;+------+-----------------------+| user | host |+------+-----------------------+| root | 127.0.0.1 || root | ::1 || | localhost || root | localhost || | localhost.localdomain || root | localhost.localdomain |+------+-----------------------+6 rows in set (0.00 sec)mysql> drop user [email protected]'127.0.0.1';Query OK, 0 rows affected (0.00 sec)mysql> drop user [email protected]'::1';Query OK, 0 rows affected (0.00 sec)mysql> drop user ' '@'localhost';Query OK, 0 rows affected (0.00 sec)mysql> drop user ' '@'mysql-db01';Query OK, 0 rows affected (0.00 sec)mysql> select user,host from mysql.user;+------+-----------------------+| user | host |+------+-----------------------+| root | localhost || root | localhost.localdomain |+------+-----------------------+2 rows in set (0.00 sec)
(2)建立主從複製使用者
mysql> grant replication slave on *.* to [email protected]'192.168.200.%' identified by '111111';Query OK, 0 rows affected (0.00 sec)mysql> select user,host from mysql.user;+------+------------------------+| user | host |+------+------------------------+| rep | 192.168.0.% || root | localhost || root | localhost.localdomain |+------+------------------------+3 rows in set (0.00 sec)mysql> show grants for [email protected]'192.168.0.%';+----------------------------------------------------------------------------------------------------------------------------+| Grants for [email protected].168.200.% |+----------------------------------------------------------------------------------------------------------------------------+| GRANT REPLICATION SLAVE ON *.* TO 'rep'@'192.168.200.%' IDENTIFIED BY PASSWORD '*FD571203974BA9AFE270FE62151AE967ECA5E0AA' |+----------------------------------------------------------------------------------------------------------------------------+1 row in set (0.00 sec)
4.3 從庫操作(mysql-slaveA和mysql-B)
4.3.1 修改配置檔案
#slaveA和slaveB 兩個配置檔案只有一處不一樣,都是這個配置檔案修改[[email protected] ~]# cat /etc/my.cnf[client]socket = /usr/local/mysql/data/mysql.sock[mysqld]lower_case_table_names = 1default-storage-engine = InnoDBport = 3306datadir = /usr/local/mysql/datacharacter-set-server = utf8socket = /usr/local/mysql/data/mysql.socklog_bin = mysql-bin #從binlog也要開啟server_id = 5 #僅需修改此項 A是5 B是10innodb_buffer_pool_size = 200Mslave-parallel-workers = 8thread_cache_size = 600back_log = 600slave_net_timeout = 60max_binlog_size = 512Mkey_buffer_size = 8Mquery_cache_size = 64Mjoin_buffer_size = 2Msort_buffer_size = 2Mquery_cache_type = 1thread_stack = 192K[[email protected] ~]# /etc/init.d/mysqld restart #重啟mysqlShutting down MySQL.. SUCCESS!Starting MySQL. SUCCESS!
特別說明:
在以往如果是基於binlog日誌的主從複製,則必須要記住主庫的master狀態資訊。
但是在MySQL5.6版本里多了一個Gtid的功能,可以自動記錄主從複製位置點的資訊,並在日誌中輸出出來。
4.4 開啟GTID
#沒開啟之前先看一下GTID狀態mysql> show global variables like '%gtid%';+--------------------------+-------+| Variable_name | Value |+--------------------------+-------+| enforce_gtid_consistency | OFF || gtid_executed | || gtid_mode | OFF || gtid_owned | || gtid_purged | |+--------------------------+-------+5 rows in set (0.00 sec)
編輯mysql配置檔案(主庫從庫都需要修改)
[[email protected] ~]# vim /etc/my.cnf[client]socket = /usr/local/mysql/data/mysql.sock[mysqld]gtid_mode =ON #這行修改log_slave_updates #這行修改enforce_gtid_consistency #這行修改lower_case_table_names = 1default-storage-engine = InnoDBport = 3306datadir = /usr/local/mysql/datacharacter-set-server = utf8socket = /usr/local/mysql/data/mysql.socklog_bin = mysql-binserver_id = 1innodb_buffer_pool_size = 200Mslave-parallel-workers = 8thread_cache_size = 600back_log = 600slave_net_timeout = 60max_binlog_size = 512Mkey_buffer_size = 8Mquery_cache_size = 64Mjoin_buffer_size = 2Msort_buffer_size = 2Mquery_cache_type = 1thread_stack = 192K
修改完配置檔案以後重啟動資料庫(主從庫都重啟資料庫)
[[email protected] ~]# /etc/init.d/mysqld restartShutting down MySQL.. SUCCESS!Starting MySQL. SUCCESS!
再次檢視GTID狀態
[[email protected] ~]# vim /etc/my.cnf[[email protected] ~]# /etc/init.d/mysqld restartShutting down MySQL.. SUCCESS!Starting MySQL. SUCCESS![[email protected] ~]# mysql -uroot -p111111Warning: Using a password on the command line

