
Jenkins+Git+Gitlab+Ansible實現持續整合自動化部署動態網站(二)--技術流ken
專案前言
在上一篇部落格《Jenkins+Git+Gitlab+Ansible實現持續化整合一鍵部署靜態網站(一)--技術流ken》中已經詳細講解了如何使用這四個工具來持續整合自動化部署一個靜態的網站。
如果大家可以熟練掌握以上內容,勢必會在工作中減輕不小的工作量。
本篇部落格將再次使用這四個工具結合freestyle和pipeline來完成動態網站的部署。
為了拓寬知識點,本篇部落格將使用jenkins的兩種常用方法來進行部署,如果你對pipeline還不熟悉,請參考我之前的部落格《Jenkins憑證及任務演示-pipeline(二)--技術流ken》。
雖說freestyle也可完成相同的操作,而且操作簡單,但是freestyle只是適合伺服器量很少的場景50-100臺左右。如果你管理了百臺、千臺伺服器勢必會用到pipeline進行批量化操作。
所以pipeline來還是應該深入去研究一下的,雖說確實有困難,但是因為它的格式相對固定單一,也不是可望而不可及。多學多練多總結。
有關持續整合自動化部署系列差不多寫了有十篇左右了。本篇部落格將是這一系列的最後一篇,接下來會更新docker及k8s系列。敬請期待。
專案需求
需求一.、使用gitlab建立專案
需求二、 使用ansible的roles實現一鍵化部署wordpress
每次部署需要備份之前的網站資料
使用roles
使用templates
指令碼對網站監控檢測
需求三、 完成之後專案上傳至gitlab
需求四、使用jenkins實現專案的持續整合
專案環境準備
centos7
Gitlab伺服器: 10.220.5.137
Ansible伺服器: 10.220.5.139
wordpress伺服器1: 10.220.5.138
防火牆以及selinux關閉狀態
Gitlab建立專案
有關專案的建立我這裡就不再贅述,大家可以參考我之前的部落格《Gitlab在linux/windows中免密使用(二)--技術流ken》
我就直接拿我之前建立好的專案進行演示
Git下載遠端倉庫內容
在ansible伺服器10.220.5.139上面操作
第一步:建立目錄並clone遠端倉庫內容
[[email protected] ~]# mkdir t
[[email protected] ~]# cd t
[[email protected] t]# git clone http://10.220.5.137/webg1/wordpress.git
Cloning into 'wordpress'...
Username for 'http://10.220.5.137': root
Password for 'http://[email protected]':
remote: Counting objects: 1062, done.
remote: Compressing objects: 100% (969/969), done.
remote: Total 1062 (delta 68), reused 1042 (delta 68)
Receiving objects: 100% (1062/1062), 4.15 MiB | 0 bytes/s, done.
Resolving deltas: 100% (68/68), done.
[[email protected] t]# ls
wordpress
Ansible劇本的編寫
第一步:建立相關目錄
在ansible伺服器端操作
[[email protected] ~]# mkdir /project/roles/wordpress/{vars,tasks,files,templates} -pv
第二步:編寫templates模版

  [[email protected] ~]# cp /etc/httpd/conf/httpd.conf /project/roles/wordpress/templates/httpd.conf.j2
  [[email protected] ~]# grep -v -E '^#|^$| +#' /project/roles/wordpress/templates/httpd.conf.j2
  ServerRoot "/etc/httpd"
  Listen {{ port }}    #定義成變數
  Include conf.modules.d/*.conf
  User {{ user }}       #定義成變數
  Group apache
  ServerAdmin [email protected]
  ServerName {{ ansible_eth0.ipv4.address }}  #引用內建變數
  DocumentRoot {{ root }}               #定義成變數
第三步:編輯hosts配置檔案
[[email protected] project]# vim /etc/ansible/hosts
[devser]
10.220.5.139
第四步:編寫測試檔案
[[email protected] project]# vim roles/wordpress/files/index.php
<?php
phpinfo();
?>
第五步:編寫網站健康監測指令碼
[[email protected] project]# cd roles/wordpress/files/
[[email protected] files]# ls
[[email protected] files]# vim check.sh
[[email protected] files]# cat check.sh
#!/bin/bash
URL=$1
PORT=$2
curl -I http://$1:$2/index.php | grep "200 OK" &>/dev/null
if [ $? -eq 0 ];then
    echo "$1 status is ok"
else
    echo "$1 status is not ok"
fi
第六步:編寫tasks下的檔案
[[email protected] wordpress]# cat tasks/main.yml
######## 安裝 httpd php mysql ###############
- name: install httpd
  yum: name=httpd state=present
- name: install mysql
  yum: name=mariadb-server state=present
- name: install php
  shell: yum install php php-mysql -y
######## 配置httpd #########################
- name: make configrantion file
  template: src=httpd.conf.j2 dest=/etc/httpd/conf/httpd.conf
- name: install test page
  copy: src=index.php dest={{ root }}
######## 啟動服務 ####################
- name: start httpd
  service: name=httpd state=restarted
- name: start mysql
  service: name=mariadb state=restarted
######### 檢查部署結果是否正常 ##########
- name: make health check
  shell: sh roles/wordpress/files/check.sh {{ ansible_eth0.ipv4.address }} {{ port }}
  delegate_to: localhost
  register: health_status
- debug: msg="{{ health_status.stdout }}"
########## 從gitlab拉取程式碼 #################
- name: backup old files
  shell: mv {{ root }} {{ backup_to }}
- name: close ssl authtication
  shell: git config --global http.sslVerify false
- name: git clone wordpress from gitlab
  git: "repo=http://{{ gitlab_user }}:{{ gitlab_pass }}@10.220.5.137/webg1/wordpress.git dest={{ root }} version=master"
第七步:編寫vars下的檔案
[[email protected] ~] # cat /project/roles/wordpress/vars/main.yml
port: 82
user: apache
root: /var/www
gitlab_user: root
gitlab_pass: 12345678
第八步:編輯劇本
劇本一定要和roles在同一個目錄之中
執行劇本的時候也要在roles同級目錄下執行
[[email protected] ~]# vim /project/wordpress.yaml
- hosts: all
  vars:
     backup_to: "{{ root }}_{{ ansible_date_time.epoch }}"
  roles:
   - wordpress
第九步:一鍵部署wordpress
[[email protected] ~]# cd /project/
[[email protected] project]# ansible-playbook -i inventory/dev dev.yaml
第十步:檢視執行結果
可以發現沒有報錯
[[email protected] project]# ansible-playbook -i inventory/den dev.yaml
 [WARNING]: Found variable using reserved name: port


PLAY [all] ***********************************************************************

TASK [Gathering Facts] ***********************************************************
ok: [10.220.5.138]

TASK [wordpress : install httpd] *************************************************
ok: [10.220.5.138]

TASK [wordpress : install mysql] *************************************************
ok: [10.220.5.138]

TASK [wordpress : install php] ***************************************************
 [WARNING]: Consider using the yum module rather than running yum.  If you need
to use command because yum is insufficient you can add warn=False to this command
task or set command_warnings=False in ansible.cfg to get rid of this message.

changed: [10.220.5.138]

TASK [wordpress : make configrantion file] ***************************************
ok: [10.220.5.138]

TASK [wordpress : install test page] *********************************************
ok: [10.220.5.138]

TASK [wordpress : start httpd] ***************************************************
changed: [10.220.5.138]

TASK [wordpress : start mysql] ***************************************************
ok: [10.220.5.138]

TASK [wordpress : make health check] *********************************************
changed: [10.220.5.138 -> localhost]

TASK [wordpress : debug] *********************************************************
ok: [10.220.5.138] => {
    "msg": "10.220.5.138 status is ok"
}

TASK [wordpress : backup old files] **********************************************
changed: [10.220.5.138]

TASK [wordpress : close ssl authtication] ****************************************
changed: [10.220.5.138]

TASK [wordpress : git clone wordpress from gitlab] *******************************
changed: [10.220.5.138]

PLAY RECAP ***********************************************************************
10.220.5.138               : ok=13   changed=6    unreachable=0    failed=0
資料上傳至Gitlab
第一步:上傳所以資料至遠端gitlab
[[email protected] project]# cd ..
[[email protected] wordpress]# ls
da  project  wordpress
[[email protected] wordpress]# ls -a
.  ..  da  .git  project  wordpress
[[email protected] wordpress]# git add .
[[email protected] wordpress]# git commit -m "v3"
[master e533bc1] v3
 2 files changed, 3 insertions(+)
 create mode 100644 project/dev.retry
 create mode 100644 project/inventory/den
[[email protected] wordpress]# git push
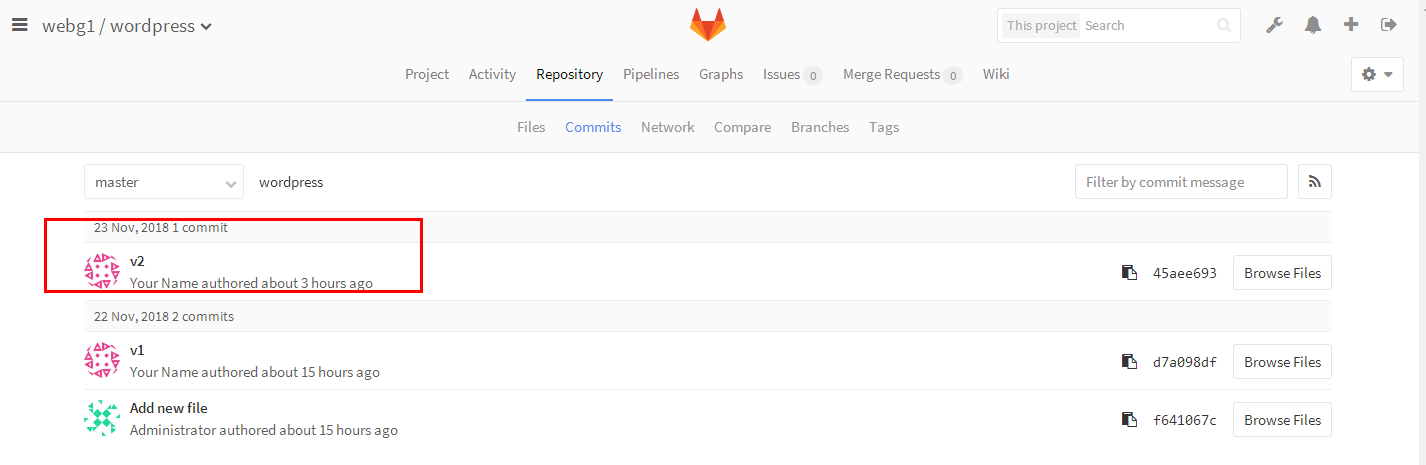
第二步:web端檢視
可以看到現在已經有了我們剛才已經上傳的v3版本了

Jenkins端實現持續整合部署--freestyle
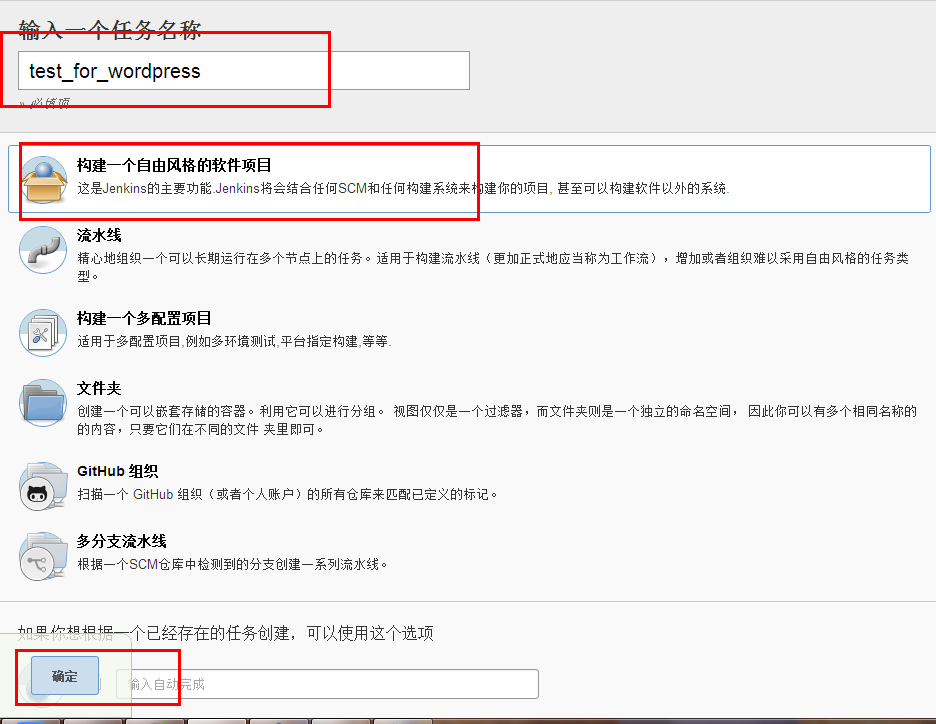
第一步:建立一個freestyle的任務
第二步:填寫gitlab倉庫資訊

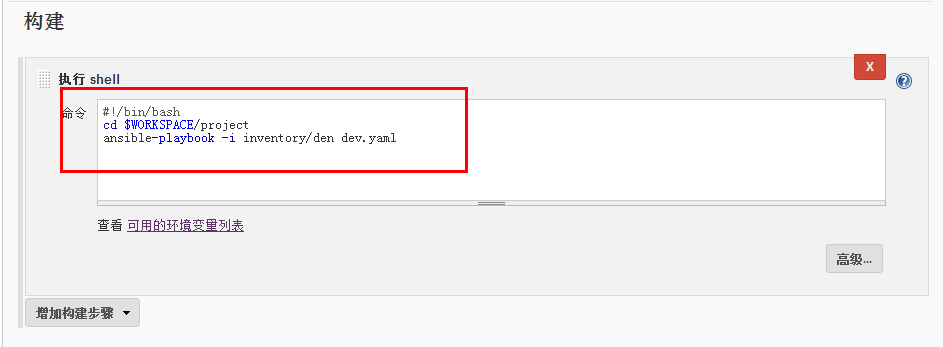
第三步:構建shell
填寫如下資訊並儲存
這裡之所以要先cd到工作目錄下的project是因為要找到dev.yaml劇本
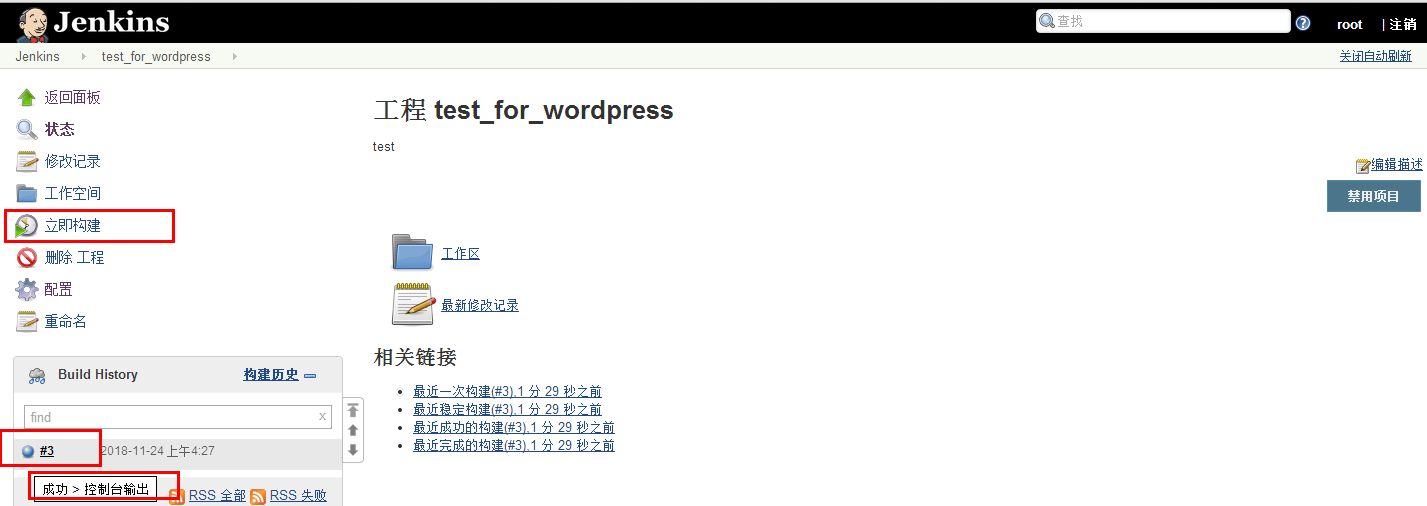
第四步:開始構建
可以發現已經部署完成
Jenkins端實現持續整合部署--pipeline
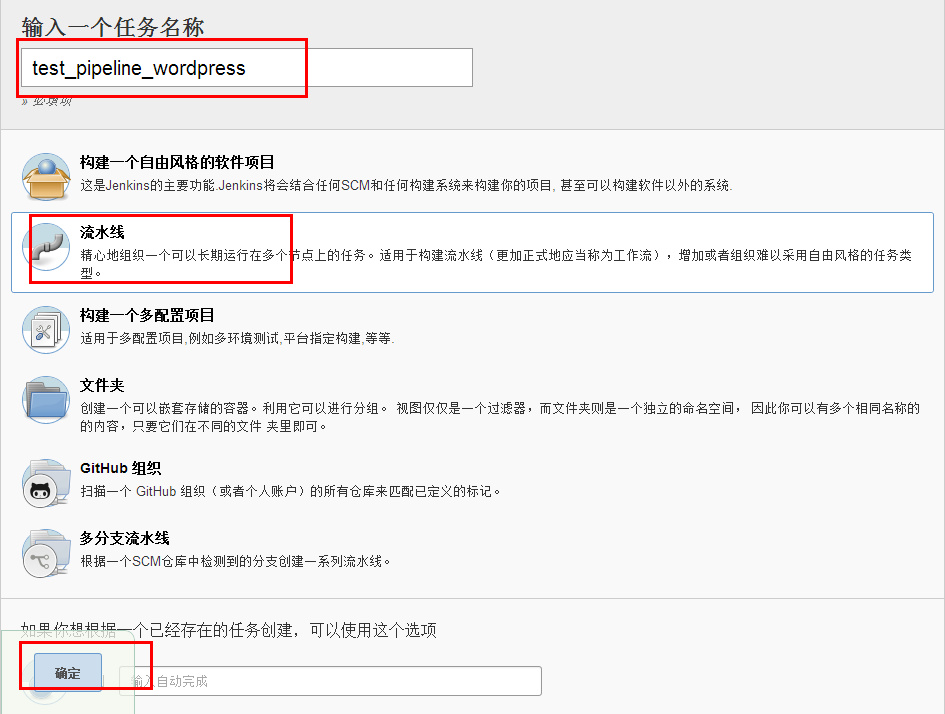
第一步:建立一個流水線即pipeline任務
第二步:編寫pipeline
如果你是複製的下面的程式碼請務必更改你的git路徑以及指定你的憑證ID
#!groovy

pipeline {
 agent {node {label 'master'}}

 environment {
  PATH="/bin:/sbin:/usr/bin:/usr/sbin:/usr/local/bin"
 }

 parameters {
  choice(
   choices: 'dev\nrprod',
   description: 'Choose deploy environment',
   name: 'deploy_env'
  )
  string (name: 'branch', defaultValue: 'master', description: 'Fill in your ansible repo branch')
 }

 stages {
  stage ("Pull deploy code") {
   steps{
    sh 'git config --global http.sslVerify false'
    dir ("${env.WORKSPACE}"){
     git branch: 'master', credentialsId: '527d840a-ad47-4a16-bfa1-c6eab88a3563', url: 'http://10.220.5.137/webg1/wordpress.git'
    }
   }

  }

  stage ("Anisble deployment") {
   steps {
    dir("${env.WORKSPACE}"){
     echo "[INFO] Start deployment"
     sh """
     set +x
     ansible-playbook -i inventory/$env ./dev.yaml -e branch=$branch -e env=$deploy_env
     set -x
     """
     echo "[INFO] Deployment finished..."
    }
   }
  }

 }

}
第三步:檢視執行結果
發現執行成功
以後程式設計師更改程式碼之後就可以自己測試上線了

第四步:資料庫授權
[[email protected] ~]# mysql -uroot -p
Enter password:
Welcome to the MariaDB monitor.  Commands end with ; or \g.
Your MariaDB connection id is 4
Server version: 5.5.56-MariaDB MariaDB Server

Copyright (c) 2000, 2017, Oracle, MariaDB Corporation Ab and others.

Type 'help;' or '\h' for help. Type '\c' to clear the current input statement.

MariaDB [(none)]> create database wordpress;
Query OK, 1 row affected (0.03 sec)

MariaDB [(none)]> grant all on *.* to [email protected]'localhost' identified by '123';
Query OK, 0 rows affected (0.02 sec)

MariaDB [(none)]> exit
Bye
第五步:填寫上面資料庫配置的資訊

第六步:配置成功頁面
注意訪問的時候IP地址之後需要加上:82埠號,因為我們上面的劇本中指定了變數port為82號埠
