
《iOS Drawing Practical UIKit Solutions》讀書筆記(一)——Drawing Context
Frameworks
iOS 繪圖基於兩個庫:
1. UIKit
2. Quartz 2D
UIKit我們很熟悉,常用的控制元件UIView,UIButton以及各種ViewController,均來自於UIKit庫。
Quartz 2D則是基於C語音的繪相簿,我們應該聽說過,但是真正應用的並不多。Quartz 2D的底層實現是基於Core Graphics的。因此Quartz的一些資料型別,均以‘CG’開頭,如CGRect,CGColorRef等。
Quartz不僅僅提供了繪圖功能,同時,其還提供了動畫,圖片編輯,PDF檔案建立、編輯等功能。(在Quartz的內部影象模型,其實與PDF檔案模型的定義很類似)
Drawing Context
無論我們使用UIKit還是Quartz庫,所有的操作均是作用於Context上的。
Context的作用類似於油畫中的畫布,我們可以設定畫布的屬性,Pop/Push畫布,以及獲取當前畫布等。
When to Draw?
話說回來,UIKit庫為我們封裝了大量的繪圖控制元件,如UIButton,我們可以僅用幾行程式碼就創建出一個能夠響應事件的圖片文字按鈕。那麼,什麼時候需要我們大費周章的去draw UI呢?
如果符合下面4種情況之一,你可以考慮去draw:
- Creating custom views
- building images
- create PDFs
- building with Core Graphics
Creating Custom Views
一個UIView就像一個空白的畫布,當我們需要自定義UIView的內容時,可以重寫
- (void)drawRect:(CGRect)rect方法。
與之匹配的,專門用於繪製列印內容的方法:
- (void)drawRect:(CGRect)rect forViewPrintFormatter:(UIViewPrintFormatter *)formatterBuilding Images
利用UIKit,你可以在UIKit image context中,生成一個UIImage或者對其進行修改。
雖然生成(或修改)UIImage會使用運算能力,但是能夠使我們的APP體積更小,顯示更為靈活。
Creating PDFs
類似於Image,你可以在UIKit PDF context中,生成,編輯一個PDF檔案。
Build with Core Graphics
當UIKit的功能不能夠滿足我們時,就需要轉向Quartz了。我們可以在Core Graphic 的context中進行一些基於Core Graphics操作。
Contexts
通過上面我們已經知道,iOS中要進行任何的繪圖操作,均要基於Context。
Context記錄了當前繪畫的所有資訊——畫布是否翻轉,繪圖的顏色,亮度等。
在iOS中,我們大致會使用如下幾種Context:
- bitmap contexts
- PDF contexts
- image contexts
Bitmap Contexts
Bitmap contexts 實際上是一個矩形data陣列,陣列的大小取決於圖片的顏色型別。如普通的圖片,一個畫素可能會佔用4bytes,分別表示RGB值以及透明度。而不透明圖片可能僅有RGB值,而忽略透明度以節省空間。對於黑白圖片,則僅會用1到2個bytes。
在UIView的方法
- (void)drawRect:(CGRect)rect中,系統會自動建立一個Context,來接受繪圖。利用UIGraphicsGetCurrentContext()檢視Context,實際上其型別就是Bitmap Context

PDF Contexts
PDF contexts 和 Bitmap context的操作是一模一樣的。但是還是有些許的差別,PDF contexts的資料資訊包括向量資料,這可以使PDF檔案在不同的解析度下不會發生形變。同時PDF context還是有page的概念,一個PDF檔案包括若干Pages。
Core Image Contexts
Core Image Contexts 是用來講Core Image 物件轉換為Quartz 2D和OpenGL。它會利用GPU加速,Core Image的物件型別為CIColor何CIImage.
在UIKit中建立Contexts
在UIKit中建立一個Contexts很簡單,僅需執行如下程式碼
 UIGraphicsBeginImageContext(CGSizeMake(100, 100));
 NSLog(@"IN Context is %@", UIGraphicsGetCurrentContext());
 UIGraphicsEndImageContext();
為了深入理解這一對函式,我們做如下實驗:
NSLog(@"OUT 1 Context is %@", UIGraphicsGetCurrentContext());
UIGraphicsBeginImageContext(CGSizeMake(100, 100));
NSLog(@"IN Context is %@", UIGraphicsGetCurrentContext());
UIGraphicsEndImageContext();
NSLog(@"OUT 2 Context is %@", UIGraphicsGetCurrentContext());
輸出為:

可見,UIKit建立的Contexts生命週期僅存在於BeginContext於EndContext之間。
device scale
UIKit建立Image Contexts還有另一個更詳細的介面,
UIGraphicsBeginImageContextWithOptions(CGSize size, BOOL opaque, CGFloat scale)這裡可以指定更詳細的Contexts。
Creating PDF Context
當需要建立PDF檔案時,我們可以建立一個PDF context,其類似Bitmap context:
UIGraphicsBeginPDFContextToFile(NSString * _Nonnull path, CGRect bounds, NSDictionary * _Nullable documentInfo);
UIGraphicsBeginPDFPage();
// Draw PDF here
UIGraphicsEndPDFContext();
建立一個PDF檔案,你必須將它draw到一個檔案或Data物件中。因此,BeginPDFContext有兩個版本:
  UIGraphicsBeginPDFContextToFile(NSString * _Nonnull path, CGRect bounds, NSDictionary * _Nullable documentInfo);

    UIGraphicsBeginPDFContextToData(NSMutableData * _Nonnull data, CGRect bounds, NSDictionary * _Nullable documentInfo)
同時,我們需要建立PDF的‘頁’,用方法:
UIGraphicsBeginPDFPage();這裡,我們不需要endPDFPage。
在Quartz中建立Contexts
在Quartz中建立Contexts,相較於UIKit,更為複雜。主要體現在:
- 時刻需要注意手動Release Quartz建立的C型別物件
Quartz的C語言介面更為複雜
在Quartz中建立Context:
CGColorSpaceRef colorSpace = CGColorSpaceCreateDeviceRGB();
    if (colorSpace == NULL) {
        NSLog(@"Error allocating color space");
        return nil;
    }
#define BITS_PER_COMPONENT  8
#define ARGB_COUNT 4
    // Create bitmap context
    CGContextRef context = CGBitmapContextCreate(NULL, width, height,
                                                 BITS_PER_COMPONENT,
                                                 width * ARGB_COUNT,
                                                 colorSpace,
                                                 (CGBitmapInfo)kCGImageAlphaPremultipliedFirst);
    if (context == NULL) {
        // 注意這裡要釋放之前建立的CG物件
        CGColorSpaceRelease(colorSpace);
        return nil;
    }

    CGImageRef imageRef = CGBitmapContextCreateImage(context);
    UIImage *image = [UIImage imageWithCGImage:imageRef];
    // 釋放CG物件
    CGColorSpaceRelease(colorSpace);
    CGContextRelease(context);
    CFRelease(imageRef);
Drawing into Contexts
大部分的Quartz方法都需要一個Context作為引數。
獲取Quartz Context有兩個方法:
- 如上面所示,用CGCreateContext方法建立一個Context
有UIKit的Context轉換為Quartz Context
下面是一個使用Quartz Context的例子
 CGColorSpaceRef colorSpace = CGColorSpaceCreateDeviceRGB();
    if (colorSpace == NULL) {
        NSLog(@"Error allocating color space");
        return;
    }
#define BITS_PER_COMPONENT  8
#define ARGB_COUNT 4
    // Create bitmap context
    CGContextRef context = CGBitmapContextCreate(NULL, 100, 200,
                                                 BITS_PER_COMPONENT,
                                                 100 * ARGB_COUNT,
                                                 colorSpace,
                                                 (CGBitmapInfo)kCGImageAlphaPremultipliedFirst);
    if (context == NULL) {
        CGColorSpaceRelease(colorSpace);
        return;
    }

    CGContextSetLineWidth(context, 4);
    CGContextSetStrokeColorWithColor(context, [UIColor grayColor].CGColor);
    CGContextStrokeEllipseInRect(context, CGRectMake(0, 0, 100, 200));
    CGImageRef imageRef = CGBitmapContextCreateImage(context);
    UIImage *image = [UIImage imageWithCGImage:imageRef];

    CGColorSpaceRelease(colorSpace);
    CGContextRelease(context);
    CFRelease(imageRef);
將UIKit Context轉換為Quartz Context
相較於Quartz,我們運用UIKit能夠更簡便地運用UIKit所建立的Context。
而我們可以使用函式
CGContextRef __nullable UIGraphicsGetCurrentContext(void)將UIKit context轉換為Quartz contest。
例如對於上面一段畫橢圓的程式碼,我們可以用UIKit簡寫為:
     UIGraphicsBeginImageContextWithOptions(CGSize size,
                                           BOOL opaque,
                                           CGFloat scale);
    // Retrieve the current context
    CGContextRef context = UIGraphicsGetCurrentContext();

    CGContextSetLineWidth(context, 4);
    CGContextSetStrokeColorWithColor(context, [UIColor grayColor].CGColor);
    CGContextStrokeEllipseInRect(context, CGRectMake(0, 0, 100, 200));
    CGImageRef imageRef = CGBitmapContextCreateImage(context);
    UIImage *image = [UIImage imageWithCGImage:imageRef];

    UIGraphicsEndImageContext();
Push/Pop Context
我們在使用UIKit Context時,會成對的使用
UIGraphicsBegin…Context
// operation with Context
UIGraphicsEnd…Context
其中會建立Context,而建立的Context的生命週期會在EndContext結束。
但是,我們可以通過Push/Pop Context的方式,來保留Context,使其在End…Context之外,仍能夠使用。
如下程式碼:
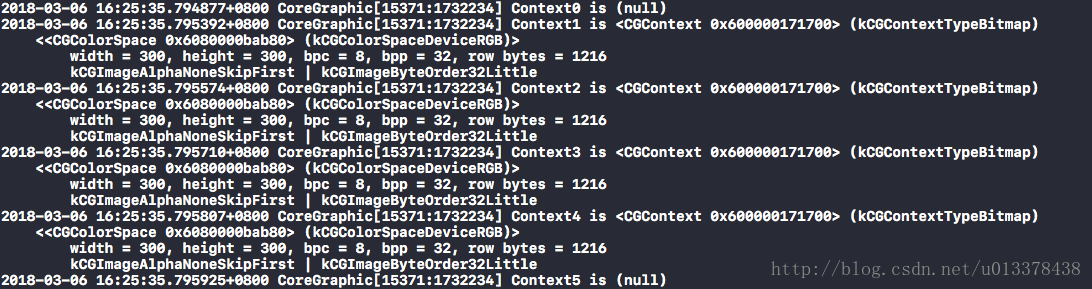
    NSLog(@"Context0 is %@", UIGraphicsGetCurrentContext());
    UIGraphicsBeginImageContextWithOptions(CGSizeMake(100, 100),
                                           YES,
                                           0);
    // Retrieve the current context
    CGContextRef context = UIGraphicsGetCurrentContext();
    NSLog(@"Context1 is %@", UIGraphicsGetCurrentContext());
    UIGraphicsPushContext(context);
    NSLog(@"Context2 is %@", UIGraphicsGetCurrentContext());

    UIGraphicsEndImageContext();
    NSLog(@"Context3 is %@", UIGraphicsGetCurrentContext());
    UIGraphicsPopContext();
    NSLog(@"Context4 is %@", UIGraphicsGetCurrentContext());
    UIGraphicsPopContext();
    NSLog(@"Context5 is %@", UIGraphicsGetCurrentContext());
輸出為:
PS:
在UIView的方法drawRect之前,系統會自動為我們Push一個context 到 UIKit的Context Stack中。因此,在drawRect方法中,我們不需要顯示的建立Context。
UIKit Current Context
基本上說有的Quartz 函式都接受context引數,而UIKit版本的方法卻不用。因為UIKit會自動維護一個graphics Stack,UIKit的方法會自動使用處於stack top的Context。
如果要混合使用Core Graphics與UIKit,則需按照如下流程:
- Create a Core Graphics context
- Push the context with UIKit method UIGraphicsPushContext()
- Use UIKit method
- Use Core Craphics method with context parameters
- Pop the context with UIGraphicsPopContext()
- Release the cotontext’s momery
UIKit and Quartz Colors
UIKit的物件是支援ARC的,而Quartz物件則是C語言形式,需要人工的retain 與 release。基本每一個UIKit物件都有對應的Quartz物件。
通常,UIKit與Quartz物件的轉換是toll free的,僅需要關鍵字__bridge。
而有些物件,是不可以直接用__bridge的。幸運的是,我們可以通過屬性來獲取對應的物件。如UIKit與Quartz中Colors物件的轉換,則應該是
UIColor *red = [UIColor redColor];
CGColorRef redRef = red.CGColor;
這裡要注意redRef物件的保持,不要讓red由於ARC自動釋放掉。
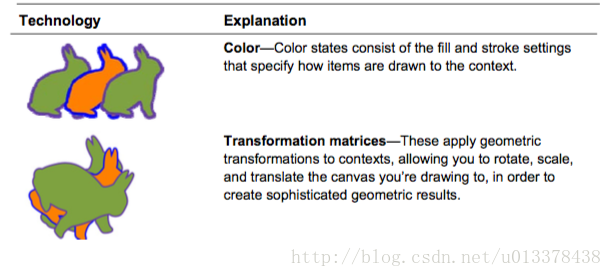
The Painter’s Model
iOS預設用一種被稱為‘Painter’s Model’來繪製內容。形象的說,就像是畫油畫一樣,後繪製的內容,會覆蓋在之前繪製的內容之上。

如圖,先繪製了紫色的圓形,在繪製了綠色圓形,綠色圓形會覆蓋在紫色圓形之上。
Context State
我們在繪製圖形時,可以指定圖形的邊框顏色與填充色等資訊。
[greenColor setFill];
[purpleColor setStroke];
[bunnyPath fill];
[bunnyPath stroke];我們將這些繪圖的狀態,稱為graphic state。
Applying State
每一個Context均有一個graphic state的stack。當我們建立新的context的時候,其graphic state stack是新的。
我們可以通過Push/Pop來操作graphic state stack(GState)。
GState stack與UIKit所管理的Context stack有所不同。
UIKit管理的context stack是針對多個context之間切換而言的。而GState stack則是對於某一個context來說的。
我們可以使用
CGContextSaveGState();
CGContextRestoreGState();
來push,pop所儲存的GState。
Context的state包括如下內容:
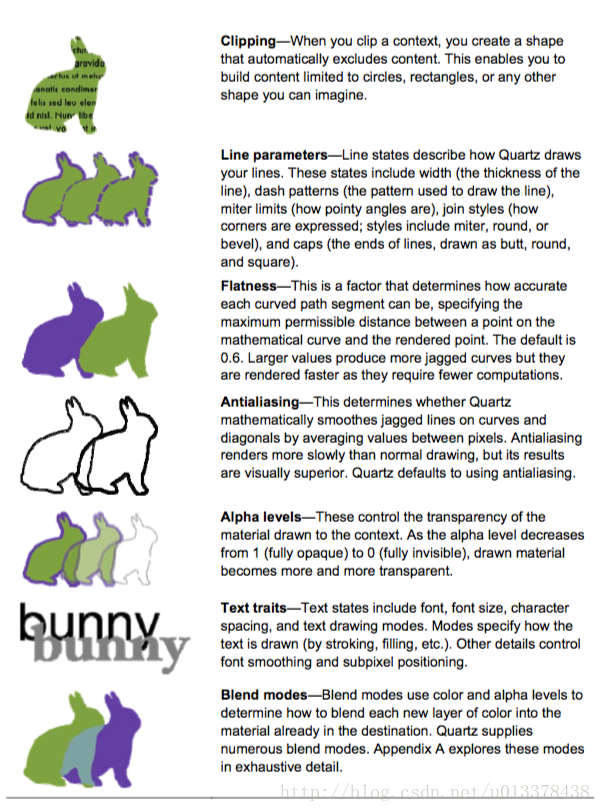
Context 座標系統
在UIKit中,座標原點是以左上角開始的,而在Quartz中,則是以左下角開始的。

座標系統取決於Context是如何被建立的,如果由UIKit函式建立,則符合UIKit座標系,反之,符合Quartz座標系。
我們可以通過垂直翻轉Quartz context的座標系,使得Quartz的Context 座標系和UIKit的Context座標系相同。程式碼如下:
- (void)FlipContextVertically:(CGSize) size{
    CGContextRef context = UIGraphicsGetCurrentContext();
    if (context == NULL) {
        NSLog(@"Error:NO context to flip");
        return;
    }
    CGAffineTransform transform = CGAffineTransformIdentity;
    transform = CGAffineTransformScale(transform, 1.0f, -1.0f);
    transform = CGAffineTransformTranslate(transform, 1.0f, -size.height);
    CGContextConcatCTM(context, transform);
}