
使用Idea建立ssm專案,SpringMVC+Spring+MyBatis+Maven整合
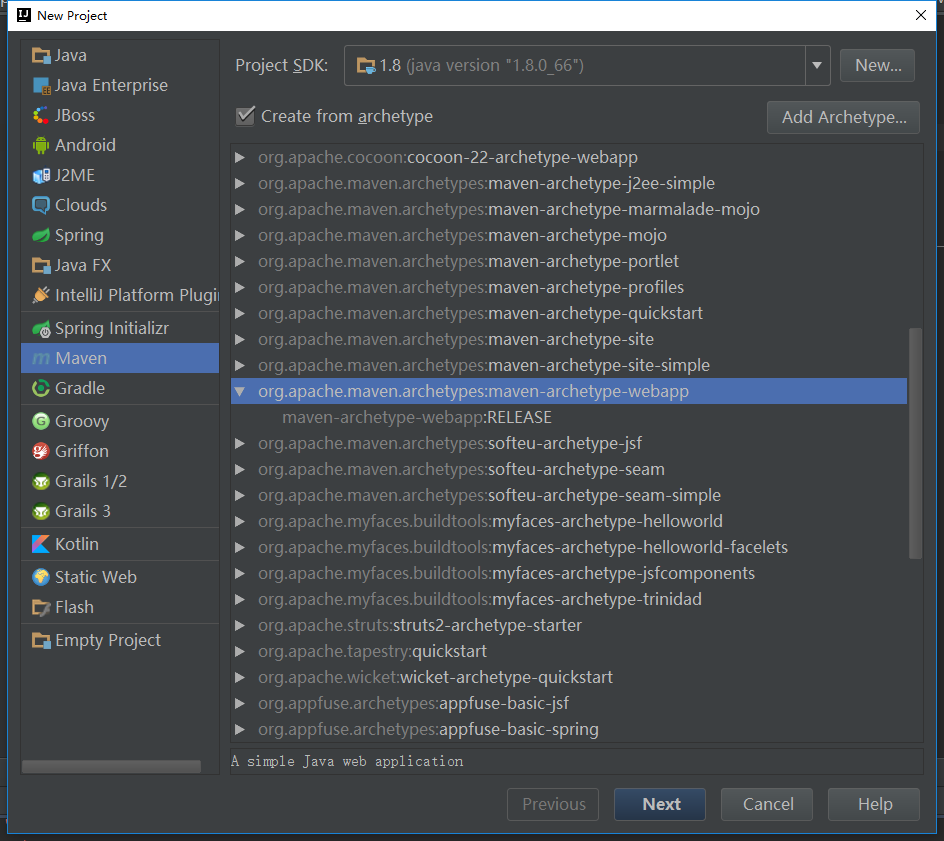
1.建立基本專案結構
用
Idea新建專案[File -> New -> Project]Idea會自動開始下載所依賴的包,等待其完成。建立自己專案結構
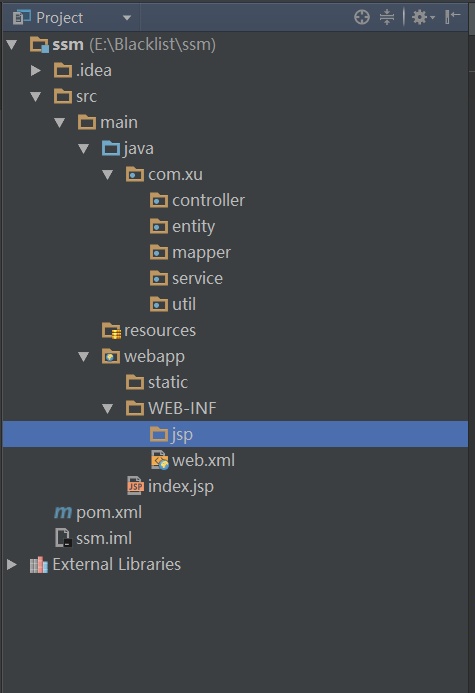
Idea的archtype只有自帶的結構,需要新增自己的結構。這裡我新建了
java這個目錄和目錄下的資料夾。記得標記
java目錄為Sources Root(資料夾會變成藍色)

2.修改pom.xml
因為使用Maven管理專案,所以可以通過直接在 pom.xml 中配置來直接引入對應的包和管理對應的包
<project xmlns="http://maven.apache.org/POM/4.0.0" xmlns:xsi="http://www.w3.org/2001/XMLSchema-instance" xsi:schemaLocation="http://maven.apache.org/POM/4.0.0 http://maven.apache.org/maven-v4_0_0.xsd"
- 1
- 2
- 3
- 4
- 5
- 6
- 7
- 8
- 9
- 10
- 11
- 12
- 13
- 14
- 15
- 16
- 17
- 18
- 19
- 20
- 21
- 22
- 23
- 24
- 25
- 26
- 27
- 28
- 29
- 30
- 31
- 32
- 33
- 34
- 35
- 36
- 37
- 38
- 39
- 40
- 41
- 42
- 43
- 44
- 45
- 46
- 47
- 48
- 49
- 50
- 51
- 52
- 53
- 54
- 55
- 56
- 57
- 58
- 59
- 60
- 61
- 62
- 63
- 64
- 65
- 66
- 67
- 68
- 69
- 70
- 71
- 72
- 73
- 74
- 75
- 76
- 77
- 78
- 79
- 80
- 81
- 82
- 83
- 84
- 85
- 86
- 87
- 88
- 89
- 90
- 91
- 92
- 93
- 94
- 95
- 96
- 97
- 98
- 99
- 100
- 101
- 102
- 103
- 104
- 105
- 106
- 107
- 108
- 109
- 110
- 111
- 112
- 113
- 114
- 115
- 116
- 117
- 118
- 119
- 120
- 121
- 122
- 123
- 124
- 125
- 126
- 127
- 128
- 129
- 130
- 131
- 132
- 133
3.Spring-MVC配置:
配置springmvc,使用註解的方式來提高開發效率,讓程式設計師能夠更關注於業務的實現而不是重複枯燥的配置操作。
<?xml version="1.0" encoding="UTF-8"?> <beans xmlns="http://www.springframework.org/schema/beans" xmlns:xsi="http://www.w3.org/2001/XMLSchema-instance" xmlns:p="http://www.springframework.org/schema/p" xmlns:mvc="http://www.springframework.org/schema/mvc" xmlns:context="http://www.springframework.org/schema/context" xsi:schemaLocation="http://www.springframework.org/schema/beans http://www.springframework.org/schema/beans/spring-beans-3.0.xsd http://www.springframework.org/schema/context http://www.springframework.org/schema/context/spring-context-3.0.xsd http://www.springframework.org/schema/mvc http://www.springframework.org/schema/mvc/spring-mvc-3.0.xsd "> <!-- 啟用spring mvc 註解 --> <context:annotation-config/> <!--自動掃描--> <context:component-scan base-package="com.xu"/> <mvc:annotation-driven/> <mvc:default-servlet-handler/> <mvc:resources location="/static/" mapping="/static/**"/> <!-- Declare a view resolver --> <bean class="org.springframework.web.servlet.view.InternalResourceViewResolver"> <property name="prefix" value="/WEB-INF/jsp/"/> <property name="suffix" value=".jsp"/> </bean></beans>
- 1
- 2
- 3
- 4
- 5
- 6
- 7
- 8
- 9
- 10
- 11
- 12
- 13
- 14
- 15
- 16
- 17
- 18
- 19
- 20
- 21
- 22
- 23
- 24
- 25
- 26
- 27
- 28
- 29
4.Spring-Mybatis配置
通過mybatis的配置,簡化所有的資料庫操作,只需要寫基本的sql語句就可以通過配置來操作對應的資料庫。
<?xml version="1.0" encoding="GBK"?><beans xmlns:xsi="http://www.w3.org/2001/XMLSchema-instance" xmlns:context="http://www.springframework.org/schema/context" xmlns="http://www.springframework.org/schema/beans" xsi:schemaLocation="http://www.springframework.org/schema/beans http://www.springframework.org/schema/beans/spring-beans-3.1.xsd http://www.springframework.org/schema/context http://www.springframework.org/schema/context/spring-context-3.1.xsd"> <context:component-scan base-package="com.xu"/> <bean id="dataSource" class="com.alibaba.druid.pool.DruidDataSource" init-method="init" destroy-method="close"> <!-- 基本屬性 url、user、password --> <property name="url" value="jdbc:mysql://localhost/xus?useUnicode=true&characterEncoding=utf-8"/> <property name="username" value="root"/> <property name="password" value="4321"/> <!-- 配置初始化大小、最小、最大 --> <property name="initialSize" value="1"/> <property name="minIdle" value="1"/> <property name="maxActive" value="20"/> <!-- 配置獲取連線等待超時的時間 --> <property name="maxWait" value="60000"/> <!-- 配置間隔多久才進行一次檢測,檢測需要關閉的空閒連線,單位是毫秒 --> <property name="timeBetweenEvictionRunsMillis" value="60000"/> <!-- 配置一個連線在池中最小生存的時間,單位是毫秒 --> <property name="minEvictableIdleTimeMillis" value="300000"/> <property name="validationQuery" value="SELECT 'x'"/> <property name="testWhileIdle" value="true"/> <property name="testOnBorrow" value="false"/> <property name="testOnReturn" value="false"/> <!-- 開啟PSCache,並且指定每個連線上PSCache的大小 --> <property name="poolPreparedStatements" value="true"/> <property name="maxPoolPreparedStatementPerConnectionSize" value="20"/> <!-- 配置監控統計攔截的filters --> <property name="filters" value="stat"/> </bean> <!-- spring和MyBatis整合,不需要mybatis的配置對映檔案 --> <bean id="sqlSessionFactory" class="org.mybatis.spring.SqlSessionFactoryBean"> <property name="dataSource" ref="dataSource"/> <!-- 自動掃描mapping.xml檔案 --> <property name="mapperLocations" value="classpath*:com/xu/mapper/xml/*.xml"></property> </bean> <!-- DAO介面所在包名,Spring會自動查詢其下的類 --> <bean class="org.mybatis.spring.mapper.MapperScannerConfigurer"> <property name="basePackage" value="com.icekredit.credit.mapper"/> <property name="sqlSessionFactoryBeanName" value="sqlSessionFactory"></property> </bean> <!-- (事務管理)transaction manager, use JtaTransactionManager for global tx --> <bean id="transactionManager" class="org.springframework.jdbc.datasource.DataSourceTransactionManager"> <property name="dataSource" ref="dataSource"/> </bean></beans>
- 1
- 2
- 3
- 4
- 5
- 6
- 7
- 8
- 9
- 10
- 11
- 12
- 13
- 14
- 15
- 16
- 17
- 18
- 19
- 20
- 21
- 22
- 23
- 24
- 25
- 26
- 27
- 28
- 29
- 30
- 31
- 32
- 33
- 34
- 35
- 36
- 37
- 38
- 39
- 40
- 41
- 42
- 43
- 44
- 45
- 46
- 47
- 48
- 49
- 50
- 51
- 52
- 53
- 54
- 55
- 56
- 57
- 58
- 59
- 60
- 61
- 62
- 63
- 64
- 65
- 66
- 67
5.web.xml
<web-app xmlns:xsi="http://www.w3.org/2001/XMLSchema-instance" xmlns="http://java.sun.com/xml/ns/javaee" xmlns:web="http://java.sun.com/xml/ns/javaee/web-app_2_5.xsd" xsi:schemaLocation="http://java.sun.com/xml/ns/javaee http://java.sun.com/xml/ns/javaee/web-app_2_5.xsd" id="WebApp_ID" version="2.5"> <display-name>Archetype Created Web Application</display-name> <context-param> <param-name>contextConfigLocation</param-name> <param-value>classpath*:spring-mybatis.xml</param-value> </context-param> <listener> <listener-class>org.springframework.web.context.ContextLoaderListener</listener-class> </listener> <filter> <filter-name>characterEncodingFilter</filter-name> <filter-class>org.springframework.web.filter.CharacterEncodingFilter</filter-class> <init-param> <param-name>encoding</param-name> <param-value>UTF-8</param-value> </init-param> <init-param> <param-name>forceEncoding</param-name> <param-value>true</param-value> </init-param> </filter> <filter-mapping> <filter-name>characterEncodingFilter</filter-name> <url-pattern>/*</url-pattern> </filter-mapping> <servlet> <servlet-name>spring-mvc</servlet-name> <servlet-class>org.springframework.web.servlet.DispatcherServlet</servlet-class> <init-param> <param-name>contextConfigLocation</param-name> <param-value>classpath*:spring-mvc.xml</param-value> </init-param> <load-on-startup>1</load-on-startup> </servlet> <servlet-mapping> <servlet-name>spring-mvc</servlet-name> <url-pattern>/</url-pattern> </servlet-mapping></web-app>
- 1
- 2
- 3
- 4
- 5
- 6
- 7
- 8
- 9
- 10
- 11
- 12
- 13
- 14
- 15
- 16
- 17
- 18
- 19
- 20
- 21
- 22
- 23
- 24
- 25
- 26
- 27
- 28
- 29
- 30
- 31
- 32
- 33
- 34
- 35
- 36
- 37
- 38
- 39
- 40
- 41
- 42
至此,一個ssm專案的框架就建立好了。隨著框架的增多,技術的發展,就基本的開發來說是越來越智慧,越來越方便了。但是這並不代表寫程式就很簡單,除了實現基本的業務邏輯以為,程式設計師應該在專案中更加關注高併發,高效能的實現。
專案地址:https://github.com/MyHerux/ssm
再分享一下我老師大神的人工智慧教程吧。零基礎!通俗易懂!風趣幽默!希望你也加入到我們人工智慧的隊伍中來!http://www.captainbed.net
 ## 新的改變
我們對Markdown編輯器進行了一些功能拓展與語法支援,除了標準的Markdown編輯器功能,我們增加了如下幾點新功能,幫助你用它寫部落格:
- 全新的介面設計 ,將會帶來全新的寫作體驗;
- 在創作中心設定你喜愛的程式碼高亮樣式,Markdown 將程式碼片顯示選擇的高亮樣式 進行展示;
- 增加了 圖片拖拽 功能,你可以將本地的圖片直接拖拽到編輯區域直接展示;
- 全新的 KaTeX數學公式 語法;
- 增加了支援甘特圖的mermaid語法1 功能;
- 增加了 多螢幕編輯 Markdown文章功能;
- 增加了 焦點寫作模式、預覽模式、簡潔寫作模式、左右區域同步滾輪設定 等功能,功能按鈕位於編輯區域與預覽區域中間;
- 增加了 檢查列表 功能。
功能快捷鍵
撤銷:Ctrl/Command + Z
重做:Ctrl/Command + Y
加粗:Ctrl/Command + B
斜體:Ctrl/Command + I
標題:Ctrl/Command + Shift + H
無序列表:Ctrl/Command + Shift + U
有序列表:Ctrl/Command + Shift + O
檢查列表:Ctrl/Command + Shift + C
插入程式碼:Ctrl/Command + Shift + K
插入連結:Ctrl/Command + Shift + L
插入圖片:Ctrl/Command + Shift + G
合理的建立標題,有助於目錄的生成
直接輸入1次#,並按下space後,將生成1級標題。
輸入2次#,並按下space後,將生成2級標題。
以此類推,我們支援6級標題。有助於使用TOC語法後生成一個完美的目錄。
如何改變文字的樣式
強調文字 強調文字
加粗文字 加粗文字
標記文字
刪除文字
引用文字
H2O is是液體。
210 運算結果是 1024.
插入連結與圖片
連結: link.
圖片: 
帶尺寸的圖片: ![]()
當然,我們為了讓使用者更加便捷,我們增加了圖片拖拽功能。
如何插入一段漂亮的程式碼片
去部落格設定頁面,選擇一款你喜歡的程式碼片高亮樣式,下面展示同樣高亮的 程式碼片.
// An highlighted block var foo = 'bar'; 生成一個適合你的列表
- 專案
- 專案
- 專案
- 專案
- 專案1
- 專案2
- 專案3
- 計劃任務
- 完成任務
建立一個表格
一個簡單的表格是這麼建立的:
| 專案 | Value |
|---|---|
| 電腦 | $1600 |
| 手機 | $12 |
| 導管 | $1 |
設定內容居中、居左、居右
使用:---------:居中
使用:----------居左
使用----------:居右
| 第一列 | 第二列 | 第三列 |
|---|---|---|
| 第一列文字居中 | 第二列文字居右 | 第三列文字居左 |
SmartyPants
SmartyPants將ASCII標點字元轉換為“智慧”印刷標點HTML實體。例如:
| TYPE | ASCII | HTML |
|---|---|---|
| Single backticks | 'Isn't this fun?' |
‘Isn’t this fun?’ |
| Quotes | "Isn't this fun?" |
“Isn’t this fun?” |
| Dashes | -- is en-dash, --- is em-dash |
– is en-dash, — is em-dash |
建立一個自定義列表
- Markdown
- Text-to- HTML conversion tool
- Authors
- John
- Luke
如何建立一個註腳
一個具有註腳的文字。2
註釋也是必不可少的
Markdown將文字轉換為 HTML。
KaTeX數學公式
您可以使用渲染LaTeX數學表示式 KaTeX:
Gamma公式展示 是通過尤拉積分