
Java開發公眾號系列教程(三):微信js-sdk多圖片上傳,支援預覽,刪除
用過微信的人都知道,日常發表朋友圈圖文動態時,可以選擇多圖片,圖片右上角有個灰色的刪除圖示,可以對即將要發表的照片資訊進行預覽和刪除。今天筆者通過微信js-sdk介面給大家把這個實現過程分享出來。

一、主體思路
微信js-sdk上傳介面支援單次最多選擇9張圖片,我們要實現的就是跟微信發圖文朋友圈一樣的功能,最多支援9張圖片,可以預覽,刪除。也就是說,如果我們第一次選了8張照片,再次選照片時,最多隻能選一張,如果總共選了8張又刪了2張,那麼我們還可以最多選3張照片。
二、案例效果
本案例應客戶方要求,最多上傳6張圖片(和上傳9張圖片的過程一樣)。圖一,上傳3張圖片時,左下角的圖示標明可以繼續上傳
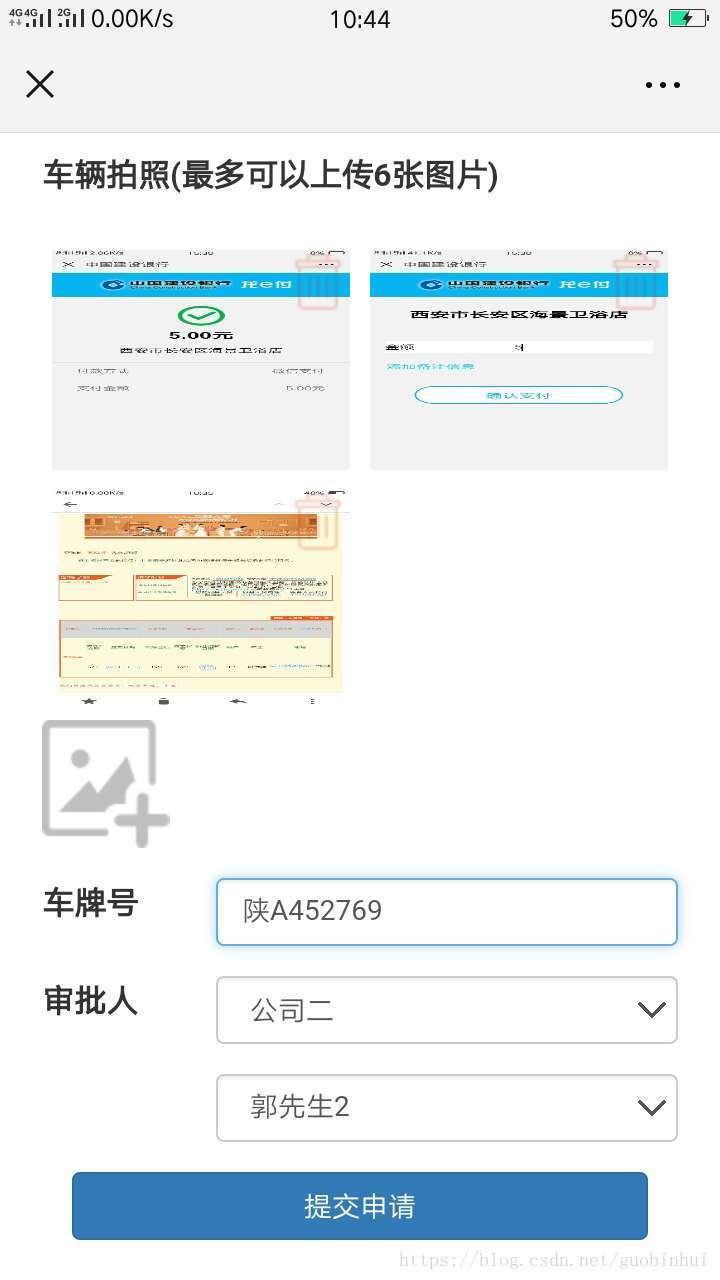
圖二,上傳6張圖片時,左下角的上傳圖示不顯示,標明圖片數量已達上限,不能再選圖片上傳了,並且每個圖片的右上角有個紅色的垃圾桶圖示,就是刪除功能,在提交之前可以隨時增刪圖片,總的圖片上傳數量上限是6。

三、具體實現過程
1、微信呼叫手機攝像頭的js-sdk版本
<script src="http://res.wx.qq.com/open/js/jweixin-1.2.0.js"></script>其他的 Bootstrap.js,JQuery.js,Ajax.js可以根據自己的實際情況引入即可
2、jsp頁面定義圖片存放容器
這裡的圖片容器就是class="car"的這個div,下面的id="add-car"這個圖片是從手機相簿新增圖片或者拍照的圖示,並且綁定了一個點選方法chooseImg(this),這個方法會呼叫微信js-sdk的上傳圖片介面,觸發選擇手機照片的事件,但是在呼叫上傳介面前,得先獲取微信js-sdk的介面許可權,獲取這個介面許可權需要先得到所需的簽名引數等。
<div class="form-group">
   <div>
      <label class="col-xs-10 col-sm-8 control-label">車輛拍照(最多可以上傳6張圖片)</label>
   </div>
   <div class="col-xs-12 col-sm-12">
      <div id="car-imgs" class="car" style="display:flex;flex-wrap:wrap;align-items:center;margin-top:15px;" data-count="6" data-type="car">
      </div>
      <img src="/img/addPic.png" id="add-car" onclick="chooseImg(this)">
   </div>
</div>
3、獲取微信js-sdk介面許可權簽名引數,通過微信wx.config({options})前臺介面獲取選擇圖片介面許可權簽名引數
<script type="text/javascript">
  var images = {
      localId: [],
      serverId: []
      };
 var carPicUrl = [];//存放車輛照片的url
        var count = 6; //圖片的最大數量
        var ios = false; //判斷是否是ios或者iphone裝置
        var $imgContainer; //通過Jquery選擇器獲取的Dom物件作為圖片容器
function chooseImg(obj){
    $.ajax({
         url:"***/passage/getWxConfig",
         dataType:"json",
         type:"post",
         data:{'openid':$("#openid").val()},
         success:function(res){
            wx.config({
               debug: false,
               appId:res.appId, // 必填,公眾號的唯一標識
               timestamp: res.timestamp, // 必填,生成簽名的時間戳
               nonceStr: res.noncestr, // 必填,生成簽名的隨機串
               signature: res.signature,// 必填,簽名,見附錄1
               jsApiList: ['chooseImage'] // 必填,需要使用的JS介面列表,所有JS介面列表見附錄2});
               var ua = navigator.userAgent;
               if (/(iPhone|iOS)/i.test(ua)) {
                 ios = true;
               } else {
                 ios = false;
               }
               alert("是否是IOS裝置"+ios);
               wx.ready(function(){
                  wx.chooseImage({
                      count: count, // 微信預設9
                      sizeType: ['original', 'compressed'],
                      sourceType: ['album', 'camera'],
                      success: function (res) {
                          count = count-res.localIds.length;
                          images.localId = res.localIds;
                          uploadImage(images.localId,$imgContainer);
                      },
                      fail:function(res){
                          alert("失敗的原因2"+JSON.stringify(res));
                      }
                   })
                });
                },
                error:function(){
                    alert("獲取JSAPI介面許可權引數失敗");
                }
            })
        }
</script>
4、後臺程式碼獲取微信js-sdk介面許可權簽名所需引數
    /**
     * create by guo bin hui in 2018-10-20
     * 獲取jsp頁面呼叫微信公眾號js-sdk上傳圖片的config介面所需引數
     */
    @RequestMapping(value = "/getWxConfig")
    @ResponseBody
    public Map getWxConfig(HttpSession seesion, HttpServletRequest request) throws IOException {
        Map <String,String> map = new HashMap <String,String> ();
        Map  data = WxAccessToken.getSavedAccessToken();
        map.put("jsapi_ticket", (String)data.get("jsapi_ticket"));
        map.put("timestamp",WeiXinUtil.getTimestamp());
        map.put("noncestr",WxPayUtil.getNonceStr());
        map.put("url", (String)request.getSession().getAttribute("url"));
        String str =  WxPayUtil.createLinkString(map);
        String sign = DigestUtils.sha1Hex(str);
        map.put("signature",sign);
        map.put("appId",Constants.appID);
        return map;
    }
關於jsapi_ticket這個引數的獲取以及全域性快取筆者已經在上一篇講到了,以及timestamp,noncestr這2個引數的獲取可以點選 《Java開發公眾號系列教程(二):公眾號開發全域性快取access_token和jsapi_ticket》檢視。
這裡的url引數指的是從哪個頁面所屬的介面發起的選擇相簿照片的介面路徑,引數的組合以及加密簽名上一篇都有。通過這個介面獲取到了jsp頁面的wx.cinfig({})介面所需的引數。
5、選擇圖片介面的使用 wx.ready(function(){})和wx.chooseImage({})
wx.ready(function(){
      wx.chooseImage({
         count: count, // 微信預設9
         sizeType: ['original', 'compressed'],
         sourceType: ['album', 'camera'],
         success: function (res) {
           count = count-res.localIds.length;
           images.localId = res.localIds;
           uploadImage(images.localId,$imgContainer);
         },
         fail:function(res){
            alert("失敗的原因2"+JSON.stringify(res));
         }
       })
});
6、具體的圖片上傳業務邏輯,由於微信的圖片上傳只能單張上傳,所以這裡寫了個上傳的遞迴方法,迴圈上傳,直到把選擇的照片全部上傳給微信伺服器,然後微信伺服器返回每張圖片的mediaId
function uploadImage(localIds,imgContainer) {
  var i = 0,picNum = images.localId.length;
  images.serverId = [];
  function upload(){
     wx.uploadImage({
       localId: localIds[i], // 需要上傳的圖片的本地ID,由chooseImage介面獲得
       isShowProgressTips: 1, // 預設為1,顯示進度提示
       success: function (res) {
           images.serverId.push(res.serverId);
           var localId = localIds[i];
           if(ios){
             wx.getLocalImgData({
             localId: localId,
             success: function (res) {
                var localData = res.localData; // localData是微信IOS端圖片的base64資料,可以用img標籤顯示
                localData = localData.replace('jgp', 'jpeg');
                if(imgContainer.attr("data-count") == "1"){//單張圖片的處理
                   imgContainer.append('<div style="height:160px;" class="uploadImg" >' +
                                            '<div class="close" style="position: absolute;top:5px;right:15px;"><img src="/img/delPic.png" onclick="delPic(this);"></div>' +
                                            '<img width="100%" height="100%"  src="'+localData+'"/></div>');
                                        imgContainer.next().css("display",'none');
               }if(imgContainer.attr("data-count") == "6"){ //多張圖片的處理
                  if(count == 0){
                    imgContainer.next().css("display",'none');
                    }
              imgContainer.append('<div style="width:50%;height:120px;" class="multiImg"><div class="close"><img src="/img/delPic.png" onclick="delImg(this);"></div><img name = "pic" style="width:100%;height:100%;margin-top:-32px;" src="'+localData+'"/></div>');
                 }
                },
              fail: function () {
                 alert('該圖片暫時無法檢視');
                }
             })
      }else{
        if(imgContainer.attr("data-count") == "1"){//單張圖片的處理
            imgContainer.append('<div style="height:160px;" class="uploadImg" >' +
                                    '<div class="close" style="position: absolute;top:5px;right:15px;"><img src="/img/delPic.png" onclick="delPic(this);"></div><img width="100%" height="100%"  src="'+localId+'"/></div>');
            imgContainer.next().css("display",'none');
          }if(imgContainer.attr("data-count") == "6"){ //多張圖片的處理
            if(count == 0){
               imgContainer.next().css("display",'none');
          }
        imgContainer.append('<div style="width:50%;height:120px;padding: 5px 5px" class="multiImg"><div class="close"><img src="/img/delPic.png" onclick="delImg(this);"></div><img name = "pic" style="width:100%;height:100%;margin-top:-32px;" src="'+localId+'"/></div>');
            }
       }
    var mediaId = res.serverId; // 返回圖片的伺服器端ID,即mediaId
       //將獲取到的 mediaId 傳入後臺 方法savePicture
       $.post("<%=request.getContextPath()%>/passage/savePicture",{mediaId:mediaId,picType:imgContainer.attr("data-type")},function(res){
        if("drivingLicense-front"==imgContainer.attr("class")){
           $("input[name='drivingLicense-front-url']").val(res);
        }else if("drivingLicense-back"==imgContainer.attr("class")){
           $("input[name='drivingLicense-back-url']").val(res);
        }else if("idCard-front"==imgContainer.attr("class")){
           $("input[name='idCard-front-url']").val(res);
        }else if("idCard-back"==imgContainer.attr("class")){
           $("input[name='idCard-back-url']").val(res);
        }else if("car"==imgContainer.attr("class")){
           var multi = imgContainer.find(".multiImg");
        $(multi[multi.length-1]).append('<input type="hidden" name="car-url" class="car-url" value="'+res+'" />');
       // alert(multi[multi.length-1].innerHTML);
       }
      i++;
      if(i < picNum){//遞迴方法迴圈上傳圖片
        upload();
      }
      })
      },
      fail: function (res) {
         alert('上傳失敗,請重新上傳!'+res);
          }
        });
     }
  upload();
}
7、從微信伺服器拉取圖片儲存至開發者伺服器或物理磁碟業務的後臺程式碼Controller,Service
    @RequestMapping(value = "/savePicture", method= RequestMethod.POST)
    @ResponseBody
    public static String savePicture(String mediaId,String picType) throws IOException{
        String imgPrevPath = WeiXinUtil.saveImageToDisk(mediaId,picType);
        return imgPrevPath;
    }
這裡的還有另外一個思路也可以實現,過程就是通過步驟6上傳到微信伺服器後,微信返回每個圖片的服務端mediaId,然後在jsp頁面的回撥方法裡呼叫JS-SDK的downloadImage()方法,把剛上傳至微信伺服器的圖片下載下來,再上傳到開發者伺服器。
筆者這裡的程式碼思路是,通過步驟6上傳到微信伺服器後,微信返回每個圖片的服務端mediaId,然後把這個引數傳給自己自定義的方法,從微信伺服器通過IOl流拉取下來,儲存至開發者伺服器,以及圖片對應的預覽路徑的資料庫儲存,跟上述思路道理是一樣的,只不過一個是通過前臺js-sdk介面下載下來的,另外一個是自定義後臺方法,通過IO流拉取下來儲存的。
由於上傳至微信伺服器的臨時素材,微信只儲存3天,所以我們要傳mediaId引數,通過IO流拉取下來,獲取到檔案流
    /**
     * 獲取臨時素材
     */
    private static InputStream getMediaStream(String mediaId)throws IOException {
        String url = "https://api.weixin.qq.com/cgi-bin/media/get";
        Map map = WxAccessToken.getSavedAccessToken();
        String access_token = (String)map.get("access_token");
        String params = "access_token=" + access_token + "&media_id=" + mediaId;
        InputStream is = null;
        try {
            String urlNameString = url + "?" + params;
            URL urlGet = new URL(urlNameString);
            HttpURLConnection http = (HttpURLConnection) urlGet.openConnection();
            http.setRequestMethod("GET"); // 必須是get方式請求
            http.setRequestProperty("Content-Type","application/x-www-form-urlencoded");
            http.setDoOutput(true);
            http.setDoInput(true);
            http.connect();
            // 獲取檔案轉化為byte流
            is = http.getInputStream();
        } catch (Exception e) {
            e.printStackTrace();
        }
        return is;
    }
獲取到圖片流之後儲存至開發者伺服器物理磁碟
/**
     * 儲存圖片至伺服器
     * @param mediaId
     * @return 檔名
     */
    public static String saveImageToDisk(String mediaId,String picType)throws IOException{
        String imgPrevPath = ""; //圖片預覽路徑
        InputStream inputStream = getMediaStream(mediaId);
        byte[] data = new byte[1024];
        int len ;
        FileOutputStream fileOutputStream = null;
        try {
            String prevPath = "";
            String uploadPath = "";
            //伺服器存圖路徑
            UploadPathUtil uploadPathUtil = new UploadPathUtil();
            if("car".equals(picType)){
                prevPath = uploadPathUtil.getCarPrevPath();
                uploadPath = uploadPathUtil.getCarUploadPath();
            }else if("idCard".equals(picType)){
                prevPath = uploadPathUtil.getIdCardPrevPath();
                uploadPath = uploadPathUtil.getIdCardUploadPath();
            }else if("drivingLicense".equals(picType)){
                prevPath = uploadPathUtil.getVehicleLicensePrevPath();
                uploadPath = uploadPathUtil.getVehicleLicenseUploadPath();
            }

            String filename = mediaId + ".jpg";
            fileOutputStream = new FileOutputStream(uploadPath + File.separator+ filename);
            imgPrevPath = prevPath + File.separator + filename;
            while ((len = inputStream.read(data)) != -1) {
                fileOutputStream.write(data, 0, len);
            }

        } catch (IOException e) {
            e.printStackTrace();
        } finally {
            if (inputStream != null) {
                try {
                    inputStream.close();
                } catch (IOException e) {
                    e.printStackTrace();
                }
            }
            if (fileOutputStream != null) {
                try {
                    fileOutputStream.close();
                } catch (IOException e) {
                    e.printStackTrace();
                }
            }
        }
        return imgPrevPath;
    }
8、每個圖片右上角的刪除按鈕以及刪除圖片事件
function delImg(dom){//多張圖片刪除處理
    var $addImg = $(dom).parents('.multiImg').parent().next();
    $(dom).parents('.multiImg').remove();
    count++;//每次刪除一張圖片,count就加1,不用筆者在解釋
    $addImg.css("display","block");
 }
現在這個完整功能就實現了,絕對堪稱微信js-sdk多圖片上傳並且支援預覽,刪除功能的最全面的案例詳解,更多技術乾貨敬請持續關注博主。歡迎廣大開發者朋友一起學習交流,聯絡筆者電話(同微信):18629374628