
Qt5.7.1 樹莓派3B+ 2016-09-23-raspbian-jessie.img 交叉編譯 ubuntu16.04
阿新 • • 發佈:2018-11-14
官方教程:
https://wiki.qt.io/RaspberryPi2EGLFS
中文提示:
http://blog.csdn.net/a_power/article/details/52809728
需要用到的工具列表:
tools工具:
https://github.com/raspberrypi/tools
qt-everywhere-opensource-src-5.6.1.tar.gz:
http://download.qt.io/official_releases/qt/5.7/5.7.1/single/
qt5.7.1 的桌面安裝包:
https://www.qt.io/download-open-source/#section-2
sysroot-relativelinks.py(不需要預先下載在編譯中新增即可):
https://raw.githubusercontent.com/riscv/riscv-poky/master/scripts/sysroot-relativelinks.py
2016-09-23-raspbian-jessie.img(raspberry 系統):
https://www.raspberrypi.org/downloads/raspbian/
基本流程參考官網流程和中文參考網站,我個人編譯成功,環境是16.04 -64bit Qt5.7.1(其它版本也沒事情) 樹莓派3B+ 2016-09-23-raspbian-jessie.img
提示參考官方教程或者中文教程前,請先看我的幾個提示點
我只針對幾個大家可能不清楚的點做一下補充說明:
幾個注意點 1、 樹莓派賬號:pi 密碼:raspberry

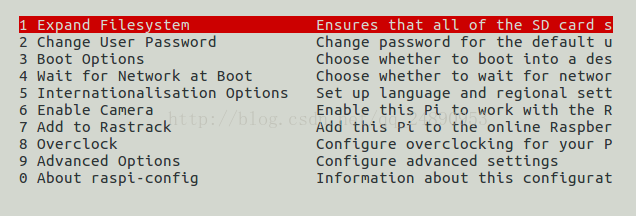
進入介面方式 sudo raspi-config 1)先把系統儲存拓展到整張SD卡 2)為了和電腦連線(使用ssh):使能SSH 路徑:Advanced Options--->SSH 3)切換GUI介面:路徑:Boot Options--->Console Autologin(選擇這個是避免登入輸密碼) 4)修改GPU記憶體:路徑:Advanced Options---> A3 Memory Split --->修改記憶體值256 5)退出重啟之後,臨時設定樹莓派IP地址:sudo ifconfig eth0 192.168.1.2 設定電腦端的IP地址:sudo ifconfig eth0 192.168.1.1 相互之間ping Ip地址,通了再進行下一步
2、
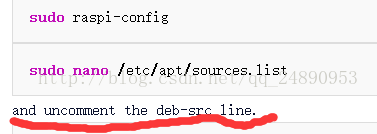

將原本禁用的 deb-src 恢復使用,Ctrl+o 儲存,Ctrl+x退出 接下去按程式流程進行
3、
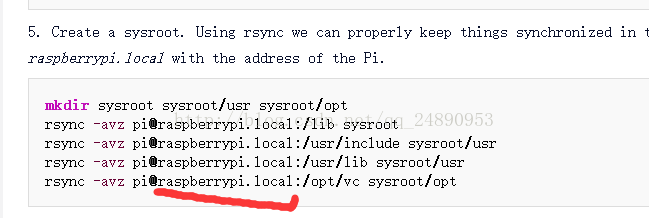
raspberrypi : 樹莓派IP地址 rsync -avz pi@192.168.1.2:/lib sysroot
4、
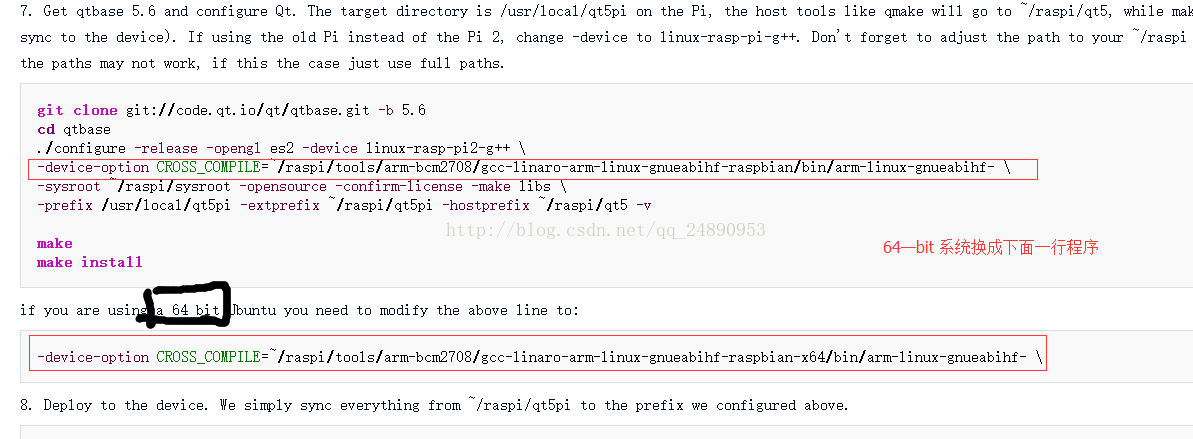
64位系統需要改成-x64
5、調整螢幕設定,建議參考官方教程(最後Additional notes)
6、缺少某個庫,比如我在編譯中出現提示缺少資料庫,則如下方式新增 舉例 1、新增qtserialport庫,首先進入qtserialport目錄下,~/raspi/qt-everywhere-opensource-src-5.7.1-qtserialport 2、執行 ~/raspi/qt5/bin/qmake -r
3、make 4、make install 5、cd ~/raspi(返回到raspi檔案下) 6、rsync -avz qt5pi [email protected]:/usr/local
7、編譯,使用 進入工程目錄下: 1、cd workspace/qt/SmartCabinet 2、~/raspi/qt5/bin/qmake 3、make
4、傳入樹莓派 複製到樹莓派 scp SmartCabinet [email protected]:/home/pi (scp 是複製到樹莓派上) 控制樹莓派 ssh [email protected]