
nginx+uwsgi+django開發環境搭建
Nginx+uWSGI+Djangoi開發環境搭建
Django簡介,環境搭建
uWSGI簡介,安裝與配置
Nginx安裝與配置
Nginx+uWSGI+Django原理解析
1、django簡介,環境搭建
django簡介
Django 是用Python開發的一個免費開源的Web框架,可以用於快速搭建高效能,優雅的網站!
Django 中提供了開發網站經常用到的模組,常見的程式碼都為你寫好了,通過減少重複的程式碼,Django 使你能夠專注於 web 應用上有 趣的關鍵性的東西。
Django的理念是DRY(Don't Repeat Yourself)來鼓勵快速開發!
學Django需要什麼基礎
1. Django是 python 語言寫的一個Web框架包,所以你得知道一些 Python 基礎知識。
2. 其次你最好有一些做網站的經驗,懂一些網頁 HTML, CSS, JavaScript 的知識。
沒有經驗也沒有關係,慢慢來就好了,你一定可以學會,Django 很簡單!
django環境搭建
虛擬軟體:Oracle VM VirtualBox
虛擬機器系統:centos 6.4
Python版本:2.7.13
Django版本:1.11.16
本地宿主機是win10,以上是我的環境配置,現在開始搭建Django環境。
安裝Django
pip install Django==1.11.16
檢查Django 是否安裝完成
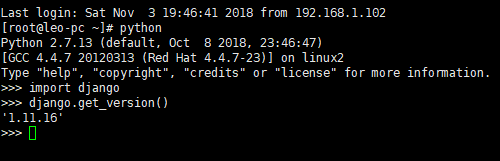
如果執行後看到版本號,就證明安裝成功了。YEAH
2、uwsgi簡介,安裝與配置
uwsgi簡介
uWSGI是一個Web伺服器,它實現了WSGI協議、uwsgi、http等協議。Nginx中HttpUwsgiModule的作用是與uWSGI伺服器進行交換。
要注意 WSGI / uwsgi / uWSGI 這三個概念的區分。
- WSGI是一種Web伺服器閘道器介面。它是一個Web伺服器(如nginx,uWSGI等伺服器)與web應用(如用Flask框架寫的程式)通訊的一種規範。
- uwsgi是一種線路協議而不是通訊協議,在此常用於在uWSGI伺服器與其他網路伺服器的資料通訊。
- 而uWSGI是實現了uwsgi和WSGI兩種協議的Web伺服器。
- uwsgi協議是一個uWSGI伺服器自有的協議,它用於定義傳輸資訊的型別(type of information),每一個uwsgi packet前4byte為傳輸資訊型別描述,它與WSGI相比是兩樣東西。
uwsgi安裝
1)uwsgi原理
2)uwsgi安裝與除錯
pip install uwsgi
檢查uwsgi是否安裝成功
建立一個python檔案 test.py
def application(env, start_response):
    start_response('200 OK',[('Content-Type','text/html')])
    return ['Hello World']
啟動uwsgi,命令uwsgi --http :8000 --wsgi-file test.py
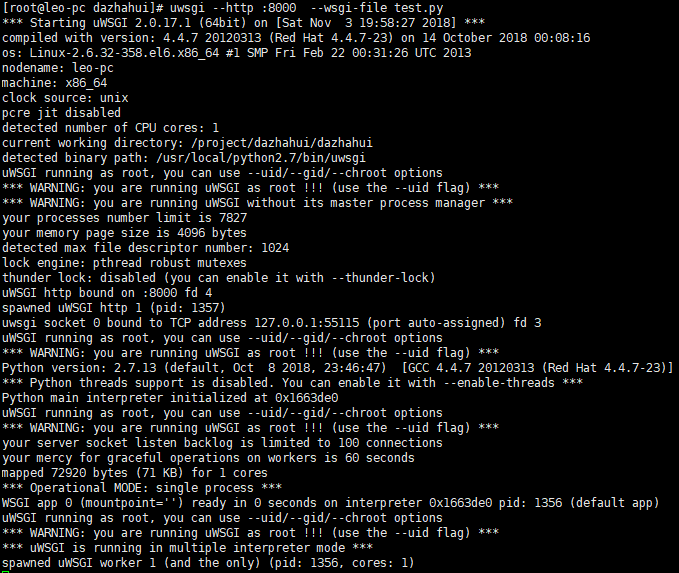
瀏覽器或者命令列訪問http://127.0.0.1:8000/,如果成功,可以看到列印 Hello World

uwsgi常用命令選項:
常用選項:

http : 協議型別和埠號

processes : 開啟的程序數量

workers : 開啟的程序數量,等同於processes(官網的說法是spawn the specified number ofworkers / processes)

chdir : 指定執行目錄(chdir to specified directory before apps loading)

wsgi-file : 載入wsgi-file(load .wsgi file)

stats : 在指定的地址上,開啟狀態服務(enable the stats server on the specified address)

threads : 執行執行緒。由於GIL的存在,我覺得這個真心沒啥用。(run each worker in prethreaded mode with the specified number of threads)

master : 允許主程序存在(enable master process)

daemonize : 使程序在後臺執行,並將日誌打到指定的日誌檔案或者udp伺服器(daemonize uWSGI)。實際上最常用的,還是把執行記錄輸出到一個本地檔案上。(肯定要啟用,要不刷屏!!)

pidfile : 指定pid檔案的位置,記錄主程序的pid號。   (生成pid檔案,以便stop uwsgi)

vacuum : 當伺服器退出的時候自動清理環境,刪除unix socket檔案和pid檔案(try to remove all of the generated file/sockets)
3)uwsgi with django
新建一個Django project
1 django-admin.py startproject project_name
2 #在 windows 上,如果報錯,嘗試用 django-admin 代替 django-admin.py
3 #project_name(你的專案名稱)
django-admin startproject dazhahui,專案目錄結構如下:
1 dazhahui
2 ├── manage.py
3 └── dazhahui
4     ├── __init__.py
5     ├── settings.py
6     ├── urls.py
7     └── wsgi.py
新建一個applicaiton
python manage.py createapp app_name
1 python manage.py createapp app_name
2 # app_name(應用程式的名稱)
python manage.py createapp app_test,應用程式目錄結構如下:
1 test_app/
2 ├── __init__.py
3 ├── admin.py
4 ├── models.py
5 ├── tests.py
6 └── views.py
測試uwsgi with django是否關聯成功
test_app應用程式下的view.py,新增一個index方法,列印 “歡迎光臨 我的django”
1 # -*- coding: utf-8 -*-
2 from __future__ import unicode_literals
3
4 from django.shortcuts import render
5 from django.http import HttpResponse
6 # Create your views here.
7 def index(request):
8  return HttpResponse(u'歡迎光臨 我的django')
dazhahui專案下的urls.py, 新增一行 url(r'^$', test_app_views.index)
 1 """dazhahui URL Configuration
 2
 3 The `urlpatterns` list routes URLs to views. For more information please see:
 4     https://docs.djangoproject.com/en/1.11/topics/http/urls/
 5 Examples:
 6 Function views
 7     1. Add an import:  from my_app import views
 8     2. Add a URL to urlpatterns:  url(r'^$', views.home, name='home')
 9 Class-based views
10     1. Add an import:  from other_app.views import Home
11     2. Add a URL to urlpatterns:  url(r'^$', Home.as_view(), name='home')
12 Including another URLconf
13     1. Import the include() function: from django.conf.urls import url, include
14     2. Add a URL to urlpatterns:  url(r'^blog/', include('blog.urls'))
15 """
16 from django.conf.urls import url
17 from django.contrib import admin
18 from test_app import views as test_app_views
19 urlpatterns = [
20     url(r'^$', test_app_views.index),
21     url(r'^admin/', admin.site.urls),
如果執行命令後,看到啟動日誌和訪問日誌,說明uwsgi和django關聯成功
1 uwsgi --http :8001 --chdir /project/dazhahui/ --wsgi-file dazhahui/wsgi.py

瀏覽器中訪問 http://127.0.0.1:8001/ 或 curl:http://127.0.0.1:8001,如果看到“歡迎光臨 我的jango”,一切正常yeah

設定uwsgi自啟動
在/etc/init.d/下建立檔案,內容如下:
 1 #! /bin/sh
 2 # chkconfig: 2345 55 25
 3 # Description: Startup script for uwsgi webserver on Debian. Place in /etc/init.d and
 4 # run 'update-rc.d -f uwsgi defaults', or use the appropriate command on your
 5 # distro. For CentOS/Redhat run: 'chkconfig --add uwsgi'
 6
 7 ### BEGIN INIT INFO
 8 # Provides:          uwsgi
 9 # Required-Start:    $all
10 # Required-Stop:      $all
11 # Default-Start:      2 3 4 5
12 # Default-Stop:     0 1 6
13 # Short-Description: starts the uwsgi web server
14 # Description:       starts uwsgi using start-stop-daemon
15 ### END INIT INFO
16
17 PATH=/usr/local/sbin:/usr/local/bin:/sbin:/bin:/usr/sbin:/usr/bin:/project/dazhahui
18 DESC="uwsgi daemon"
19 NAME=uwsgi
20 DAEMON=/usr/bin/uwsgi
21 # CONFIGFILE=/etc/$NAME.ini
22 CONFIGFILE=/project/dazhahui/$NAME.ini
23 PIDFILE=/run/$NAME.pid
24 SCRIPTNAME=/etc/init.d/$NAME
25
26 set -e
27 [ -x "$DAEMON" ] || exit 0
28
29 do_start() {
30      $DAEMON $CONFIGFILE || echo -n "uwsgi already running"
31 }
32
33 do_stop() {
34      $DAEMON --stop $PIDFILE || echo -n "uwsgi not running"
35      rm -f $PIDFILE
36      echo "$DAEMON STOPED."
37 }
38
39 do_reload() {
40      $DAEMON --reload $PIDFILE || echo -n "uwsgi can't reload"
41 }
42
43 do_status() {
44      ps aux|grep $DAEMON
45 }
46
47 case "$1" in
48  status)
49      echo -en "Status $NAME: \n"
50      do_status
51  ;;
52  start)
53      echo -en "Starting $NAME: \n"
54      do_start
55  ;;
56  stop)
57      echo -en "Stopping $NAME: \n"
58      do_stop
59  ;;
60  reload|graceful)
61      echo -en "Reloading $NAME: \n"
62      do_reload
63  ;;
64  *)
65      echo "Usage: $SCRIPTNAME {status|start|stop|reload}" >&2
66      exit 3
67  ;;
68 esac
69
70 exit 0
設定許可權 chmod +x uwsgi
新增開機啟動
chkconfig uwsgi on
使用service進行管理
service uwsgi {status|start|stop|reload}
3、nginx安裝與配置
安裝nginx
使用yum安裝nginx
1 yum install nginx
nginx常用命令
service nginx start
service nginx stop
service nginx restart
service ngixn reload 重新nginx配置檔案
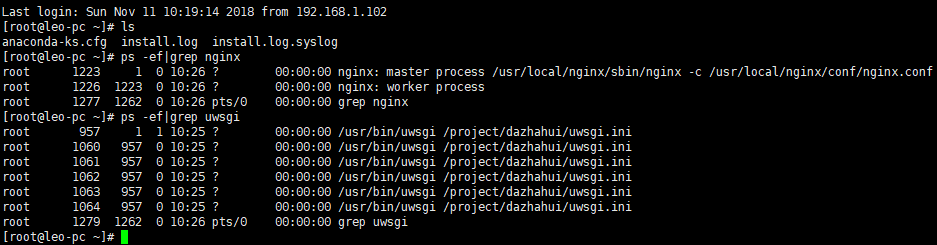
看到nginx啟動成功日誌,訪問curl http://127.0.0.1/ 如果看到nginx的歡迎頁面Welcome to nginx,說明nginx安裝成功
設定nginx系統自啟動
root使用者登入,在 /etc/init.d/目錄下新建一個nginx指令碼檔案。使用vi命令
vi /etc/init.d/nginx
  1 #!/bin/sh
  2 #
  3 # nginx - this script starts and stops the nginx daemon
  4 #
  5 # chkconfig:   - 85 15
  6 # description: Nginx is an HTTP(S) server, HTTP(S) reverse \
  7 #               proxy and IMAP/POP3 proxy server
  8 # processname: nginx
  9 # config:      /etc/nginx/nginx.conf
 10 # config:      /etc/sysconfig/nginx
 11 # pidfile:     /var/run/nginx.pid
 12
 13 # Source function library.
 14 . /etc/rc.d/init.d/functions
 15
 16 # Source networking configuration.
 17 . /etc/sysconfig/network
 18
 19 # Check that networking is up.
 20 [ "$NETWORKING" = "no" ] && exit 0
 21
 22 nginx="/usr/local/nginx/sbin/nginx"
 23 prog=$(basename $nginx)
 24
 25 NGINX_CONF_FILE="/usr/local/nginx/conf/nginx.conf"
 26
 27 [ -f /etc/sysconfig/nginx ] && . /etc/sysconfig/nginx
 28
 29 lockfile=/var/lock/subsys/nginx
 30
 31 start() {
 32     [ -x $nginx ] || exit 5
 33     [ -f $NGINX_CONF_FILE ] || exit 6
 34     echo -n $"Starting $prog: "
 35     daemon $nginx -c $NGINX_CONF_FILE
 36     retval=$?
 37     echo
 38     [ $retval -eq 0 ] && touch $lockfile
 39     return $retval
 40 }
 41
 42 stop() {
 43     echo -n $"Stopping $prog: "
 44     killproc $prog -QUIT
 45     retval=$?
 46     echo
 47     [ $retval -eq 0 ] && rm -f $lockfile
 48     return $retval
 49 killall -9 nginx
 50 }
 51
 52 restart() {
 53     configtest || return $?
 54     stop
 55     sleep 1
 56     start
 57 }
 58
 59 reload() {
 60     configtest || return $?
 61     echo -n $"Reloading $prog: "
 62     killproc $nginx -HUP
 63 RETVAL=$?
 64     echo
 65 }
 66
 67 force_reload() {
 68     restart
 69 }
 70
 71 configtest() {
 72 $nginx -t -c $NGINX_CONF_FILE
 73 }
 74
 75 rh_status() {
 76     status $prog
 77 }
 78
 79 rh_status_q() {
 80     rh_status >/dev/null 2>&1
 81 }
 82
 83 case "$1" in
 84     start)
 85         rh_status_q && exit 0
 86     $1
 87         ;;
 88     stop)
 89         rh_status_q || exit 0
 90         $1
 91         ;;
 92     restart|configtest)
 93         $1
 94         ;;
 95     reload)
 96         rh_status_q || exit 7
 97         $1
 98         ;;
 99     force-reload)
100         force_reload
101         ;;
102     status)
103         rh_status
104         ;;
105     condrestart|try-restart)
106         rh_status_q || exit 0
107             ;;
108     *)
109       echo $"Usage: $0 {start|stop|status|restart|condrestart|try-restart|reload|force-reload|configtest}"
110         exit 2
111
112 esac
2)nginx with uwsgi
nginx.conf的目錄下有uwsgi_params檔案(/usr/local/nginx/conf/uwsgi_params),這個檔案很重要,用於與nginx建立關聯。
在自己的工程目錄下,建立如dazhahui.conf(/project/dazhahui/dazhahui.conf)的配置檔案;複製nginx.conf裡面全部的內容,全部寫入dazhahui.conf中。
然後按照下面寫的,把dazhahui.conf配置檔案中的server段部分全部替換掉。
 1   server {
 2         listen 80;
 3         server_name 192.168.1.103;
 4         charset utf-8;
 5         access_log  /project/dazhahui/logs/nginx_access.log;
 6         error_log   /project/dazhahui/logs/nginx_error.log;
 7
 8         location / {
 9            uwsgi_connect_timeout 30;
10            uwsgi_pass  unix:/project/dazhahui/dazhahui.sock;
11            include     /usr/local/nginx/conf/uwsgi_params; 12
13       }
14         location /media {
15            alias /project/dazhahui/media;
16       }
17
18         location /static {
19            alias /project/dazhahui/static;
20       }
21     }
listen 80表示伺服器監聽80埠;
server name 可以填寫域名或者ip地址,我這裡寫上我的虛擬機器分配的ip 192.168.1.103,在瀏覽器就用這個ip訪問
access_log和error_log指定nginx的訪問日誌和錯誤日誌的存放路徑
location /表示專案的根目錄,uwsgi_connect_timeout指定連結超時時間30秒,uwsgi_pass可以指定socket檔案的絕對路徑或者uwsgi監聽的ip:埠
location /media和location /static存放靜態檔案目錄,其中location /static指明專案引用的靜態檔案目錄,瀏覽器中顯示的靜態資源所在的根目錄名;使用者在瀏覽器中檢視到的所有image、css或js資源都是處在http://127.0.0.1/static下.
與Django settings.py配置檔案靜態檔案目錄一致
STATIC_ROOT = os.path.join(BASE_DIR, "static/")
每次啟動uwsgi都要輸一大串命令:uwsgi --http :8001 --chdir /project/dazhahui/ --wsgi-file dazhahui/wsgi.py,建議一個uWSGI配置檔案,在自己的工程目錄下建立uwsgi.ini
 1 [uwsgi]
 2 #
 3 Django-related settings
 4 #
 5 socket = /project/dazhahui/dazhahui.sock
 6 chmod-socket=664
 7
 8 # the base directory (project full path)
 9 chdir = /project/dazhahui/
10
11 # Django's wsgi file
12 wsgi-file = wsgi.py
13 #module = dazhahui.wsgi # 新配置
14
15 http=192.168.1.103:8001
16
17 #
18 process-related settings
19 #
20 # master
21 master = true
22
23 # maximum number of worker processes
24 processes = 4
25
26 threads = 2
27 stats = 127.0.0.1:9191
28 #uid = nobody
29 #gid = nobody
30
31 harakiri = 30
32 # run process background and save log to daemonize
33 daemonize = /project/dazhahui/logs/uwsgi.log
34 pidfile = /var/run/uwsgi.pid
35 #plugins = python
36 pythonpath = /usr/local/python2.7/lib/python2.7/site-packages/
socket的欄位值/project/dazhahui/dazhahui.sock必須要跟dazhahui.conf的uwsgi_pass的欄位值完全一致,否則會出問題。
chdir指定專案的根目錄;
wsgi-file指的是wsgi.py在自己工程中的相對路徑,我的django工程的wsgi.py檔案是在”/project/dazhahui/wsgi.py”,
daemonize指定uWSGI日誌的儲存路徑。
列舉下相關主要的檔案路徑:
1 工程路徑:                  /project/dazhahui
2 工程靜態檔案路徑:            /project/dazhahui/static
3 wsgi.py的路徑:             /project/dazhahui/wsgi.py
4 uwsgi.ini的路徑:           /project/dazhahui/uwsgi.ini
5 uwsgi日誌路徑:             /project/dazhahui/logs/uwsgi.log
6 destiny.conf的路徑:        /project/dazhahui/dazhahui.conf
7 uwsgi_params的路徑:        /usr/local/nginx/conf/uwsgi_params
8 nginx訪問日誌路徑:          /project/dazhahui/logs/nginx_access.log
9 nginx錯誤日誌路徑:          /project/dazhahui/logs/nginx_error.log
可以發現,我幾乎把所有有關工程的配置檔案和日誌檔案都放在工程目錄下了,方便後期維護與查錯。
啟動uWSGI
1 uwsgi --ini /project/dazhahui/uwsgi.ini
啟動nginx
在這之前,我們要先去nginx配置檔案的根目錄拷貝mime.types(/etc/nginx/conf/mime.types)到工程目錄(/wwwroot/destiny/mime.types),和destiny.conf放在一起。
否則用配置檔案啟動nginx會報錯:
1 nginx: [emerg] open() "/**/**/**/mime.types" failed (2: No such file or directory)
當然,如果不想拷貝mime.types檔案,也可以將配置檔案中“include mime.types;”一項,改成絕對路徑“include /etc/nginx/conf/mime.types;”
如果nginx已經開啟,先關閉nginx(service nginx stop或nginx -s stop),再執行以下命令:
1 nginx -c /project/dazhahui/dazhahui.conf
這裡的-c 表示載入配置檔案啟動
4、nginx+uwsgi+django原理解析
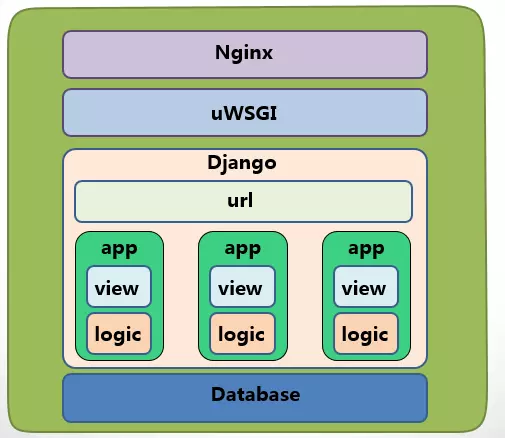
Nginx+uwsgi+django的結構圖
瀏覽器發起一個請求,nginx監聽埠並接收請求,nginx已載入的dazhahui.conf配置檔案通過uwsgi_pass配置項,找到對應的uwsgi暴露的IP和埠,通過uwsgi協議轉發給uWsgi Web伺服器,uwsgi伺服器通過wsgi.py檔案的wsgi-file項找到Django專案,
Django接受並處理瀏覽器的請求,將處理結果返回給uWsgi Web伺服器,uWsgi通知Nginx,Nginx把響應結果返回給瀏覽器。

Nginx+uWsgi+Django的通訊關係
參考:
https://blog.csdn.net/imphp/article/details/38232133
https://www.jianshu.com/p/1c50b15b143a
https://blog.csdn.net/ocean20/article/details/80496712