
Maven、Jenkins實現自動化部署
阿新 • • 發佈:2018-11-10
工程例項程式碼:https://github.com/chocolateBlack/multi_env_folder_maven
利用Maven、Jenkins實現專案自動化部署,能夠按照bin、conf、lib檔案進行打包,並能夠通過Jenkins按照環境一鍵發不到伺服器上
- 首先通過Maven外掛實現按照不同環境,生成配置檔案
為了應對環境切換,在配置檔案conf.yaml中使用Maven屬性,在專案打包過程制定是按照id為dev的profile進行構建,還是以id為test的profile進行構建。其中conf.yaml和profle的配置如下:
conf.yaml:path=${hdfs.path}
profile的配置如下:
<profiles>
        <profile>
                <id>dev</id>
                <properties>
                        <active.profile>dev</active.profile>
                        <!-- 業務配置資訊 -->
                        <hdfs.path>/dev/wh/source/tp</hdfs.path>
                </properties>
                <activation>
                        <activeByDefault>true</activeByDefault>
                </activation>
        </profile>
        <profile>
                <id>test</id>
                <properties>
                        <active.profile>dev</active.profile>
                        <!-- 業務配置資訊 -->
                        <hdfs.path>/test/wh/source/tp</hdfs.path>
                </properties>
        </profile>
 </profiles>
接下來就需要讓maven能夠解析conf資料夾中Maven屬性,這就是maven-resources-plugin要做的事情。
開啟資源過濾,並指定過濾的目錄。以下配置指定src/main/conf目錄下所有型別的檔案開啟資源過濾,並將解析後的檔案指定輸出到target/class/conf目錄下
<resources>
        <resource>
                <directory>src/main/conf/</directory>
                <filtering>true</filtering>
                <includes>
                        <include>**/*.*</include>
                </includes>
                <targetPath>conf</targetPath><!-- 最終打包的目錄是target/class/conf,使用者assembly外掛從這個目錄中讀取編譯好的配置檔案 -->
        </resource>
</resources>
2.其次,利用maven-assembly-plugin外掛,將編譯好的專案分成bin、conf、lib目錄。
- maven-assembly-plugin的配置中,指定一個主類這樣可以使用java -jar方式或者java -cp的方式執行該專案jar包;
- 以jar-with-dependencies的方式,將專案依賴的jar包一併打包到一個jar中
- 指定assembly.xml檔案,主要用於編譯好的檔案分發到bin、conf、lib目錄中
maven-assembly-plugin外掛的配置:<plugin> <groupId>org.apache.maven.plugins</groupId> <artifactId>maven-assembly-plugin</artifactId> <version>2.6</version> <executions><execution><!-- 配置執行器 --> <id>make-assembly</id> <phase>package</phase><!-- 繫結到package生命週期階段上 --> <goals> <goal>single</goal><!-- 只執行一次 --> </goals> <configuration> <archive> <manifest> <!-- 此處指定main方法入口的class --> <mainClass>com.test.HelloMaven</mainClass> </manifest> </archive> <descriptorRefs> <descriptorRef>jar-with-dependencies</descriptorRef> </descriptorRefs> <finalName>${project.name}</finalName> <descriptor>src/main/assembly/assembly.xml</descriptor><!--配置描述檔案路徑--> </configuration> </execution> </executions> </plugin>
關於檔案分發的assembly.xml配置:
<fileSets>
        <!-- 將src/main/bin下的檔案,打包到目標目錄的bin資料夾下 -->
        <fileSet>
                <directory>src/main/bin</directory>
                <outputDirectory>bin</outputDirectory>
                <fileMode>755</fileMode>
        </fileSet>
        <!-- 經過maven-resources-plugin外掛生成的配置檔案位於target/classes/conf/中 -->
        <fileSet>
                <directory>target/classes/conf/</directory>
                <outputDirectory>conf</outputDirectory>
                <fileMode>755</fileMode>
                <lineEnding>unix</lineEnding>
                <excludes>
                        <exclude>*.formatted</exclude>
                </excludes>
        </fileSet>
</fileSets>
<dependencySets>
        <!-- 工程單獨的jar,分發到lib目錄中 -->
        <dependencySet>
                <fileMode>755</fileMode>
                <outputFileNameMapping>${project.artifactId}-${project.version}.jar</outputFileNameMapping>
                <outputDirectory>/lib/</outputDirectory>
                <scope>runtime</scope>
                <includes>
                        <include>${project.groupId}:${project.artifactId}</include>
                </includes>
        </dependencySet>
        <!-- jar-with-dependencies方式,包含依賴jar的大包,放到lib目錄下 -->
        <dependencySet>
                <fileMode>755</fileMode>
                <outputFileNameMapping>${project.name}-jar-with-dependencies.jar</outputFileNameMapping>
                <outputDirectory>/lib/</outputDirectory>
                <scope>runtime</scope>
        </dependencySet>
</dependencySets>
專案結構圖: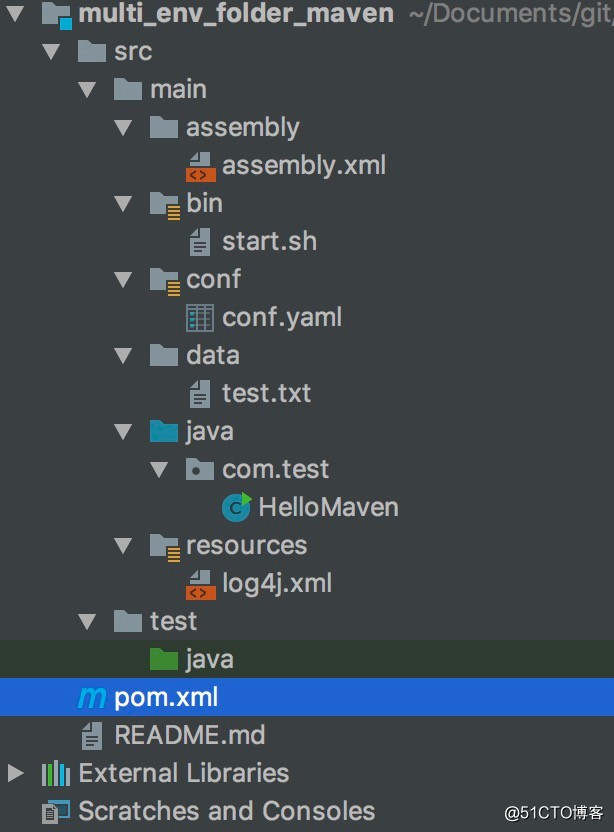
通過mvn package -Pdev命令打包後target目錄下的結構圖,紅框標記的就是期待的結構目錄,並且conf中的配置檔案是按照dev環境生成的結果(path=/dev/wh/source/tp)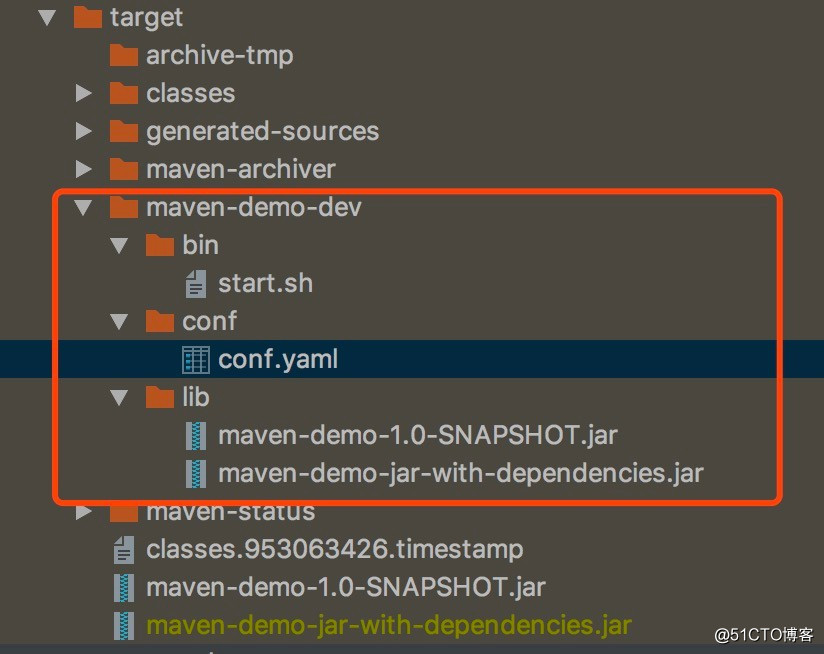
3.專案按bin、conf、lib生成部署結構,剩下的事情就交給Jenkins,通過Jenkins以及其外掛,將打包結果上傳目標伺服器