Unity AssetBundle打包場景並載入
1.首先我們建立倆場景用於切換。
2.編輯倆指令碼。
指令碼1(放入Editor資料夾):可以在unity選單欄的Assets下方找到Build AssetBundle MyScene。如下圖:

CreatAssetsBundle:
using UnityEngine;
using System.Collections;
using UnityEditor;
public class CreatAssetsBundle : Editor
{
// 打包unity場景檔案
[MenuItem("Assets/Build AssetBundle MyScene")]
static void MyBuild()
{
// 需要打包的場景名字
string[] path = { "Assets/loadScene.unity" };
BuildPipeline.BuildPlayer(path, Application.dataPath + "/MyScene.unity3d", BuildTarget.StandaloneWindows64, BuildOptions.BuildAdditionalStreamedScenes);
// 重新整理,可以直接在Unity工程中看見打包後的檔案
AssetDatabase.Refresh();
}
}
指令碼2(用於下載AssetsBundle打包的場景):
LoadScene:
using UnityEngine;
using System.Collections;
using UnityEngine.SceneManagement;
public class LoadScene : MonoBehaviour
{
private string url;
private string assetname;
void Start()
{
// 下載壓縮包,寫出具體的名字
url = "file://" + Application.dataPath + "/MyScene.unity3d";
assetname = "SampleScene";
StartCoroutine(Download());
}
IEnumerator Download()
{
WWW www = new WWW(url);
// Debug.LogError(url);
yield return www;
if (www.error != null)
{
Debug.Log("下載失敗");
}
//else//第一種載入方法 需要把場景拖進buildsetting
//{
// AssetBundle bundle = www.assetBundle;
// SceneManager.LoadScene(0);
// print("跳轉場景");
// // AssetBundle.Unload(false),釋放AssetBundle檔案記憶體映象,不銷燬Load建立的Assets物件
// // AssetBundle.Unload(true),釋放AssetBundle檔案記憶體映象同時銷燬所有已經Load的Assets記憶體映象
// bundle.Unload(false);
//}
else//第二種方法 直接載入
{
WWW download = WWW.LoadFromCacheOrDownload("file://" + Application.dataPath + "/MyScene.unity3d", 1);
yield return download;
var bundle = download.assetBundle;
SceneManager.LoadScene(assetname);
}
// 中斷正在載入過程中的WWW
www.Dispose();
}
}
準備工作:
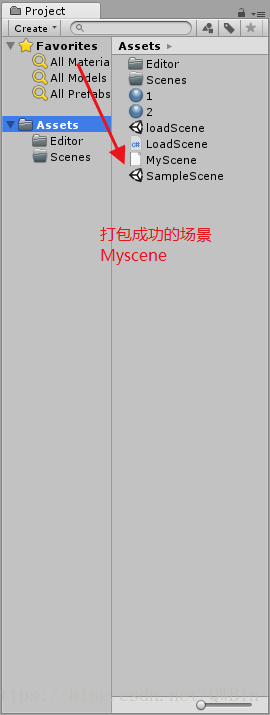
先後先點選“Build AssetBundle MyScene”
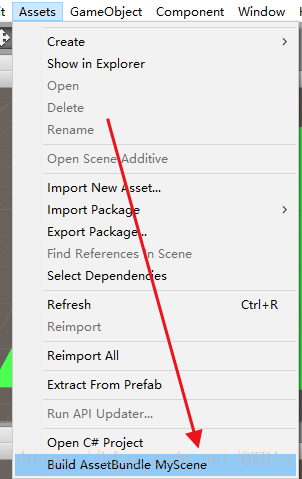
點選: