
CI持續整合系統環境--Gitlab+Gerrit+Jenkins完整對接
原文地址https://www.cnblogs.com/kevingrace/p/5651447.html
近年來,由於開源專案、社群的活躍熱度大增,進而引來持續整合(CI)系統的誕生,也越發的聽到更多的人在說協同開發、敏捷開發、迭代開發、持續整合和單元測試這些拉風的術語。然而,大都是僅僅聽到在說而已,國內也很少有公司能有完整的 CI 體系流程。反之一些開源專案都有完整的 CI體系,比如openstack。
為了實現程式碼託管->程式碼稽核->程式碼釋出的一套自動化流程,我特意在IDC伺服器上部署了Gitlab+Gerrit+Jenkins對接環境,以下記錄了操作過程:
整體的架構圖如下:

----------------------------------------------------------------------------------------------------------------------------------------
1)Gitlab上進行程式碼託管
在gitlab上建立的專案設定成Private,普通使用者對這個專案就只有pull許可權,不能直接進行push,Git自帶code review功能。
強制Review :在 Gitlab 上建立的專案,指定相關使用者只有Reporter許可權,這樣使用者沒有許可權使用git push功能,只能git review到Gerrit 系統上,Jenkins在監聽Gerrit上的專案事件會觸發構建任務來測試程式碼, Jenkins 把測試結果通過 ssh gerrit 給這個專案打上 Verified (資訊校驗)成功或失敗標記,成功通知其它人員 Review(程式碼稽核) 。
Gitlab保護Master 分支:在 Gitlab 上建立的專案可以把 Master 分支保護起來,普通使用者可以自己建立分支並提交程式碼到自己的分支上,沒有許可權直接提交到Master分支,使用者最後提交申請把自己的分支 Merge 到 Master ,管理員收到 Merge 請求後, Review 後選擇是否合併。
可以將gitlab和gerrit部署在兩臺機器上,這樣gitlab既可以託管gerrit程式碼,也可以作為gerrit的備份。
因為gitlab和gerrit做了同步,gerrit上的程式碼會同步到gitlab上。
這樣即使gerrit部署機出現故障,它裡面的程式碼也不會丟失,可以去gitlab上拿。
2)Gerrit稽核程式碼
Gerrit是一款被Android開源專案廣泛採用的code review(程式碼稽核)系統。普通使用者將gitlab裡的專案clone到本地,修改程式碼後,雖不能直接push到程式碼中心 ,但是可以通過git review提交到gerrit上進行稽核。gerrit相關稽核員看到review資訊後,判斷是否通過,通過即commit提交。然後,gerrit程式碼會和gitlab完成同步。
grrit的精髓在於不允許直接將本地修改同步到遠端倉庫。客戶機必須先push到遠端倉庫的refs/for/*分支上,等待稽核。
gerrit上也可以對比程式碼稽核提交前後的內容狀態。
3)jenkins程式碼釋出
當用戶git review後,程式碼通過jenkins自動測試(verified)、人工review 後,程式碼只是merge到了Gerrit的專案中,並沒有merge到 Gitlab的專案中,所以需要當 Gerrit 專案倉庫有變化時自動同步到Gitlab的專案倉庫中。Gerrit 自帶一個 Replication 功能,同時我們在安裝 Gerrit 時候預設安裝了這個 Plugin,通過新增replication.config 給 Gerrit即可(下文有介紹)
----------------------------------------------------------------------------------------------------------------------------------------
一、基礎環境搭建(參考下面三篇文件)
CI持續整合系統環境---部署gerrit環境完整記錄
CI持續整合系統環境---部署Gitlab環境完整記錄
CI持續整合系統環境---部署Jenkins完整記錄
二、Gitlab+Gerrit+Jenkins的對接
1)Gitlab配置
gitlab上的管理員賬號是gerrit,郵箱是[email protected]
建立了一個普通賬號wangshibo,郵箱是[email protected]
[[email protected]]# su - gerrit
[[email protected] ~]$ ssh-keygen -t rsa -C
[[email protected] ~]$ cat ~/.ssh/id_rsa.pub
將上面gerrit賬號的公鑰內容更新到Gitlab上。
使用gerrit賬號登陸Gitlab,點選頁面右上角的Profile Settings - 點選左側的SSH Keys小鑰匙圖示 - 點選Add SSH Key。
在Key對應的輸入框中輸入上段落$cat .ssh/id_rsa.pub顯示的公鑰全文,點選Title,應該會自動填充為[email protected]。如下:
在Gitlab上建立wangshibo使用者
然後在機器上生成wangshibo公鑰(先提前在機器上建立wangshibo使用者,跟上面一樣操作),然後將公鑰內容更新到Gitlab上(用wangshibo賬號登陸Gitlab)
用gerrit登陸Gitlab,新建group組為dev-group,然後建立新專案test-project1(在dev-group組下,即專案的Namespace為dev-group,將wangshibo使用者新增到dev-group組內,許可權為Reporter),具體如下截圖:


建立的專案設定成Private即私有的,這樣普通使用者這它就只有pull許可權,沒有push許可權。


在test-project1工程裡建立檔案,建立過程此處省略......
檔案建立後,如下:

在linux系統上登入wangshibo賬號下,克隆工程test-project1.git,測試許可權
[[email protected]]# su - wangshibo
[[email protected] ~]$ git clone [email protected]:dev-group/test-project1.git
Initialized empty Git repository in /home/wangshibo/test-project1/.git/
remote: Counting objects: 15, done.
remote: Compressing objects: 100% (9/9), done.
remote: Total 15 (delta 0), reused 0 (delta 0)
Receiving objects: 100% (15/15), done.
[[email protected] ~]$ cd ~/test-project1/
[[email protected] ~]$ git config --global user.name 'wangshibo'
[[email protected] ~]$ git config --global user.email '[email protected]'
[[email protected] ~]$ touch testfile
[[email protected] ~]$ git add testfile
[[email protected] ~]$ git commit -m 'wangshibo add testfile'
[[email protected] ~]$git push
GitLab: You are not allowed to push code to this project.
fatal: The remote end hung up unexpectedly
上面有報錯,因為普通使用者沒有直接push的許可權。需要先review到gerrit上進行稽核並commit後,才能更新到程式碼中心倉庫裡。
2)Gerrit配置
在linux伺服器上切換到gerrit賬號下生成公私鑰
[[email protected]]$ ssh-keygen -t rsa -C [email protected]
將id_rsa.pub公鑰內容更新到gerrit上(管理員gerrit賬號登陸)的SSH Public Keys裡

同樣的,將gerrit的其他兩個普通賬號wangshibo和jenkins也在linux伺服器上生產公私鑰,郵箱分別是[email protected]和[email protected]
並將兩者的公鑰id_rsa.pub內容分別更新到各自登陸的gerrit的SSH Public Keys裡
3)Jenkins配置
Jenkins系統已經建立了管理員賬戶jenkins並安裝了Gerrit Trigger外掛和Git plugin外掛
在“系統管理”->“外掛管理"->”可選外掛"->搜尋上面兩個外掛進行安裝
使用jenkins賬號登陸jenkins,進行Jenkins系統的SMTP設定 (根據具體情況配置)
“主頁面->系統管理->系統設定”,具體設定如下:
首先管理員郵件地址設定成[email protected]

設定SMTP的伺服器地址,點選“高階”

[email protected]的密碼要確認填對,然後測試郵件傳送功能,如果如下出現successfully,就成功了! 點選“儲存”

接下來設定Gerrit Trigger


Add New Server : Check4Gerrit
勾選 Gerrit Server With Default Configurations
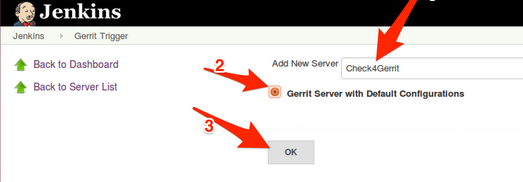
具體設定如下:
設定好之後,點選“Test Connection”,如果測試連接出現如下的Success,即表示連線成功!
點選左下方的Save儲存。

-----------------------------------------------------------------------------------------
如果上一步在點選“Test Connection”測試的時候,出現下面報錯:
解決辦法:
管理員登入gerrit
Projects->List->All-Projects
Projects->Access
Global Capabilities->Stream Events 點選 Non-Interactive Users
新增 [email protected] 使用者到 ‘Non-Interactive Users’ 組
-----------------------------------------------------------------------------------------

4)Gerrit 和 Jenkins 整合
讓Gerrit支援Jenkins
如果安裝Gerrit時沒有或者沒有選擇新增Verified標籤功能[‘lable Verified’],需要自己新增。
如下是手動新增Verified標籤功能的設定(由於我在安裝Gerrit的時候已經選擇安裝Verified標籤功能了,所以下面橙色字型安裝操作可省略)
[如果在安裝gerrit的時候沒有選擇安裝這個標籤功能,就需要在此處手動安裝下。具體可以登陸gerrit,ProjectS->list->All-Projects->Access->Edit->Add Permission 看裡面是否有Verfied的選項]
# su - gerrit
$ git init cfg; cd cfg
$ git config --global user.name 'gerrit'
$ git config --global user.email '[email protected]'
$ git remote add origin ssh://[email protected]:29418/All-Projects
$ git pull origin refs/meta/config
$ vim project.config
[label "Verified"]
function = MaxWithBlock
value = -1 Fails
value = 0 No score
value = +1 Verified
$ git commit -a -m 'Updated permissions'
$ git push origin HEAD:refs/meta/config
$ rm -rf cfg
用gerrit管理員賬號登入Gerrit
現在提交的Review請求只有Code Rivew稽核,我們要求的是需要Jenkins的Verified和Code Review雙重保障,在 Projects 的 Access 欄裡,針對 Reference: refs/heads/ 項新增 Verified 功能,如下如下:
Projects -> List -> All-Projects
Projects -> Access -> Edit -> 找到 Reference: refs/heads/* 項 -> Add Permission -> Label Verified -> Group Name 裡輸入 Non-Interactive Users -> 回車 或者 點選Add 按鈕 -> 在最下面點選 Save Changes 儲存更改。
(注意:提前把jenkins使用者新增到Non-Interactive Users組內)
許可權修改結果如下:


截圖如下:


新增Verified後的許可權如下

Gitlab上設定test-project1工程
前面我們在Gitlab上搭建了一個 test-project1 的工程,普通使用者是沒有辦法去 push 的,只能使用 git review 命令提交. 而 git review 命令需要 .gitreview 檔案存在於專案目錄裡。
用 gerrit使用者新增.gitreview 檔案
[[email protected]]# su - gerrit
[[email protected]]$ git clone [email protected]:dev-group/test-project1.git
[[email protected]]$ cd test-project1
[[email protected]]$ vim .gitreview
| 1 2 3 4 |
[gerrit]
host=103.10.86.30
port=29418
project=
test
-project1.git
|
新增.gitreview到版本庫
[[email protected]]$git add .gitreview
[[email protected]]$git config --global user.name 'gerrit'
[[email protected]]$git config --global user.email '[email protected]'
[[email protected]]$git commit .gitreview -m 'add .gitreview file by gerrit.'
[[email protected]]$git push origin master
用gerrit使用者新增.testr.conf 檔案
Python 程式碼我使用了 testr,需要先安裝 testr 命令
[[email protected]]# easy_install pip
[[email protected]]# pip install testrepository
在 test-project1 這個專案中新增 .testr.conf 檔案
[[email protected]]#su - gerrit
[[email protected]]$cd test-project1
[[email protected]]$vim .testr.conf
| 1 2 3 4 5 6 7 |
[DEFAULT]
test_command=OS_STDOUT_CAPTURE=1
OS_STDERR_CAPTURE=1
OS_TEST_TIMEOUT=60
${PYTHON:-python} -m subunit.run discover -t ./ ./ $LISTOPT $IDOPTION
test_id_option=--load-list $IDFILE
test_list_option=-list
|
提交到版本庫中
[[email protected]]$git add .testr.conf
[[email protected]]$git commit .testr.conf -m 'add .testr.conf file by gerrit'
[[email protected]]$git push origin master
Gerrit上設定 test-project1工程
在Gerrit上建立 test-project1 專案
要知道review是在gerrit上,而gerrit上現在是沒有專案的,想讓gitlab上的專案能在gerrit上review的話,必須在gerrit上建立相同的專案,並有相同的倉庫檔案.
用gerrit使用者在 Gerrit 上建立 test-project1 專案
[[email protected]]# su - gerrit
[[email protected]]$ ssh-gerrit gerrit create-project test-project1 (gerrit環境部署篇裡已經設定好的別名,方便連線gerrit)
登陸gerrit介面,發現test-project1工程已經建立了。(這種方式建立的專案是空的)

clone --bare Gitlab上的倉庫到 Gerrit (gerrit上的專案最好是從gitlab上git clone --bare過來,並且專案不要為空)
因為gerrit使用者無訪問gitlab的許可權。所以要先看是否gerrit使用者下已經存在了id_rsa金鑰,如果沒有則建立,然後把公鑰加入到gitlab的管理員賬戶上(因為後面Gerrit系統還會有個複製git庫到 Gitlab的功能需要管理員許可權)(這個測試環境,gitlab和gerrit的管理員我用的都是gerrit,所以祕鑰也是共用)
[[email protected]]$ cd /home/gerrit/gerrit_site/git/ //即登陸到gerrit安裝目錄的git下
[[email protected] git]$ rm -fr test-project1.git
[[email protected] git]$ git clone --bare [email protected]:dev-group/test-project1.git //建立並將遠端gitlab上的這個專案內容釋出到gerrit上
[[email protected] git]$ ls
All-Projects.git test-project1.git
[[email protected] git]$ cd test-project1.git/
[[email protected] git]$ ls //即test-project1工程和gerrit裡預設的All-Projects.git工程結構是一樣的了
branches config description HEAD hooks info objects packed-refs refs
同步 Gerrit的test-project1 專案到 Gitlab 上的 test-project1 專案目錄中
當用戶git review後,程式碼通過 jenkins 測試、人工 review 後,程式碼只是 merge 到了 Gerrit 的 test-project1 專案中,並沒有 merge 到 Gitlab 的 test-project1 專案中,所以需要當 Gerrit test-project1 專案倉庫有變化時自動同步到 Gitlab 的 test-project1 專案倉庫中。
Gerrit 自帶一個 Replication 功能,同時我們在安裝 Gerrit 時候預設安裝了這個 Plugin。
現在只需要新增一個 replication.config 給 Gerrit
[[email protected]]$ cd /home/gerrit/gerrit_site/etc/
[[email protected]]$ vim replication.config
| 1 2 3 4 5 6 7 |
[remote
"test-project1"
]
projects =
test
-project1
url = [email protected]:dev-group
/test-project1
.git
push = +refs
/heads/
*:refs
/heads/
*
push = +refs
/tags/
*:refs
/tags/
*
push = +refs
/changes/
*:refs
/changes/
*
threads = 3
|
設定gerrit使用者的 ~/.ssh/config
[[email protected]]$ vim /home/gerrit/.ssh/config
| 1 2 3 |
Host 103.10.86.30:
IdentityFile ~/.
ssh
/id_rsa
PreferredAuthentications publickey
|
在gerrit使用者的~/.ssh/known_hosts 中,給103.10.86.30 新增 rsa 金鑰
[[email protected]]$ sh -c "ssh-keyscan -t rsa 103.10.86.30 >> /home/gerrit/.ssh/known_hosts"
[[email protected]]$ sh -c "ssh-keygen -H -f /home/gerrit/.ssh/known_hosts"
----------------------------------------------特別注意----------------------------------------------
上面設定的~/.ssh/config檔案的許可權已定要設定成600
不然會報錯:“Bad owner or permissions on .ssh/config“
----------------------------------------------------------------------------------------------------
重新啟動 Gerrit 服務
[[email protected]]$/home/gerrit/gerrit_site/bin/gerrit.sh restart
Gerrit 的複製功能配置完畢
在 gerrit 文件中有一個 ${name} 變數用來複制 Gerrit 的所有專案,這裡並不需要。如果有多個專案需要複製,則在 replication.config 中新增多個 [remote ….] 欄位即可。務必按照上面步驟配置複製功能。
在 Jenkins 上對 test-project1 專案建立構建任務
Jenkins上首先安裝git外掛:Git Plugin
登陸jenkins,“系統管理”->“管理外掛”->“可選外掛”->選擇Git Pluin外掛進行安裝
Jenkins上建立專案
新增 test-project1工程


下面新增url:http://103.10.86.30:8080/p/test-project1.git
新增分支:origin/$GERRIT_BRANCH
如下:


構建Excute Shell,新增如下指令碼
cd $WORKSPACE
[ ! -e .testrepository ] && testr init
testr run

測試
linux系統上用wangshibo賬號提交一個更改
用wangshibo登入
刪除目錄 test-project1
克隆 test-project1 工程
進入 test-project1 目錄
新增檔案、提交
git review 增加 review 到Gerrit
[[email protected]]# su - wangshibo
[[email protected]]$ rm -rf test-project1/
[[email protected]]$ git clone [email protected]:dev-group/test-project1.git
[[email protected]]$ cd test-project1/
[[email protected]]$ touch testfile
[[email protected]]$ git add testfile
[[email protected]]$ git commit -m "wangshibo add this testfile"
[[email protected]]$ git review //提交review程式碼稽核請求
The authenticity of host '[103.10.86.30]:29418 ([103.10.86.30]:29418)' can't be established.
RSA key fingerprint is 83:ff:31:e8:68:66:6d:49:29:08:91:aa:ef:36:77:3e.
Are you sure you want to continue connecting (yes/no)? yes
Creating a git remote called "gerrit" that maps to:
ssh://[email protected]:29418/test-project1.git
Your change was committed before the commit hook was installed
Amending the commit to add a gerrit change id
remote: Resolving deltas: 100% (1/1)
remote: Processing changes: new: 1, refs: 1, done
To ssh://[email protected]:29418/test-project1.git
* [new branch] HEAD -> refs/publish/master
----------------------------------------小提示----------------------------------------
安裝git-review
[[email protected]]# git clone git://github.com/facebook/git-review.git
[[email protected]]# cd git-review
[[email protected]]# python setup.py install
[[email protected]]# pip install git-review==1.21
[[email protected]]# yum install readline-devel
--------------------------------------------------------------------------------------
程式碼稽核處理
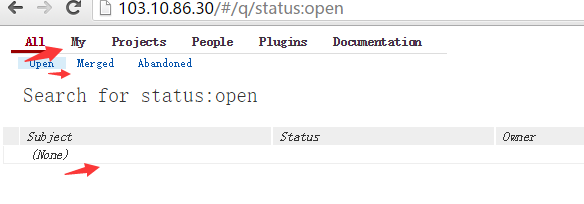
用gerrit管理員賬號登入 Gerrit ,點選"All“->”Open“-> 開啟提交的review
開啟後就能看見jenkins使用者已經Verified【原因下面會提到】。
然後點選Review進行稽核

由於上面已經配置了gerrit跟jenkins的對接工作,所以當git review命令一執行,jenkins上的test-project1工程的測試任務就會自動觸發
如下:如果任務自動執行成功了,就說明jenkins測試通過,然後jenkins會利用ssh連線gerrit並給提交的subject打上verified資訊校驗結果,然後稽核人員再進行review。

所以用gerrit管理員登陸後發現,jenkins已經通過了Verified。然後進入subject,先檢視程式碼/檔案變更,然後點選Reply,寫一點review後的意見之類的,然後評分(+2通過,-2拒絕,+1投贊成票,-1投反對票),然後點選post。

注意:
等到jenkins上Verified通過後,即看到下圖右下角出現“Verified +1 jenkins"後
才能點選"Code-Review+2",如下:

然後點選“Submit",提交稽核過的程式碼


再次檢視,review請求已被稽核處理,並且已經Merged合併了!

最後登入 Gitlab檢視 test-project1 工程,可以看到新增加檔案操作已經同步過來了


注意:在稽核人員進行review和submit操作前,要先等到jenkins測試並通過ssh方式連上gerrit給相應提交稽核的subjects帶上Verified通過後才能進行。(gitlab+gerrit+jenkins環境配置後,提交到gerrit上稽核的subjects的review人員中會預設第一個是jenkins,jenkins有結果並verified後,其他人員才能veriew和submit。也就是說當開發人員使用git review上報gerrit進行code review後,jenkins會自動觸發測試任務,通過後會在gerrit的subject稽核介面顯示verified結果,當顯示的結果是“verified +1 jenkins“後就可以進行Review和submit了,最後同步到gitlab中心倉庫。)
檢視同步日誌:
可以在gerrit伺服器上檢視replication日誌:
[[email protected] logs]$ pwd
/home/gerrit/gerrit_site/logs
[[email protected] logs]$ cat replication_log
.........................
[2016-07-14 15:30:13,043] [237da7bf] Replication to [email protected]:dev-group/test-project1.git completed in 1288 ms
[2016-07-14 15:32:29,358] [] scheduling replication test-project1:refs/heads/master => [email protected]:dev-group/test-project1.git
[2016-07-14 15:32:29,360] [] scheduled test-project1:refs/heads/master => [03b983c0] push [email protected]:dev-group/test-project1.git to run after 15s
[2016-07-14 15:32:44,360] [03b983c0] Replication to [email protected]:dev-group/test-project1.git started...
[2016-07-14 15:32:44,363] [03b983c0] Push to [email protected]:dev-group/test-project1.git references: [RemoteRefUpdate[remoteName=refs/heads/master, NOT_ATTEMPTED, (null)...dda55b52b5e5f78e2332ea2ffcb7317120347baa, srcRef=refs/heads/master, forceUpdate, message=null]]
[2016-07-14 15:32:48,019] [03b983c0] Replication to [email protected]:dev-group/test-project1.git completed in 3658 ms
----------------------------------------------------------------------------------------------------
關於jenkins上的結果:
如上,在伺服器上wangshibo賬號下
git review命令一執行,即程式碼稽核只要一提出,Jenkins 就會自動獲取提交資訊並判斷是否verified
如下,當jenkins上之前建立的工程test-project1執行成功後,那麼jenkins對提交到gerrit上的review請求
就會自動執行Verified(如上)

----------------------------------------------注意----------------------------------------------
有個發現:
jenkins上測試並返回給gerrit上提交的subject打上Verified資訊核實通過的標籤後,會將程式碼拿到自己本地相應工程的workspace目錄下
這裡的jenkins程式碼路徑是:/usr/local/tomcat7/webapps/jenkins/workspace/test-project1
不過值得注意的是,jenkins拿過來的程式碼只是每次git review修改前的程式碼狀態
可以把這個當做每次程式碼修改提交前的備份狀態
即:程式碼修改後,在gerrit裡面稽核,commit後同步到gitlab,修改前的程式碼狀態存放在jenkins裡面
-----------------------------------------------------------------------------------------------
手動安裝gerrit外掛
[[email protected] ~]$ pwd
/home/gerrit
[[email protected] ~]$ ls
gerrit-2.11.3.war gerrit_site
進行外掛安裝,下面安裝了四個外掛
[[email protected] ~]$ java -jar gerrit-2.11.3.war init -d gerrit_site --batch --install-plugin replication
Initialized /home/gerrit/gerrit_site
[[email protected] ~]$ java -jar gerrit-2.11.3.war init -d gerrit_site --batch --install-plugin reviewnotes
Initialized /home/gerrit/gerrit_site
[[email protected] ~]$ java -jar gerrit-2.11.3.war init -d gerrit_site --batch --install-plugin commit-message-length-validator
Initialized /home/gerrit/gerrit_site
[[email protected] ~]$ java -jar gerrit-2.11.3.war init -d gerrit_site --batch --install-plugin download-commands
Initialized /home/gerrit/gerrit_site
檢視plugins目錄,發現已經有外掛了
[[email protected] ~]$ cd gerrit_site/plugins/
[[email protected] ~]$ ls
commit-message-length-validator.jar download-commands.jar replication.jar reviewnotes.jar
檢視安裝了哪些外掛
[[email protected] ~]$ ssh-gerrit gerrit plugin ls
Name Version Status File
-------------------------------------------------------------------------------
commit-message-length-validator v2.11.3 ENABLED commit-message-length-validator.jar
download-commands v2.11.3 ENABLED download-commands.jar
replication v2.11.3 ENABLED replication.jar
reviewnotes v2.11.3 ENABLED reviewnotes.jar
或者登陸gerrit也可檢視

------------------------------------------------注意------------------------------------------------
gerrit手動同步程式碼到gitlab中心倉庫上
[[email protected] ~]$ ssh-gerrit gerrit --help //檢視幫助,發現gerrit COMMAND --help可查詢命令幫忙
[[email protected] ~]$ ssh-gerrit replication start --help //檢視replication同步命令的用法
replication start [PATTERN ...] [--] [--all] [--help (-h)] [--url PATTERN] [--wait]
PATTERN : project name pattern
-- : end of options
--all : push all known projects
--help (-h) : display this help text
--url PATTERN : pattern to match URL on
--wait : wait for replication to finish before exiting
[[email protected] ~]$ ssh-gerrit replication start --all //同步所有工程
-------------------------------------------------------------------------------------------------------
過載replication的同步服務
[[email protected] ~]$ ssh-gerrit gerrit plugin reload replication
如果報錯:fatal: remote plugin administration is disabled
解決辦法:
在/home/gerrit/gerrit_site/etc/gerrit.config檔案裡新增下面內容:
[plugins]
allowRemoteAdmin = true
然後重啟gerrit服務即可:
[[email protected] ~]$ /home/gerrit/gerrit_site/bin/gerrit.sh restart
Stopping Gerrit Code Review: OK
Starting Gerrit Code Review: OK
----------------------------------------------------------------------
ssh-gerrit是別名
[[email protected] ~]$ cat ~/.bashrc
# .bashrc
# Source global definitions
if [ -f /etc/bashrc ]; then
. /etc/bashrc
fi
alias ssh-gerrit='ssh -p 29418 -i ~/.ssh/id_rsa 103.10.86.30 -l gerrit'
# User specific aliases and functions
-------------------------------------------------------------------------------------------
多個工程在Gitlab上可以放在不同的group下進行管理
如下面兩個工程(多個工程,就在後面追加配置就行)
dev-group /test-project1
app/xqsj_android
多個工程的replication
[[email protected] etc]$ cat replication.config
| 1 2 3 4 5 6 7 8 9 10 11 12 13 14 15 |
[remote
"test-project1"
]
projects =
test
-project1
url = [email protected]:dev-group
/test-project1
.git
push = +refs
/heads/
*:refs
/heads/
*
push = +refs
/tags/
*:refs
/tags/
*
push = +refs
/changes/
*:refs
/changes/
*
threads = 3
[remote
"xqsj_android"
]
projects = xqsj_android
url = [email protected]:app
/xqsj_android
.git
push = +refs
/heads/
*:refs
/heads/
*
push = +refs
/tags/
*:refs
/tags/
*
push = +refs
/changes/
*:refs
/changes/
*
threads = 3
|
然後在每個程式碼庫裡新增.gitreview和.testr.conf 檔案,
注意.gitreview檔案裡的專案名稱
按照上面同步配置後,Gerrit裡面的程式碼就會自動同步到Gitlab上,包括master分支和其他分支都會自動同步的。
如果,自動同步失效或者有問題的話,可以嘗試手動同步(下面有提到)
另外:為了減少錯誤,建議在配置的時候,gitlab和gerrit裡的賬號設定成一樣的,共用賬號/郵箱/公鑰
gerrit預設的兩個project:All-Project和All-Users絕不能刪除!!
--------------------------------------------去掉jenkins測試的方式---------------------------------------------
如果gerrit不跟jenkins結合,不通過jenkins測試並返回verified核實的方式,可以採用下面的程式碼稽核流程(必須先對提交的稽核資訊進行verified核實,然後再進行程式碼的review稽核,最後submit提交):
[去掉上面gerrit和jenkins對接設定,即關閉jenkins服務(關停對應的tomcat應用),gerrit的access授權項verified裡刪除“Group Non-Interactive Users”(在這個組內踢出jenkins使用者),並刪除gerrit上的jenkins使用者]
1)上傳程式碼者(自己先verified核實,然後通知稽核者稽核)
修改程式碼,驗證後提交到 Gerrit 上。
程式碼提交後登陸 Gerrit,自己檢查程式碼(重點看縮排格式跟原檔案是否一致;去掉紅色空格部分;修改內容是否正確;命名是否有意義;註釋內容是否符合要求等)。
自己檢查沒問題後,點 “Reply”按鈕,在“Verified”中 +1,在“Code Review”中 +1,並點“Post“
在”Reviewer”欄中,點選”Add"新增稽核者 [如果不新增稽核者,上傳者自己也可以稽核並完成提交。注意:只有Review是+2的時候,才能出現submit的提交按鈕]
如果程式碼稽核沒有通過,請重複步驟1,2,3。
流程截圖:
程式碼提交後,上傳者自行登陸gerrit,找到提交的subject,點選"Reply"


2)稽核者
收到郵件通知後登陸 Gerrit,稽核程式碼。
如果稽核通過,點 “Reply”按鈕,在“Verified”中 +1,在“Code Review”中 +2,並點“Post”,最後點選“Submit“提交!
如果程式碼稽核沒有通過,點 “Review”按鈕,在“Code Review”中 -2,寫好評論後,點“Post”。
流程截圖:
如上,subject的owner新增稽核者後,稽核者登陸gerrit進行review
點選“Reply"


這樣,就完成了一個程式碼的稽核全部過程!
登陸gitlab,就會發現gerrit上稽核通過並提交後的程式碼已經同步過來了!
注意:
如上的設定,在gerrit裡授權的時候:
Revified許可權列表裡新增“Project Owners“(-1和+1)和稽核者組(-1和+1)
Review許可權列表裡新增“Project Owners“和稽核者組(都要設定-2和+2)
附授權截圖:

------------------------------------讓非管理員使用者也有gitweb訪問許可權--------------------------------------
發現在gerrit與gitweb整合後,預設情況下,只有gerrit的管理員才有gitweb的訪問許可權,普通使用者點選gitweb連結顯示404錯誤。
最後發現使用gitweb需要有【refs/*】下所有的read許可權和【refs/meta/config】的read許可權!
預設情況下:
【refs/*】下的read許可權授予物件是:Administrators和Anonymous Users(所有使用者都是匿名使用者,這個範圍很大,已預設包括所有使用者)

【refs/meta/config】的read許可權授予物件是:Administrators和Project Owners
如想要比如上面的xqsh-app組內的使用者能正常訪問gitweb,那麼就在【refs/meta/config】分支下授予這個組的Allow許可權即可!!
截圖如下:

使用普通使用者wangshibo(在xqsj-app組內)登陸gerrit,發現能開啟xqsj_android專案的gitweb超連結訪問了


---------------------------------------------------------------------------------------------------------
後續應開發人員的要求:Gitlab+gerrit+jenkins環境下,gerrit有幾個細節,都是需要設定好的:
1)專案A的開發人員對於除A以外的專案沒有訪問許可權;
2)每個開發人員應該有+2和submit,以及建立分支的許可權;
3)給teamleader配置force push的許可權;
設定方案:
第1個要求:
在gerrit裡面設定read許可權,即"refs/*"下的"Read"許可權。
先保持將All-Projects預設許可權不變!
然後重新Edit專案A的許可權去覆蓋掉All-Projects繼承過來的這個許可權(下面會提到)
如下截圖(前面的Exclusive一定要打勾,覆蓋效果才能生效)

其實,開發人員是沒有必要開通gitlab賬號!只要gerrit提前和gitlab做好同步對接工作,那麼直接設定好gerrit許可權,開發人員可直接通過ssh方式登陸gerrit進行程式碼操作(git clone程式碼,然後修改,提交稽核,自動同步等)所以,只需要給開發人員開通gerrit賬號即可!
<如下,通過ssh方式連線gerrit上的專案,進行git clone程式碼或git pull操作等>
如下:
按照gerrit上的ssh連線方式clone專案程式碼(前提是把本地伺服器的公鑰上傳到gerrit上)
可以複製下圖中的clone或clone with commit-msg hook地址在本地進行程式碼clone

第2個要求:
a)在gerrit裡面設定,建立組比如xqsj-app,然後把這個組新增到gerrit介面相對應專案的”access“授權裡的“refs/heads/*”->Label Code-Review內,以及Submit內,這樣就保證每個開發人員有+2和submit許可權
b)將上面建立的xqsh-app組新增到gerrit介面相對應專案的”access“授權裡的“refs/heads/*”->“Create Reference”內,這樣就能保證每個開發人員有建立分支的許可權了。
第3個要求:
建立teamleader組,比如xqsj-app-teamleader,將這個組新增到A專案編輯的下面兩個許可權裡,去覆蓋從All-Projects繼承過來的許可權!
“refs/heads/*”-&