
DEVOPS03 - HTTP協議與urllib模組、paramiko模組
一、HTTP客戶端
1.1 全球資訊網與HTTP
1.1.1 HTTP概述
超文字傳輸協議(HTTP,HyperText TransferProtocol)是網際網路上應用最為廣泛的一種網路協議
1.1.2 HTTP訊息詳解
1.http的請求部分
1.1 基本結構

- 請求行 GET /test/hello.html HTTP/1.1
- 請求頭(並不是每一次請求都一樣)
- 空行
- 請求資料(內容名字=內容體)
1.2 常用的GET請求頭
1. Host:localhost:8080[瀏覽器要找的主機]
2. Accept:text/html,image/*(告訴伺服器,瀏覽器可以接受文字,網頁圖片)
3. Accept-Charaset:ISO-8859-1 [接受字元編碼:iso-8859-1]
4. User-Agent:Nozilla/4.0(Com...)[告訴伺服器我的瀏覽器核心]
5. Connection:close/Keep-Alive [保持連結,發完資料後,我不關閉連結]
2.服務端響應資訊
2.1 基本結構
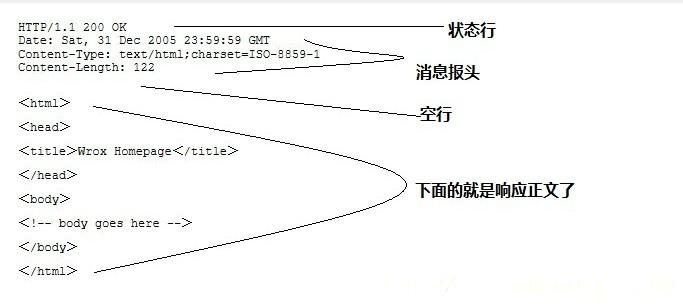
- 狀態行 HTTP/1.1 200 OK
- 響應頭
- 空行
- 響應資料
2. GET響應頭資訊
1.server:apache tomcat [告訴瀏覽器我是tomcat]
2.Content-Encoding:gzip[告訴瀏覽器我使用了gzip]
3.Content-Type:text/html;charset=gb2312[內容格式和編碼]
4.Content-Lenght:80 [告訴瀏覽器回送的資料大小]
5.Last-Modified:Tue,11 Juj,2000 18 18:29:20[告訴瀏覽器該資源上次更新 時間是多少]
6.Date:Tue,11 Jul 2000 18:23:51 [返回資料給客戶端的時間]
7.Connection:close/Keep-Alive [連線方式為長連線]
二、urllib模組
2.1 urllib基礎
2.1.1 urllib簡介
urllib中包括了四個模組
1. urllib.request可以用來發送request和獲取request的結果
2. urllib.error包含了urllib.request產生的異常
3. urllib.parse用來解析和處理URL
4. urllib.robotparse用來解析頁面的robots.txt檔案
2.1.2 爬取網頁
1. 先需要匯入用到的模組:urllib.request
2. 在匯入了模組之後,我們需要使用urllib.request.urlopen開啟並爬取一個網頁
3.讀取內容常見的有3種方式:
– read()讀取檔案的全部內容,與readlines()不同的是,read()會把讀取到的內容賦給一個字串變數。
– readlines()讀取檔案的全部內容,readlines()會把讀取到的內容賦值給一個列表變數。
– readline()讀取檔案的一行內容。
import	urllib.request
html = urllib.request.urlopen('hep://www.tedu.cn')
html.readline()
html.read(4096)
html.readlines()
2.1.3 爬取百度主頁資料
1. 爬取的網頁為http://www.baidu.com的資料
2. 儲存的檔名為/tmp/baidu.html
from  urllib import request
html=request.urlopen('http://www.baidu.com/')
data=html.read()
print(type(data))
with open('/tmp/baidu.html','wb') as fobj:
    fobj.write(data)
2.1.4 下載網路資源
1. urllib不僅可以下載網頁,其他網路資源均可下載
2.有些檔案比較大,需要像讀取檔案一樣,每次讀取一部分資料
import urllib.request
html = urllib.request.urlopen('hep://172.40.50.116/python.pdf')
fobj = open('/tmp/python.pdf',    'ab')
while True:
      data=html.read(4096)
      if not data:
          break
      fobj.write(data)
fobj.close()
2.1.5 爬取圖片
1. 將http://www.tedu.cn所有的圖片下載到本地
2. 本地的目錄為/tmp/images
3. 圖片名與網站上圖片名保持一致
from urllib import request
import os
import re

def get_webData(url,fname='web.html'):
    html=request.urlopen(url)
    with open(fname,'wb') as fobj:
        while True:
            data=html.read(4096)
            if not data:
                break
            fobj.write(data)

if __name__ == '__main__':
    if not os.path.exists('/tmp/163/'):
        os.mkdir('/tmp/163/')
    get_webData('http://www.163.com','/tmp/163/163.html')

    img_urllist=[]
    img_patt=r'(http|https)://[\w/\.-]+\.(jpg|jpeg|png)'
    with open('/tmp/163/163.html','rb') as fobj:
        for line in fobj:
            line=line.decode('GBK')
            m=re.search(img_patt,line)
            if m:       #匹配不到返回的是None
                img_urllist.append(m.group())

    for img_url in  img_urllist:
        fname=img_url.split('/')[-1]
        fname=os.path.join('/tmp/163',fname)
        try:
            get_webData(img_url,fname)
        except:
            pass

    print('下載完成!!!')
2.1.6 模擬客戶端
1.有些網頁為了防止別人惡意採集其資訊所以進行了一些反爬蟲的設定,而我們又想進行爬取
2.可以設定一些Headers資訊(User-Agent),模擬成瀏覽器去訪問這些網站
from urllib import request

header={'User-Agent':'Mozilla/5.0 (X11; Linux x86_64; rv:52.0) Gecko/20100101 Firefox/52.0'}
url='http://127.0.0.1/'
html=request.Request(url,headers=header)

print(request.urlopen(html).read())
2.2 urllib進階
2.2.1 資料編碼
1. 一般來說,URL標準中只會允許一部分ASCII字元,比如數字、字母、部分符號等
2. 而其他的一些字元,比如漢字等,>是不符合URL標準的。此時,我們需要編碼。
3.如果要進行編碼,可以使用urllib.request.quote()進行
from urllib import request
print(request.quote('李俊 你好'))

#%E6%9D%8E%E4%BF%8A%20%E4%BD%A0%E5%A5%BD
2.2.2 HTTP異常處理
1. 如果訪問的頁面不存在或拒絕訪問,程式將丟擲異常
2. 捕獲異常需要匯入urllib.error模組
>>> html = urllib.request.urlopen('http://172.40.50.116/a.html')
urllib.error.HTTPError: HTTP Error 404: Not Found
>>> html = urllib.request.urlopen('http://172.40.50.116/aaa')
urllib.error.HTTPError: HTTP Error 403: Forbidden
2.2.3 處理Web服務錯誤
1. 起動一個web服務
2. 在web伺服器的文件目錄下建立目錄ban,許可權設定為700
3. 編寫python程式訪問不存在的路徑和ban目錄,處理404和403錯誤
4. 404錯誤列印“無此頁面”,403錯誤列印“無權訪問”
from urllib import request,error

no_url='http://127.0.0.1/a.html'
ban_url='http://127.0.0.1/ban/'
try:
    html=request.urlopen(no_url)
except error.HTTPError as e:
    print(e)

try:
    html2=request.urlopen(ban_url)
except error.HTTPError as e:
    print(e)
三、paramiko模組
3.1 安裝paramiko模組
3.1.1 本地安裝
# yum install -y gcc gcc-c++ python-devel
# tar xzf paramiko-1.15.4.tar.gz
# python setup.py install
3.1.2 網路安裝
# pip install paramiko
3.2 paramiko基本使用
1. SSHClient
– 建立用於連線ssh伺服器的例項
>>> ssh = paramiko.SSHClient()
2. paramiko.AutoAddPolicy
– 設定自動新增主機金鑰
3. ssh.connect
– 連線ssh伺服器
4. ssh.exec_comand
– 在ssh伺服器上執行指定命令
3.3 編寫用於實現ssh訪問的指令碼
1. 編寫用於實現ssh訪問的指令碼
– 建立SSHClient例項
– 設定新增主機金鑰策略
– 連線ssh伺服器
– 執行指定命令
import paramiko
ssh=paramiko.SSHClient()
ssh.set_missing_host_key_policy(paramiko.AutoAddPolicy)
ssh.connect('192.168.4.10',username='root',password='123456')
ssh.exec_command('useradd zhangsan')
a=ssh.exec_command('id zhangsan')
print(len(a))
print(a)
print(a[0])
print(a[2].read())

stdin,stdout,stderr=ssh.exec_command('id wangwu')
print(stderr.read())
3.4 利用多執行緒實現ssh併發訪問
1. 在檔案中取出所有遠端主機IP地址
2. 在shell命令列中接受遠端伺服器IP地址檔案、遠端伺服器密碼以及在遠端主機上執行的命令
3. 通過多執行緒實現在所有的遠端伺服器上併發執行命令
import paramiko
import os,sys
import getpass
from threading import Thread

def rcmd(host,passwd,command,user='root',port=22):
    host=host
    passwd=passwd
    command=command
    ssh = paramiko.SSHClient()
    ssh.set_missing_host_key_policy(paramiko.AutoAddPolicy)
    ssh.connect(host, username=user, password=passwd,port=port)
    stdin, stdout, stderr=ssh.exec_command(command)
    out=stdout.read()
    # print(out)
    err=stderr.read()
    # print(err)
    if out:
        print('%s [out]:\n%s' % (host,out.decode()))
    if err:
        print('%s [err]:\n%s' % (host,err.decode()))

if __name__ == '__main__':
    if len(sys.argv) != 3:
        print('Usage:%s ipFile "command"' % (sys.argv[0]))
        sys.exit(1)
    ipfile=sys.argv[1]
    password=getpass.getpass
    command=sys.argv[2]

    with open(ipfile) as fobj:
        for line in fobj:
            ip=line.strip()
            print(ip)
            t=Thread(target=rcmd,args=(ip,password,command))
            t.start()