《Maven實戰》讀書筆記--(1)使用intellij idea搭建並配置maven多模組專案
本文使用intellij idea搭建Maven3多模組專案,並進行配置相關配置,以實現專案的構建打包。
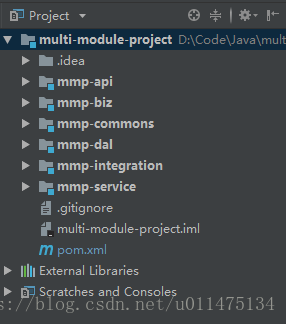
專案結構
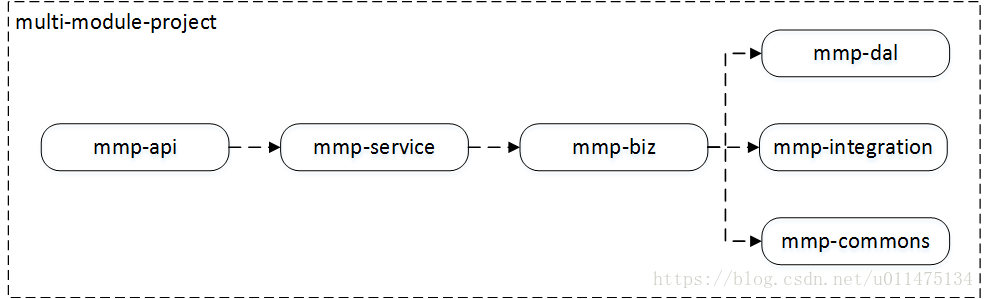
multi-module-project是我們的專案名稱,其中包含多個模組:
mmp-dal模組:資料訪問層,提供對原始資料(主要指資料庫)的操作mmp-integration模組:提供對第三方服務的呼叫mmp-commons模組:提供工具類、常量定義等公共服務mmp-biz模組:使用以上模組完成相關業務mmp-service模組:對業務模組相應介面進行包裝,並進行入參與返回值判斷mmp-api模組:提供對外服務的介面
搭建專案
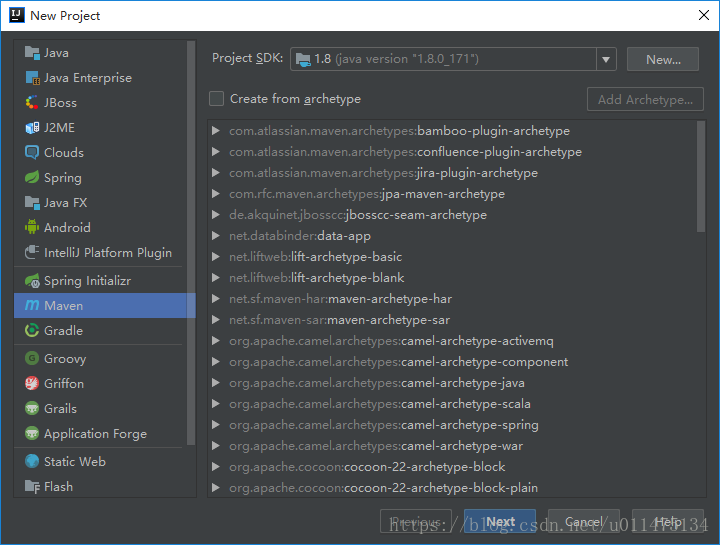
新建專案,選擇Maven,不要勾選Create from archetype。
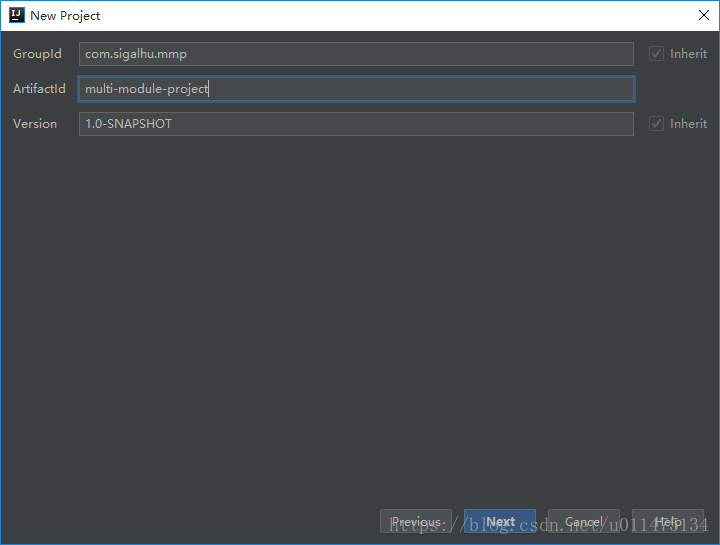
填寫GroupId、ArtifactId與Version。
GroupId定義了專案屬於哪個組,一般和專案所在的組織或公司存在關聯ArtifactId定義了當前Maven專案在組中唯一的IDVersion指定了專案當前的版本,SNAPSHOT意為快照,說明該專案還處於開發中,是不穩定版本
下面的Project name與Project location預設是沒有-的,這裡我們為了與前面ArtifactId一致,將-加上。
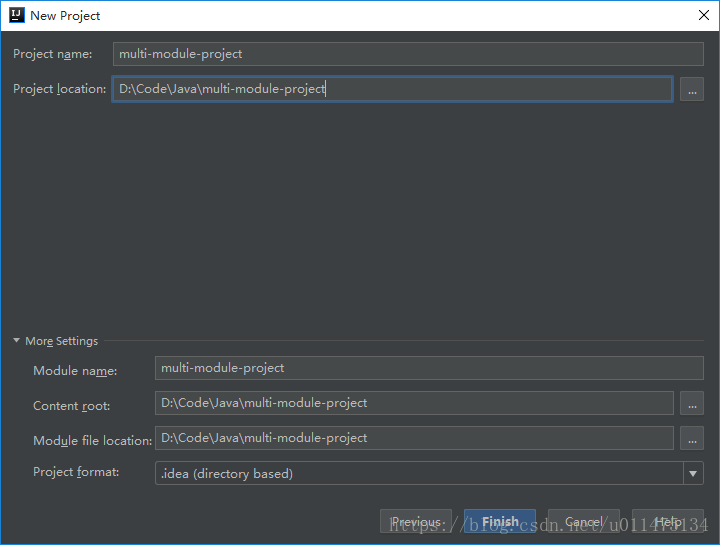
由於multi-module-project
src資料夾。
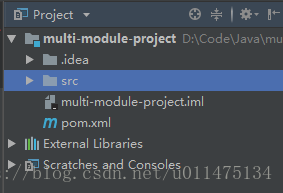
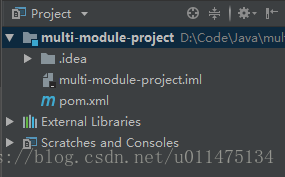
接下來我們給該專案新增模組。
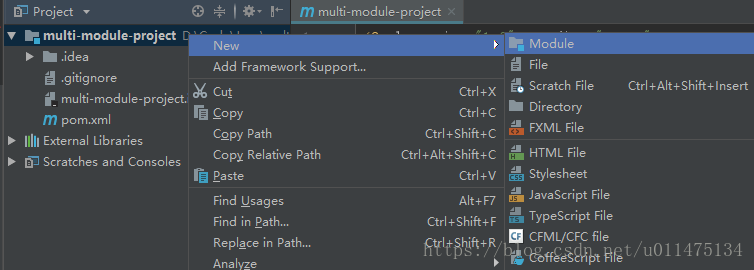
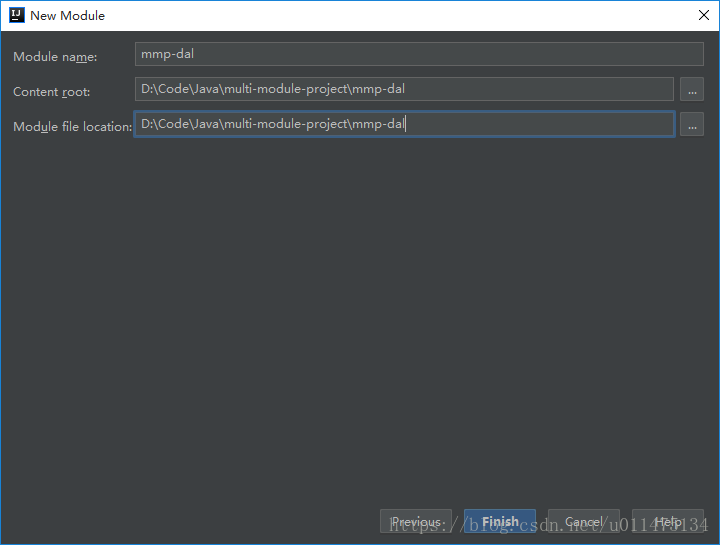
首先新增mmp-dal模組。
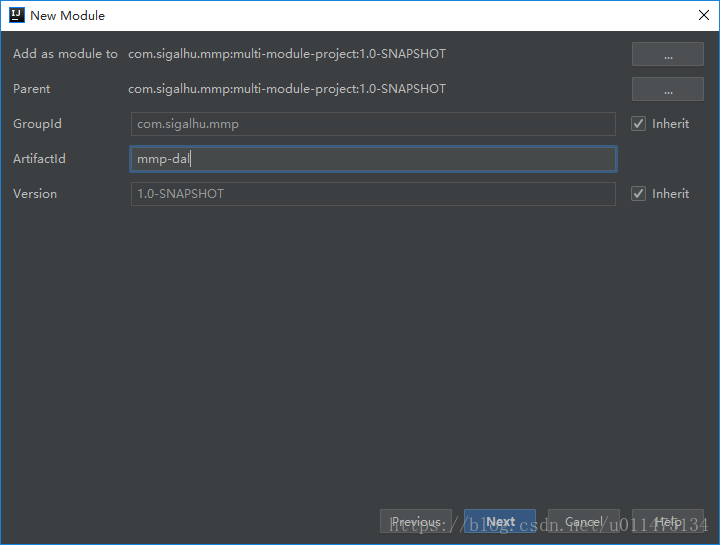
和上面一樣,這裡我們為了與前面ArtifactId一致,將-加上。
依次新增各個模組。
下面multi-module-project的POM配置是idea自動生成的,其中的註釋解釋了各個引數的含義。
<?xml version="1.0" encoding="UTF-8"?>
<project xmlns="http://maven.apache.org/POM/4.0.0"
xmlns:xsi="http://www.w3.org/2001/XMLSchema-instance" 下面mmp-dal的POM配置同樣由idea自動生成,我們通過註釋對各個引數進行說明。
<?xml version="1.0" encoding="UTF-8"?>
<project xmlns="http://maven.apache.org/POM/4.0.0"
         xmlns:xsi="http://www.w3.org/2001/XMLSchema-instance"
         xsi:schemaLocation="http://maven.apache.org/POM/4.0.0 http://maven.apache.org/xsd/maven-4.0.0.xsd">
    <!--使用parent宣告父模組-->
    <parent>
        <artifactId>multi-module-project</artifactId>
        <groupId>com.sigalhu.mmp</groupId>
        <version>1.0-SNAPSHOT</version>
    </parent>
    <modelVersion>4.0.0</modelVersion>

    <!--子模組隱式地從父模組繼承了groupId和version-->
    <!--artifactId定義了當前Maven專案在組中唯一的ID-->
    <artifactId>mmp-dal</artifactId>
</project>
配置依賴
專案搭建好後,我們先來配置一下測試依賴,在multi-module-project的POM中新增配置,這裡由於篇幅所限,省略了之前已經提到的配置。
在配置依賴時,我們一般在父模組的dependencyManagement中進行宣告,此時宣告的依賴並未生效,同時在properties中定義一個表示版本號的Maven屬性,並通過${...}加以引用,在以後當我們想要升級依賴的版本時,只需要修改properties就可以。
接下來,我們通過dependencies來引入專案依賴,由於junit的依賴資訊已經在dependencyManagement中宣告過了,所以我們只需要在dependencies中宣告junit的groupId和artifactId,Maven就會找到在dependencyManagement中的對應宣告並引用該依賴。
通過dependencies引入的依賴會作用於當前專案以及在modules中宣告的子模組,這裡所有子模組都要使用junit進行單元測試,因此在父模組中引用該依賴。
<project>
    ...
    <!--使用properties定義Maven屬性-->
    <properties>
        <junit.version>4.12</junit.version>
    </properties>

    <!--dependencies下可包含多個dependency以宣告專案的依賴-->
    <dependencies>
        <dependency>
            <groupId>junit</groupId>
            <artifactId>junit</artifactId>
        </dependency>
    </dependencies>

    <dependencyManagement>
        <dependencies>
            <!--測試-->
            <dependency>
                <!--定義當前Maven專案隸屬的實際專案,一個實際專案往往會被劃分成很多模組-->
                <groupId>junit</groupId>
                <!--定義實際專案中的一個Maven專案(模組),推薦使用實際專案名稱作為artifactId的字首-->
                <artifactId>junit</artifactId>
                <!--Maven執行時會將POM中所有${junit.version}替換成實際值-->
                <version>${junit.version}</version>
                <!--scope為依賴範圍,test表示該依賴只對測試有效-->
                <scope>test</scope>
            </dependency>
        </dependencies>
    </dependencyManagement>
</project>根據最開始的專案結構,我們知道該專案各個子模組之間也是存在依賴關係的,首先在multi-module-project的POM中宣告各個子模組,其中project.version是Maven的預設屬性,表示當前專案的版本。
<project>
    ...
    <dependencyManagement>
        <dependencies>
            ...
            <dependency>
                <groupId>com.sigalhu.mmp</groupId>
                <artifactId>mmp-api</artifactId>
                <version>${project.version}</version>
            </dependency>
            <dependency>
                <groupId>com.sigalhu.mmp</groupId>
                <artifactId>mmp-biz</artifactId>
                <version>${project.version}</version>
            </dependency>
            <dependency>
                <groupId>com.sigalhu.mmp</groupId>
                <artifactId>mmp-commons</artifactId>
                <version>${project.version}</version>
            </dependency>
            <dependency>
                <groupId>com.sigalhu.mmp</groupId>
                <artifactId>mmp-dal</artifactId>
                <version>${project.version}</version>
            </dependency>
            <dependency>
                <groupId>com.sigalhu.mmp</groupId>
                <artifactId>mmp-integration</artifactId>
                <version>${project.version}</version>
            </dependency>
            <dependency>
                <groupId>com.sigalhu.mmp</groupId>
                <artifactId>mmp-service</artifactId>
                <version>${project.version}</version>
            </dependency>
        </dependencies>
    </dependencyManagement>
</project>mmp-biz模組依賴mmp-dal模組、mmp-integration模組與mmp-commons模組,因此在mmp-biz模組的POM中宣告依賴。
<project>
    ...
    <dependencies>
        <dependency>
            <groupId>com.sigalhu.mmp</groupId>
            <artifactId>mmp-dal</artifactId>
        </dependency>
        <dependency>
            <groupId>com.sigalhu.mmp</groupId>
            <artifactId>mmp-integration</artifactId>
        </dependency>
        <dependency>
            <groupId>com.sigalhu.mmp</groupId>
            <artifactId>mmp-commons</artifactId>
        </dependency>
    </dependencies>
</project>同理,在mmp-service模組的POM中宣告對mmp-biz模組的依賴。
<project>
    ...
    <dependencies>
        <dependency>
            <groupId>com.sigalhu.mmp</groupId>
            <artifactId>mmp-biz</artifactId>
        </dependency>
    </dependencies>
</project>在mmp-api模組的POM中宣告對mmp-service模組的依賴。
<project>
    ...
    <dependencies>
        <dependency>
            <groupId>com.sigalhu.mmp</groupId>
            <artifactId>mmp-service</artifactId>
        </dependency>
    </dependencies>
</project>
打包配置
首先說一下思路,當我們完成開發後,需要將各個子模組打包,並與各個子模組的依賴、配置檔案、啟動指令碼一起上傳到伺服器,以完成專案的部署。在這裡,我們使用maven-dependency-plugin來拷貝各個模組的依賴,使用maven-assembly-plugin來對整個專案進行打包,而各子模組使用Maven預設配置進行打包。
依賴處理
為了降低耦合度,我們在multi-module-project下新建mmp-assembly模組以負責打包任務,新建模組流程同上,需要注意的是,根據前面說過的構建過程,必須把mmp-assembly模組放在modules的最後一個,讓該模組最後構建,因為該模組是用來打包整個專案的。
<project>
    ...
    <modules>
        <module>mmp-dal</module>
        <module>mmp-integration</module>
        <module>mmp-commons</module>
        <module>mmp-biz</module>
        <module>mmp-service</module>
        <module>mmp-api</module>
        <module>mmp-assembly</module>
    </modules>
    ...
</project>我們先使用maven-dependency-plugin將各個子模組的依賴拷貝到mmp-assembly模組的打包路徑,具體配置如下,我們在build的plugins下宣告外掛。
需要說明的是,maven-dependency-plugin和其他所有外掛一樣,都只作用於本模組,只是我們通過配置使得該外掛與其他模組發生耦合,下面配置的意思是將本模組在dependencies下宣告的除groupId為com.sigalhu.mmp的所有依賴拷貝到打包路徑下的lib資料夾中。
<project>
    ...
    <!--此處是為了下面copy-libs拷貝該宣告模組的依賴-->
    <dependencies>
        <dependency>
            <groupId>com.sigalhu.mmp</groupId>
            <artifactId>mmp-dal</artifactId>
        </dependency>
        <dependency>
            <groupId>com.sigalhu.mmp</groupId>
            <artifactId>mmp-integration</artifactId>
        </dependency>
        <dependency>
            <groupId>com.sigalhu.mmp</groupId>
            <artifactId>mmp-commons</artifactId>
        </dependency>
        <dependency>
            <groupId>com.sigalhu.mmp</groupId>
            <artifactId>mmp-biz</artifactId>
        </dependency>
        <dependency>
            <groupId>com.sigalhu.mmp</groupId>
            <artifactId>mmp-service</artifactId>
        </dependency>
        <dependency>
            <groupId>com.sigalhu.mmp</groupId>
            <artifactId>mmp-api</artifactId>
        </dependency>
    </dependencies>

    <build>
        <plugins>
            <plugin>
                <groupId>org.apache.maven.plugins</groupId>
                <artifactId>maven-dependency-plugin</artifactId>
                <version>2.8</version>
                <executions>
                    <execution>
                        <id>copy-libs</id>
                        <!--通過phase配置,將其繫結到process-resources生命週期階段-->
                        <phase>process-resources</phase>
                        <goals>
                            <goal>copy-dependencies</goal>
                        </goals>
                        <configuration>
                            <!--排除本專案-->
                            <excludeGroupIds>com.sigalhu.mmp</excludeGroupIds>
                            <!--排除所有scope為test的依賴-->
                            <includeScope>compile</includeScope>
                            <!--依賴儲存路徑-->
                            <outputDirectory>${project.build.directory}/lib</outputDirectory>
                        </configuration>
                    </execution>
                </executions>
            </plugin>
        </plugins>
    </build>
</project>
子模組處理
我們通過配置maven-dependency-plugin將各個子模組的jar包拷貝到打包路徑下的core資料夾下,我們在artifactItems下宣告想要拷貝的模組,由於我們在multi-module-project的POM中將mmp-assembly模組放在modules的最後一個,因此當對mmp-assembly進行打包時,其他子模組必定已經打包完畢,即jar包必定存在。
<project>
    ...
    <build>
        <plugins>
            <plugin>
                <groupId>org.apache.maven.plugins</groupId>
                <artifactId>maven-dependency-plugin</artifactId>
                <version>2.8</version>
                <executions>
                    ...
                    <execution>
                        <id>copy-core</id>
                        <phase>package</phase>
                        <goals>
                            <goal>copy</goal>
                        </goals>
                        <configuration>
                            <artifactItems>
                                <artifactItem>
                                    <groupId>com.sigalhu.mmp</groupId>
                                    <artifactId>mmp-dal</artifactId>
                                </artifactItem>
                                <artifactItem>
                                    <groupId>com.sigalhu.mmp</groupId>
                                    <artifactId>mmp-integration</artifactId>
                                </artifactItem>
                                <artifactItem>
                                    <groupId>com.sigalhu.mmp</groupId>
                                    <artifactId>mmp-commons</artifactId>
                                </artifactItem>
                                <artifactItem>
                                    <groupId>com.sigalhu.mmp</groupId>
                                    <artifactId>mmp-biz</artifactId>
                                </artifactItem>
                                <artifactItem>
                                    <groupId>com.sigalhu.mmp</groupId>
                                    <artifactId>mmp-service</artifactId>
                                </artifactItem>
                                <artifactItem>
                                    <groupId>com.sigalhu.mmp</groupId>
                                    <artifactId>mmp-api</artifactId>
                                </artifactItem>
                            </artifactItems>
                            <outputDirectory>${project.build.directory}/core</outputDirectory>
                        </configuration>
                    </execution>
                </executions>
            </plugin>
        </plugins>
    </build>
</project>
配置檔案處理
在實際開發中,我們一般都有不同的環境,例如測試環境、開發環境、穩定環境、預發環境、線上環境等,不同環境下,配置檔案中的配置各不相同,例如資料庫的配置,各個環境下所存取的資料庫肯定不會是同一個。
在multi-module-project下新建settings資料夾,並在該資料夾下新建不同環境的配置檔案。
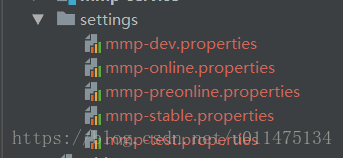
在各配置檔案中,我們聲明瞭一個屬性用來表示不同的環境。
# mmp-test.properties
user.env=_test

# mmp-dev.properties
user.env=_dev

# mmp-stable.properties
user.env=_stable

# mmp-preonline.properties
user.env=_preonline

# mmp-online.properties
user.env=_online同時,我們將mmp-assembly模組的目錄結構修改如下:
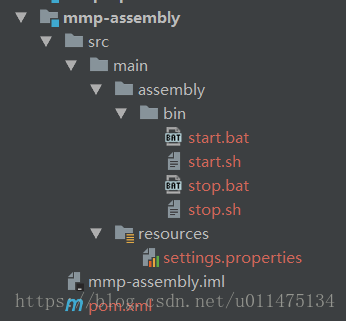
其中bin資料夾中是我們專案的啟動指令碼,resources資料夾中是我們專案的配置檔案,可以看到該屬性值是未定的,接下來我們將利用Maven的profile與filters來將下面配置檔案的${…}替換為settings資料夾中配置檔案的對應屬性值。
# settings.properties
user.env=${user.env}在下面的配置中,我們將id為stable的profile設定為預設啟用,當打包該專案時,如果我們沒有指定profile,則filter下的${profile.name}的將會被替換為stable,此時mmp-assembly模組的settings.properties中的${…}會被替換為mmp-stable.properties中屬性的值。
<project>
...
<profiles>
<profile>
<id>test</id>
<activation>
<!--指定profile自動啟用,如果POM中有任何一個profile通過以上其他任意一種方式被啟用,所有預設啟用配置都會失效-->
<activeByDefault>false</activeByDefault>
</activation>
<!--設定屬性值,通過啟用不同的profile來實現相同屬性,不同屬性值的替換-->
<properties>
<profile.name>test</profile.name>
</properties>
</profile>
<profile>
<id>dev</id>
<activation>
<activeByDefault>false</activeByDefault>
</activation>
<properties>
<profile.name>dev</profile.name>
</properties>
</profile>
<profile>
<id>stable</id>
<activation>
<activeByDefault>true</activeByDefault>
</activation>
<properties>
<profile.name>stable</profile.name>
</properties>
</profile>
<profile>
<id>preonline</id>
<activation>
<activeByDefault>false</activeByDefault>
</activation>
<properties>
<profile.name>preonline</profile.name>
</properties>
</profile>
<profile>
<id>online</id>
<activation>
<activeByDefault>false</activeByDefault>
</activation>
<properties>
<profile.name>online</profile.name>
</properties>
</profile>
</profiles>
<build>
<!--指明使用該屬性檔案作為resource/filtering屬性值的來源-->
<filters>
<filter>../settings/mmp-${profile.name}.properties</filter>
</filters>
<!--設定資源目錄,預設為src/main/resources-->
<resources>
<resource>
<directory>src/main/resources</directory>
<!--開啟資源過濾,資原始檔當中${…}符號會被替換為系統屬性或者專案屬性的值-->
<filtering>true</filtering>
<includes>
<include>*.properties</include>
</includes>
</resource>
</resources>
...
</build>
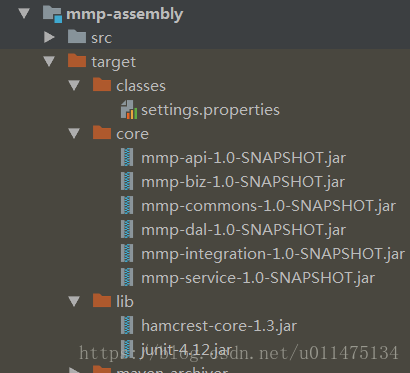
</project>打包配置
現在如果我們對專案執行package命令,可以看到如下圖所示,配置檔案、子模組還有依賴都位於各自資料夾下,這裡為了便於理解,我們註釋了junit的依賴範圍,因此junit及其依賴會被拷貝到lib資料夾下。
下面我們使用maven-assembly-plugin將以上這些包和檔案再加上啟動指令碼打包成zip壓縮檔案。
<project>
    ...
    <build>
        ...
        <plugins>
            ...
            <plugin>
                <groupId>org.apache.maven.plugins</groupId>
                <artifactId>maven-assembly-plugin</artifactId>
                <!--宣告一個非快照版本,避免由於外掛版本變化造成的構建不穩定性-->
                <version>2.5.3</version>
                <configuration>
                    <finalName>${project.artifactId}-${project.version}</finalName>
                    <descriptors>
                        <descriptor>src/main/assembly/assembly.xml</descriptor>
                    </descriptors>
                    <!--指定打包型別-->
                    <formats>
                        <format>zip</format>
                    </formats>
                    <!--是否在包名尾部追加assembly.xml中定義的assembly id-->
                    <appendAssemblyId>false</appendAssemblyId>
                    <!--打包檔案儲存路徑,預設為target-->
                    <outputDirectory>target</outputDirectory>
                    <!--這樣配置後,mvn deploy不會把assembly打的zip包上傳到nexus-->
                    <attach>false</attach>
                </configuration>
                <!--executions下每個execution可以用來配置執行一個任務-->
                <executions>
                    <execution>
                        <!--通過phase配置,將其繫結到package生命週期階段-->
                        <phase>package</phase>
                        <!--通過goals配置指定要執行的外掛目標-->
                        <goals>
                            <goal>single</goal>
                        </goals>
                    </execution>
                </executions>
            </plugin>
        </plugins>
    </build>
</project>descriptors中指定的assembly.xml檔案配置如下:
<?xml version='1.0' encoding='UTF-8'?>
<assembly>
    <id>assembly</id>
    <!--指定是否包含打包層目錄,當值為true,檔案被放在finalName目錄下,否則直接放在包的根目錄下-->
    <includeBaseDirectory>false</includeBaseDirectory>

    <!--指定要包含的檔案集,可以定義多個fileSet-->
    <fileSets>
        <fileSet>
            <!--指定要包含的目錄-->
            <directory>${project.build.directory}/classes</directory>
            <!--指定當前要包含的目錄的目的地-->
            <outputDirectory>conf</outputDirectory>
        </fileSet>
        <fileSet>
            <directory>src/main/assembly/bin</directory>
            <outputDirectory>bin</outputDirectory>
        </fileSet>
        <fileSet>
            <directory>${project.build.directory}/lib</directory>
            <outputDirectory>lib</outputDirectory>
        </fileSet>
        <fileSet>
            <directory>${project.build.directory}/core</directory>
            <outputDirectory>core</outputDirectory>
        </fileSet>
    </fileSets>
</assembly>
構建專案
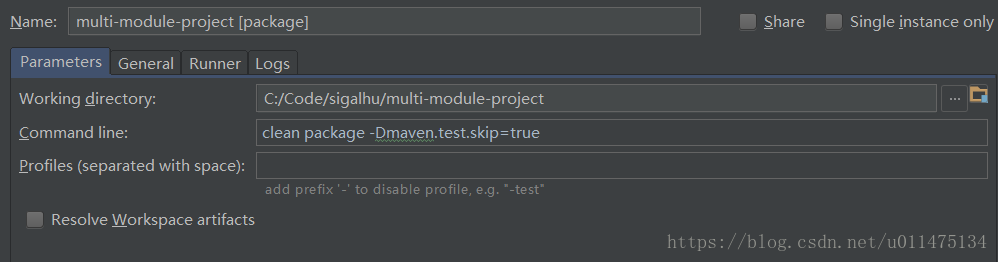
在idea中,我們可以在Profiles中勾選不同profile來針對不同環境進行打包,如果Profiles中沒有我們定義的profile,可以點選下圖左上角的Reimport All Maven Projects重新載入。
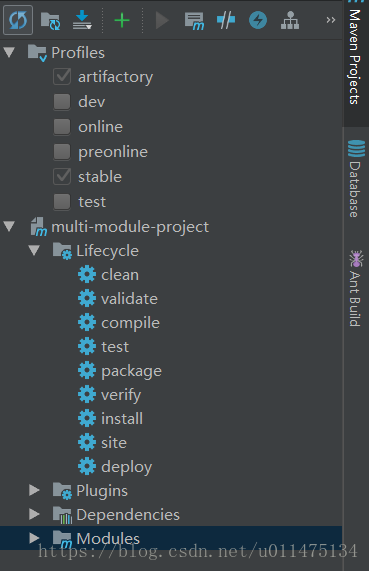
在構建專案時,我們先執行clean命令清除打包路徑下的檔案,然後執行package命令進行打包。
如果我們想要在構建時不執行測試程式碼,可以選中上圖選單欄的倒數第二個按鈕來跳過測試,但需要注意的是,這種方法只會不執行測試程式碼,測試程式碼還是會被編譯,我們可以通過自定義命令來跳過測試程式碼的編譯與執行。