
centos7.0 下安裝git(http方式)
1、 安裝依賴的庫
| 1 |
|
2、 刪除原本的安裝的git
| 1 |
|
3、下載git-2.10.0.tar.gz 到 /usr/local/src
| 1 2 |
|
4、 編譯安裝
| 1 2 3 4 |
|
5、 增加軟連線
| 1 2 |
|
如果能正常顯示版本號,即表示成功。
6、新建git倉庫
| 1 2 3 |
|
7、修改上一步建立的資料夾test.git的所有者與所屬群組,要讓apache能讀/寫這個資料夾,注意這裡-R必須加上,不然clone會出現許可權不夠問題
| 1 |
|
8、Apache的配置(ps:這裡開始就和之前安裝git方式不一樣了)
8.1、安裝Apache(系統有的可以忽略這一步)
| 1 2 |
|
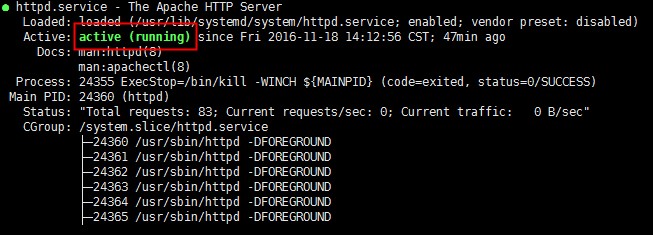
啟動Apache,並測試安裝是否成功
| 1 2 3 |
|
8.2、建立新使用者,輸入密碼
| 1 |
|
(PS: -m:表示MD5加密方式 ;-c:表示建立檔案,只有第一次建立使用者時候加上該引數,以後不用)
8.3、設定git-team.htpasswd檔案的訪問許可權
| 1 |
|
8.4、修改apache配置檔案httpd.conf
| 1 |
|
在檔案末尾新增下列內容:
|
|
8.5、重啟Apache
| 1 |
|
到這裡git伺服器基本功能就搭建好了,可以clone了
地址 http://自己伺服器IP或域名/git/test.git
(PS:這裡如果連線不上,可以檢視你的防火牆80埠是否開啟,如果沒開啟當然是無法clone的)
9、安裝gitweb實現瀏覽器訪問git伺服器
9.1、下載安裝gitweb
| 1 |
|
9.2、修改git.conf
| 1 |
|
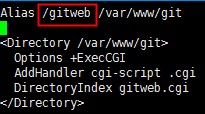
將 "Alias /git /var/www/git" 改為 "Alias /gitweb /var/www/git"
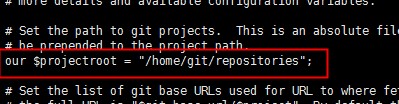
9.3、修改gitweb.conf
| 1 |
|
修改成:our $projectroot = "/home/git/repositories"
ok,到這裡就可以用瀏覽器訪問了,地址 http://自己的伺服器IP或者域名/gitweb/

10、客戶端http方式訪問的,每次都要輸入密碼這裡可以設定長期儲存密碼,客戶端執行
| 1 |
|
增加倉庫地址時候帶上使用者名稱(name)和密碼(password)也可以
| 1 |
|
這裡注意一點,如果使用者名稱是郵箱地址或者中文 把它 url編碼 ,@對應的是%40