
unity3d入門 Demo 學習記錄
閑來學習一下 unity3d 的Demo,記錄如下。
官方 Demo,名字為 Roll-A-Ball,如圖
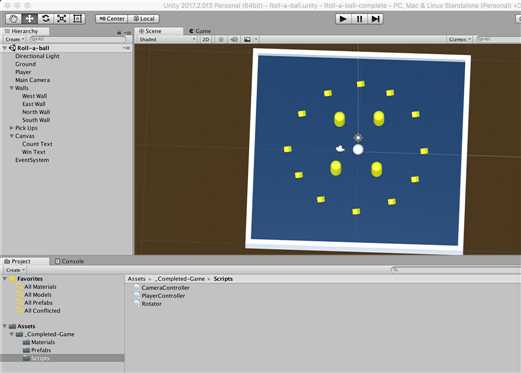
場景比較簡單,包含地面、玩家精靈、主攝像機、墻壁、可拾取的方塊、分數為示 text、平行光源。
資源目錄下,包含材質、預制件、腳本。
材質:定義了背景、小方塊所需的材質。
預制件:場景中共有12個小方塊,所以先做一個 PickUp 的預制件。制作一個預制件,先向場景中創建一個3d對象cube,為該cube對象添加鋼體組件、腳本組件,然後把該 cube 對象拖進一個空的預制作,這樣便可方批量創建,現在向場景再拖入11個該預制件。
腳本:攝像機腳本、玩家精錄腳本、自轉腳本。腳本是這個小遊戲靈魂,控制各移動邏輯,下面會詳述。
一、Rotator.cs 腳本綁定到小方塊預制件:
using UnityEngine;
using System.Collections;
public class Rotator : MonoBehaviour {
// Before rendering each frame..
void Update ()
{
// Rotate the game object that this script is attached to by 15 in the X axis,
// 30 in the Y axis and 45 in the Z axis, multiplied by deltaTime in order to make it per second
// rather than per frame.
transform.Rotate (new Vector3 (15, 30, 45) * Time.deltaTime);
}
}
核心就一句代碼,綁定該腳本的GameObject每秒 繞指定軸旋轉。
二、CameraController.cs腳本綁定到攝像機。
using UnityEngine;
using System.Collections;
public class CameraController : MonoBehaviour {
// store a public reference to the Player game object, so we can refer to it‘s Transform
public GameObject player;
// Store a Vector3 offset from the player (a distance to place the camera from the player at all times)
private Vector3 offset;
// At the start of the game..
void Start ()
{
// Create an offset by subtracting the Camera‘s position from the player‘s position
offset = transform.position - player.transform.position;
}
// After the standard ‘Update()‘ loop runs, and just before each frame is rendered..
void LateUpdate ()
{
// Set the position of the Camera (the game object this script is attached to)
// to the player‘s position, plus the offset amount
transform.position = player.transform.position + offset;
}
}
在Start方法中,記下攝像機與玩家精靈的距離差值,在LateUpdate方法中更新攝像機的位置,使攝像機跟隨玩家精錄的移動。
三、PlayerController.cs綁定到 player 對象。
using UnityEngine;
// Include the namespace required to use Unity UI
using UnityEngine.UI;
using System.Collections;
public class PlayerController : MonoBehaviour {
// Create public variables for player speed, and for the Text UI game objects
public float speed; //精靈移動速度
public Text countText;//分數 Text
public Text winText;//勝利 Text
// Create private references to the rigidbody component on the player, and the count of pick up objects picked up so far
private Rigidbody rb;//精靈本身綁定的鋼體對像
private int count;//分數記數
// At the start of the game..
void Start ()
{
// Assign the Rigidbody component to our private rb variable
rb = GetComponent<Rigidbody>();//鋼體對象附值
// Set the count to zero
count = 0;//初始化分數
// Run the SetCountText function to update the UI (see below)
SetCountText ();//設置初始化文本
// Set the text property of our Win Text UI to an empty string, making the ‘You Win‘ (game over message) blank
winText.text = "";
}
// Each physics step.. 處理輸入
void FixedUpdate ()
{
// Set some local float variables equal to the value of our Horizontal and Vertical Inputs
//取得鍵盤輸入的 x 方向、y方向
float moveHorizontal = Input.GetAxis ("Horizontal");
float moveVertical = Input.GetAxis ("Vertical");
//x 方向、y 方向組成方向向量
// Create a Vector3 variable, and assign X and Z to feature our horizontal and vertical float variables above
Vector3 movement = new Vector3 (moveHorizontal, 0.0f, moveVertical);
// Add a physical force to our Player rigidbody using our ‘movement‘ Vector3 above,
// multiplying it by ‘speed‘ - our public player speed that appears in the inspector
//給精靈的鋼體對象一個該方向向量上的、大小為 speed 的力
rb.AddForce (movement * speed);
}
// When this game object intersects a collider with ‘is trigger‘ checked,
// store a reference to that collider in a variable named ‘other‘..
//處理碰撞邏輯
void OnTriggerEnter(Collider other)
{
// ..and if the game object we intersect has the tag ‘Pick Up‘ assigned to it..
//與精靈碰撞的對象,如果 tag 是 Pick Up,那麽隱藏,同時記數+1,更新文本顯示
if (other.gameObject.CompareTag ("Pick Up"))
{
// Make the other game object (the pick up) inactive, to make it disappear
other.gameObject.SetActive (false);
// Add one to the score variable ‘count‘
count = count + 1;
// Run the ‘SetCountText()‘ function (see below)
SetCountText ();
}
}
// Create a standalone function that can update the ‘countText‘ UI and check if the required amount to win has been achieved
// 文本更新方法,勝利判定邏輯
void SetCountText()
{
// Update the text field of our ‘countText‘ variable
countText.text = "Count: " + count.ToString ();
// Check if our ‘count‘ is equal to or exceeded 12
if (count >= 12)
{
// Set the text value of our ‘winText‘
winText.text = "You Win!";
}
}
}
unity3d入門 Demo 學習記錄