
LVM邏輯卷管理--在線擴容、邏輯卷與卷組容量縮減、邏輯卷快照
公司生產環境中使用了LVM邏輯卷管理,所以今天花時間整理一下。
通過LVM技術整合所有的磁盤資源進行分區,然後創建PV物理卷形成一個資源池,再劃分卷組,最後在卷組上創建不同的邏輯卷,繼而初始化邏輯卷,掛載到系統中使用。
LVM對比傳統硬盤存儲的優點
1、 統一管理:整合多個磁盤或分區形成一個資源池
2、 靈活性:可以使用不同磁盤、不同分區來組成一個邏輯卷
3、 可伸縮性:邏輯卷和卷組的容量都可以使用命令來擴展或者縮減,且不會影響破壞原有數據,支持磁盤熱插拔。
4、 支持熱插拔
5、 支持在線數據移動
6、 設備命名方便
7、 鏡像卷:可以很方便的做數據鏡像
8、 卷快照:把邏輯卷中的數據快照保存到新的邏輯卷進行備份
邏輯卷與邏輯分區不是同一概念,邏輯分區容量大小不能改變;邏輯卷容量大小可以改變(基於物理卷和卷組之上的邏輯卷);邏輯卷管理器(LVM)可以更輕松的管理磁盤空間(整合的磁盤池)
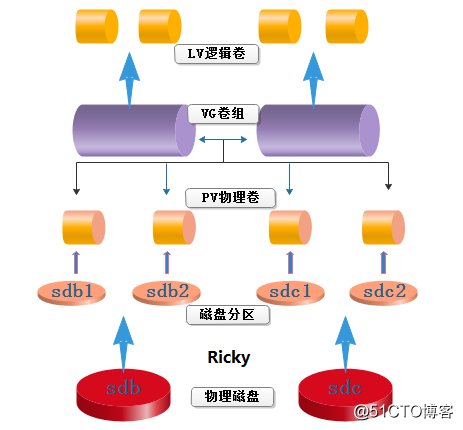
LVM原理圖
Physical volume (PV物理卷)、Volume group (VG卷組)、Logical volume(LV邏輯卷),通過圖解更容易讀懂物理磁盤、磁盤分區、物理卷、卷組、邏輯卷之間的關系(個人理解,僅供參考)
測試環境
內核
LVM1版本需要2.4(包括)以後的內核支持;LVM2需要2.6(包括)以後的內核版本支持。
[root@localhost ~]# cat /etc/redhat-release
CentOS Linux release 7.4.1708 (Core)
[root@localhost ~]# uname -r
3.10.0-693.el7.x86_64
新添加兩塊磁盤
[root@localhost ~]# fdisk -l
Disk /dev/sda: 21.5 GB, 21474836480 bytes, 41943040 sectors
Units = sectors of 1 * 512 = 512 bytes
Sector size (logical/physical): 512 bytes / 512 bytes
I/O size (minimum/optimal): 512 bytes / 512 bytes
Disk label type: dos
Disk identifier: 0x0000457f

   Device Boot      Start         End      Blocks   Id  System
/dev/sda1   *        2048     2099199     1048576   83  Linux
/dev/sda2         2099200    41943039    19921920   8e  Linux LVM

Disk /dev/sdb: 21.5 GB, 21474836480 bytes, 41943040 sectors
Units = sectors of 1 * 512 = 512 bytes
Sector size (logical/physical): 512 bytes / 512 bytes
I/O size (minimum/optimal): 512 bytes / 512 bytes

Disk /dev/sdc: 21.5 GB, 21474836480 bytes, 41943040 sectors
Units = sectors of 1 * 512 = 512 bytes
Sector size (logical/physical): 512 bytes / 512 bytes
I/O size (minimum/optimal): 512 bytes / 512 bytes

Disk /dev/mapper/centos-root: 18.2 GB, 18249416704 bytes, 35643392 sectors
Units = sectors of 1 * 512 = 512 bytes
Sector size (logical/physical): 512 bytes / 512 bytes
I/O size (minimum/optimal): 512 bytes / 512 bytes

Disk /dev/mapper/centos-swap: 2147 MB, 2147483648 bytes, 4194304 sectors
Units = sectors of 1 * 512 = 512 bytes
Sector size (logical/physical): 512 bytes / 512 bytes
I/O size (minimum/optimal): 512 bytes / 512 bytes
磁盤分區
第一塊磁盤
[root@localhost ~]# fdisk /dev/sdb
Command (m for help): n
Partition type:
   p   primary (0 primary, 0 extended, 4 free)
   e   extended
Select (default p): p
Partition number (1-4, default 1):
First sector (2048-41943039, default 2048):
Using default value 2048
Last sector, +sectors or +size{K,M,G} (2048-41943039, default 41943039): +10G
Partition 1 of type Linux and of size 10 GiB is set

Command (m for help): n
Partition type:
   p   primary (1 primary, 0 extended, 3 free)
   e   extended
Select (default p): p #主分區
Partition number (2-4, default 2):
First sector (20973568-41943039, default 20973568):
Using default value 20973568
Last sector, +sectors or +size{K,M,G} (20973568-41943039, default 41943039):
Using default value 41943039
Partition 2 of type Linux and of size 10 GiB is set

Command (m for help): p #第一塊磁盤劃分兩個主分區

Disk /dev/sdb: 21.5 GB, 21474836480 bytes, 41943040 sectors
Units = sectors of 1 * 512 = 512 bytes
Sector size (logical/physical): 512 bytes / 512 bytes
I/O size (minimum/optimal): 512 bytes / 512 bytes
Disk label type: dos
Disk identifier: 0xfba75d9e

   Device Boot      Start         End      Blocks   Id  System
/dev/sdb1            2048    20973567    10485760   83  Linux
/dev/sdb2        20973568    41943039    10484736   83  Linux
Command (m for help): t #做LVM管理,需要修改分區類型為Linux LVM
Partition number (1,2, default 2): 1
Hex code (type L to list all codes): 8e
Changed type of partition ‘Linux‘ to ‘Linux LVM‘

Command (m for help): t
Partition number (1,2, default 2): 2
Hex code (type L to list all codes): 8e
Changed type of partition ‘Linux‘ to ‘Linux LVM‘

Command (m for help): p

Disk /dev/sdb: 21.5 GB, 21474836480 bytes, 41943040 sectors
Units = sectors of 1 * 512 = 512 bytes
Sector size (logical/physical): 512 bytes / 512 bytes
I/O size (minimum/optimal): 512 bytes / 512 bytes
Disk label type: dos
Disk identifier: 0xfba75d9e

   Device Boot      Start         End      Blocks   Id  System
/dev/sdb1            2048    20973567    10485760   8e  Linux LVM
/dev/sdb2        20973568    41943039    10484736   8e  Linux LVM
Command (m for help): w #保存分區信息
The partition table has been altered!

Calling ioctl() to re-read partition table.
Syncing disks.
告訴內核
[root@localhost ~]# partprobe /dev/sdb #更新內核分區表

[root@localhost ~]# ls -l /dev/sdb*
brw-rw----. 1 root disk 8, 16 Oct 13 11:30 /dev/sdb
brw-rw----. 1 root disk 8, 17 Oct 13 11:30 /dev/sdb1
brw-rw----. 1 root disk 8, 18 Oct 13 11:30 /dev/sdb2
[root@localhost ~]#
第二塊磁盤
創建一個主分區和一個邏輯分區,用來測試擴展分區和邏輯分區是否能夠創建PV物理卷並加入VG卷組,實驗證明,擴展分區是無法創建PV和加入VG,主分區和邏輯分區可以。
[root@localhost ~]# fdisk /dev/sdc
Welcome to fdisk (util-linux 2.23.2).

Changes will remain in memory only, until you decide to write them.
Be careful before using the write command.

Device does not contain a recognized partition table
Building a new DOS disklabel with disk identifier 0x5d61bb7c.

Command (m for help): n
Partition type:
   p   primary (0 primary, 0 extended, 4 free)
   e   extended
Select (default p): p #主分區
Partition number (1-4, default 1):
First sector (2048-41943039, default 2048):
Using default value 2048
Last sector, +sectors or +size{K,M,G} (2048-41943039, default 41943039): +10G
Partition 1 of type Linux and of size 10 GiB is set

Command (m for help): n
Partition type:
   p   primary (1 primary, 0 extended, 3 free)
   e   extended
Select (default p): e #擴展分區,要創建擴展分區之後,才能創建邏輯分區;擴展分區只能創建一個,分區表支持創建最多四分主分區,如果想要創建4個以上的分區,必須創建擴展分區,然後創建邏輯分區
Partition number (2-4, default 2):
First sector (20973568-41943039, default 20973568):
Using default value 20973568
Last sector, +sectors or +size{K,M,G} (20973568-41943039, default 41943039):
Using default value 41943039
Partition 2 of type Extended and of size 10 GiB is set

Command (m for help): n
Partition type:
   p   primary (1 primary, 1 extended, 2 free)
   l   logical (numbered from 5)
Select (default p): l #創建邏輯分區
Adding logical partition 5
First sector (20975616-41943039, default 20975616):
Using default value 20975616
Last sector, +sectors or +size{K,M,G} (20975616-41943039, default 41943039):
Using default value 41943039
Partition 5 of type Linux and of size 10 GiB is set

Command (m for help): p

Disk /dev/sdc: 21.5 GB, 21474836480 bytes, 41943040 sectors
Units = sectors of 1 * 512 = 512 bytes
Sector size (logical/physical): 512 bytes / 512 bytes
I/O size (minimum/optimal): 512 bytes / 512 bytes
Disk label type: dos
Disk identifier: 0x5d61bb7c

   Device Boot      Start         End      Blocks   Id  System
/dev/sdc1            2048    20973567    10485760   83  Linux
/dev/sdc2        20973568    41943039    10484736    5  Extended
/dev/sdc5        20975616    41943039    10483712   83  Linux

Command (m for help): t #修改分區類型
Partition number (1,2,5, default 5): 1
Hex code (type L to list all codes): 8e
Changed type of partition ‘Linux‘ to ‘Linux LVM‘

Command (m for help): t
Partition number (1,2,5, default 5): 2
Hex code (type L to list all codes): 8e

You cannot change a partition into an extended one or vice versa.
Delete it first.

Type of partition 2 is unchanged: Extended

Command (m for help): t
Partition number (1,2,5, default 5): 5
Hex code (type L to list all codes): 8e
Changed type of partition ‘Linux‘ to ‘Linux LVM‘

Command (m for help): p

Disk /dev/sdc: 21.5 GB, 21474836480 bytes, 41943040 sectors
Units = sectors of 1 * 512 = 512 bytes
Sector size (logical/physical): 512 bytes / 512 bytes
I/O size (minimum/optimal): 512 bytes / 512 bytes
Disk label type: dos
Disk identifier: 0x5d61bb7c

   Device Boot      Start         End      Blocks   Id  System
/dev/sdc1            2048    20973567    10485760   8e  Linux LVM
/dev/sdc2        20973568    41943039    10484736    5  Extended
/dev/sdc5        20975616    41943039    10483712   8e  Linux LVM

Command (m for help): w #保存分區表信息
The partition table has been altered!

Calling ioctl() to re-read partition table.
Syncing disks.
[root@localhost ~]# partprobe /dev/sdc
[root@localhost ~]# ls -l /dev/sdc*
brw-rw----. 1 root disk 8, 32 Oct 13 11:35 /dev/sdc
brw-rw----. 1 root disk 8, 33 Oct 13 11:35 /dev/sdc1
brw-rw----. 1 root disk 8, 34 Oct 13 11:35 /dev/sdc2
brw-rw----. 1 root disk 8, 37 Oct 13 11:35 /dev/sdc5
創建PV、VG、LV
創建PV物理卷
[root@localhost ~]# pvcreate /dev/sdc2 #sdc2是擴展分區,無法做成物理卷PV
  Device /dev/sdc2 not found (or ignored by filtering).
[root@localhost ~]# pvcreate /dev/sdb1 #把sdb1做成物理卷PV,也可以用下面的寫法,一次性把所有主分區或邏輯分區做成物理卷PV
  Physical volume "/dev/sdb1" successfully created.
[root@localhost ~]# pvcreate /dev/sdb2 /dev/sdc1 /dev/sdc5
  Physical volume "/dev/sdb2" successfully created.
  Physical volume "/dev/sdc1" successfully created.
  Physical volume "/dev/sdc5" successfully created.
[root@localhost ~]# pvdisplay  #查看物理卷詳細信息
  --- Physical volume ---
  PV Name               /dev/sda2
  VG Name               centos
  PV Size               <19.00 GiB / not usable 3.00 MiB
  Allocatable           yes (but full)
  PE Size               4.00 MiB
  Total PE              4863
  Free PE               0
  Allocated PE          4863
  PV UUID               610jgI-z9pr-N5H1-R1Qv-jVMh-cMOD-2VKNm5

  "/dev/sdb1" is a new physical volume of "10.00 GiB"
  --- NEW Physical volume ---
  PV Name               /dev/sdb1
  VG Name
  PV Size               10.00 GiB
  Allocatable           NO
  PE Size               0
  Total PE              0
  Free PE               0
  Allocated PE          0
  PV UUID               l65LfK-FxkO-I8ux-0Lj6-jQB1-ev6d-jl4D8v

  "/dev/sdc1" is a new physical volume of "10.00 GiB"
  --- NEW Physical volume ---
  PV Name               /dev/sdc1
  VG Name
  PV Size               10.00 GiB
  Allocatable           NO
  PE Size               0
  Total PE              0
  Free PE               0
  Allocated PE          0
  PV UUID               olFzUh-w2jf-sK32-i4lr-oYHP-zWTf-dKmgYw

  "/dev/sdc5" is a new physical volume of "<10.00 GiB"
  --- NEW Physical volume ---
  PV Name               /dev/sdc5
  VG Name
  PV Size               <10.00 GiB
  Allocatable           NO
  PE Size               0
  Total PE              0
  Free PE               0
  Allocated PE          0
  PV UUID               54wYXO-sN3e-Lyc6-2ZQg-YMkH-6khg-TqbKOA

  "/dev/sdb2" is a new physical volume of "<10.00 GiB"
  --- NEW Physical volume ---
  PV Name               /dev/sdb2
  VG Name
  PV Size               <10.00 GiB
  Allocatable           NO
  PE Size               0
  Total PE              0
  Free PE               0
  Allocated PE          0
  PV UUID               aqkWHa-RIxf-15Y9-mgLw-x82r-thpL-kxzYhc

[root@localhost ~]# pvs #顯示所有的物理卷,大小都是10G(分區的時候分配的)
  PV         VG     Fmt  Attr PSize   PFree
  /dev/sda2  centos lvm2 a--  <19.00g      0
  /dev/sdb1         lvm2 ---   10.00g  10.00g
  /dev/sdb2         lvm2 ---  <10.00g <10.00g
  /dev/sdc1         lvm2 ---   10.00g  10.00g
  /dev/sdc5         lvm2 ---  <10.00g <10.00g
創建卷組
[root@localhost ~]# vgcreate VGtest1 /dev/sdb1 /dev/sdc1 #創建卷組1,卷組的PV物理卷,可以是不同磁盤,即整合了所有磁盤分區做成資源池
  Volume group "VGtest1" successfully created
[root@localhost ~]# vgcreate VGtest2 /dev/sdb2 /dev/sdc5 #創建卷組2
  Volume group "VGtest2" successfully created
[root@localhost ~]# vgs #顯示所有卷組信息
  VG      #PV #LV #SN Attr   VSize   VFree
  VGtest1   2   0   0 wz--n-  19.99g 19.99g
  VGtest2   2   0   0 wz--n-  19.99g 19.99g
  centos    1   2   0 wz--n- <19.00g     0
[root@localhost ~]# vgdisplay #查看所有卷組的詳細信息
  --- Volume group ---
  VG Name               centos
  System ID
  Format                lvm2
  Metadata Areas        1
  Metadata Sequence No  3
  VG Access             read/write
  VG Status             resizable
  MAX LV                0
  Cur LV                2
  Open LV               2
  Max PV                0
  Cur PV                1
  Act PV                1
  VG Size               <19.00 GiB
  PE Size               4.00 MiB
  Total PE              4863
  Alloc PE / Size       4863 / <19.00 GiB
  Free  PE / Size       0 / 0
  VG UUID               FjdwU1-IYgt-Q6r2-uGm7-q1de-g0yh-EsGm64

  --- Volume group ---
  VG Name               VGtest1
  System ID
  Format                lvm2
  Metadata Areas        2
  Metadata Sequence No  1
  VG Access             read/write
  VG Status             resizable
  MAX LV                0
  Cur LV                0
  Open LV               0
  Max PV                0
  Cur PV                2
  Act PV                2
  VG Size               19.99 GiB
  PE Size               4.00 MiB
  Total PE              5118
  Alloc PE / Size       0 / 0
  Free  PE / Size       5118 / 19.99 GiB
  VG UUID               pk62Bc-lRQW-iXim-VUng-PrIk-s9WR-10uctH

  --- Volume group ---
  VG Name               VGtest2
  System ID
  Format                lvm2
  Metadata Areas        2
  Metadata Sequence No  1
  VG Access             read/write
  VG Status             resizable
  MAX LV                0
  Cur LV                0
  Open LV               0
  Max PV                0
  Cur PV                2
  Act PV                2
  VG Size               19.99 GiB
  PE Size               4.00 MiB
  Total PE              5118
  Alloc PE / Size       0 / 0
  Free  PE / Size       5118 / 19.99 GiB
  VG UUID               XsUyyE-1OSa-Xbno-L0W3-cL3E-XmeH-qb3QWW
創建邏輯卷
[root@localhost ~]# lvcreate -n LVtest1 -L 1G VGtest1 #-n表示創建邏輯卷名,-L表示分配邏輯卷的空間大小,VGtest1表示在卷組VGtest1上創建邏輯卷LVtest1
  Logical volume "LVtest1" created.
[root@localhost ~]# lvcreate -n LVtest2 -L 1G VGtest2
  Logical volume "LVtest2" created.
[root@localhost ~]# lvs #顯示邏輯卷的信息(大小為1G,上面分配的)
  LV      VG      Attr       LSize   Pool Origin Data%  Meta%  Move Log Cpy%Sync Convert
  LVtest1 VGtest1 -wi-a-----   1.00g
  LVtest2 VGtest2 -wi-a-----   1.00g
  root    centos  -wi-ao---- <17.00g
  swap    centos  -wi-ao----   2.00g
[root@localhost ~]# lvdisplay #顯示邏輯卷的詳細信息
  --- Logical volume ---
  LV Path                /dev/centos/swap
  LV Name                swap
  VG Name                centos
  LV UUID                gS0ted-R1jU-NKWR-rpFb-quUd-Yu7w-c0VfGz
  LV Write Access        read/write
  LV Creation host, time localhost, 2018-09-14 09:38:10 -0400
  LV Status              available
  # open                 2
  LV Size                2.00 GiB
  Current LE             512
  Segments               1
  Allocation             inherit
  Read ahead sectors     auto
  - currently set to     8192
  Block device           253:1

  --- Logical volume ---
  LV Path                /dev/centos/root
  LV Name                root
  VG Name                centos
  LV UUID                LTcnK5-ufCZ-5Cwx-Lpfi-Frgo-NMBm-OEE73C
  LV Write Access        read/write
  LV Creation host, time localhost, 2018-09-14 09:38:10 -0400
  LV Status              available
  # open                 1
  LV Size                <17.00 GiB
  Current LE             4351
  Segments               1
  Allocation             inherit
  Read ahead sectors     auto
  - currently set to     8192
  Block device           253:0

  --- Logical volume ---
  LV Path                /dev/VGtest1/LVtest1
  LV Name                LVtest1
  VG Name                VGtest1
  LV UUID                PMv1Zv-WtJy-13v4-1GBc-5WaB-mcpk-f7dN22
  LV Write Access        read/write
  LV Creation host, time localhost.localdomain, 2018-10-13 11:48:28 -0400
  LV Status              available
  # open                 0
  LV Size                1.00 GiB
  Current LE             256
  Segments               1
  Allocation             inherit
  Read ahead sectors     auto
  - currently set to     8192
  Block device           253:2

  --- Logical volume ---
  LV Path                /dev/VGtest2/LVtest2
  LV Name                LVtest2
  VG Name                VGtest2
  LV UUID                HCk2OB-3iVy-Ryma-rKeH-kIie-NYKr-ZVkiIf
  LV Write Access        read/write
  LV Creation host, time localhost.localdomain, 2018-10-13 11:48:47 -0400
  LV Status              available
  # open                 0
  LV Size                1.00 GiB
  Current LE             256
  Segments               1
  Allocation             inherit
  Read ahead sectors     auto
  - currently set to     8192
  Block device           253:3
會創建對應的目錄和文件
[root@localhost ~]# ls -l /dev/VGtest1/LVtest1
lrwxrwxrwx. 1 root root 7 Oct 13 11:48 /dev/VGtest1/LVtest1 -> ../dm-2
[root@localhost ~]# ls -l /dev/d
disk/   dm-0    dm-1    dm-2    dm-3    dmmidi  dri/
[root@localhost ~]# ls -l /dev/dm-2
brw-rw----. 1 root disk 253, 2 Oct 13 11:48 /dev/dm-2
格式化LV邏輯卷
[root@localhost ~]# mke2fs -t ext4 /dev/VGtest1/LVtest1 #物理卷需要格式化之後才能使用,格式化為ext4格式
mke2fs 1.42.9 (28-Dec-2013)
Filesystem label=
OS type: Linux
Block size=4096 (log=2)
Fragment size=4096 (log=2)
Stride=0 blocks, Stripe width=0 blocks
65536 inodes, 262144 blocks
13107 blocks (5.00%) reserved for the super user
First data block=0
Maximum filesystem blocks=268435456
8 block groups
32768 blocks per group, 32768 fragments per group
8192 inodes per group
Superblock backups stored on blocks:
        32768, 98304, 163840, 229376

Allocating group tables: done
Writing inode tables: done
Creating journal (8192 blocks): done
Writing superblocks and filesystem accounting information: done

[root@localhost ~]# mkfs.ext4 /dev/VGtest2/LVtest2 #也可以使用這種方式格式化
mke2fs 1.42.9 (28-Dec-2013)
Filesystem label=
OS type: Linux
Block size=4096 (log=2)
Fragment size=4096 (log=2)
Stride=0 blocks, Stripe width=0 blocks
65536 inodes, 262144 blocks
13107 blocks (5.00%) reserved for the super user
First data block=0
Maximum filesystem blocks=268435456
8 block groups
32768 blocks per group, 32768 fragments per group
8192 inodes per group
Superblock backups stored on blocks:
        32768, 98304, 163840, 229376

Allocating group tables: done
Writing inode tables: done
Creating journal (8192 blocks): done
Writing superblocks and filesystem accounting information: done
掛載LV邏輯卷
[root@localhost ~]# mkdir /appdata
[root@localhost ~]# mkdir /applog
[root@localhost ~]# mount /dev/VGtest1/LVtest1 /appdata #把LV邏輯卷掛載到實際的目錄
[root@localhost ~]# mount /dev/VGtest2/LVtest2 /applog
[root@localhost ~]# df -h
Filesystem                   Size  Used Avail Use% Mounted on
/dev/mapper/centos-root       17G  1.2G   16G   7% /
devtmpfs                     482M     0  482M   0% /dev
tmpfs                        493M     0  493M   0% /dev/shm
tmpfs                        493M  6.8M  486M   2% /run
tmpfs                        493M     0  493M   0% /sys/fs/cgroup
/dev/sda1                   1014M  125M  890M  13% /boot
tmpfs                         99M     0   99M   0% /run/user/0
/dev/mapper/VGtest1-LVtest1  976M  2.6M  907M   1% /appdata
/dev/mapper/VGtest2-LVtest2  976M  2.6M  907M   1% /applog
[root@localhost ~]# mount |grep VGtest
/dev/mapper/VGtest1-LVtest1 on /appdata type ext4 (rw,relatime,seclabel,data=ordered)
/dev/mapper/VGtest2-LVtest2 on /applog type ext4 (rw,relatime,seclabel,data=ordered)
永久掛載LV邏輯卷
[root@localhost ~]# vim /etc/fstab
#
# /etc/fstab
# Created by anaconda on Fri Sep 14 09:38:12 2018
#
# Accessible filesystems, by reference, are maintained under ‘/dev/disk‘
# See man pages fstab(5), findfs(8), mount(8) and/or blkid(8) for more info
#
/dev/mapper/centos-root /                       xfs     defaults        0 0
UUID=944557a0-3f7c-434d-8202-c960db70b860 /boot                   xfs     defaults        0 0
/dev/mapper/centos-swap swap                    swap    defaults        0 0
/dev/VGtest1/LVtest1 /appdata                   ext4    defaults        0 0
/dev/VGtest2/LVtest2 /applog                    ext4    defaults        0 0
~
~
"/etc/fstab" 13L, 617C written
[root@localhost ~]# mount -a  #重新加載/etc/fstab文件
VG卷組擴容
新建一個PV物理卷,然後加入VG即可(fdisk創建分區->修改分區類型Linux LVM->向內核註冊新分區->創建物理卷->把物理卷加入需要擴容的卷組)。
發現卷組pv空間不夠,我們需要擴大卷組空間,現在系統上新增了一塊20G的硬盤/dev/sdc。
[root@localhost ~]# fdisk /dev/sdd #把新添加的磁盤進行分區
Welcome to fdisk (util-linux 2.23.2).

Changes will remain in memory only, until you decide to write them.
Be careful before using the write command.

Device does not contain a recognized partition table
Building a new DOS disklabel with disk identifier 0xc29c0ac3.

Command (m for help): n
Partition type:
   p   primary (0 primary, 0 extended, 4 free)
   e   extended
Select (default p): p #主分區
Partition number (1-4, default 1):
First sector (2048-41943039, default 2048):
Using default value 2048
Last sector, +sectors or +size{K,M,G} (2048-41943039, default 41943039): +5G
Partition 1 of type Linux and of size 5 GiB is set

Command (m for help): t #修改分區類型
Selected partition 1
Hex code (type L to list all codes): 8e
Changed type of partition ‘Linux‘ to ‘Linux LVM‘

Command (m for help): p

Disk /dev/sdd: 21.5 GB, 21474836480 bytes, 41943040 sectors
Units = sectors of 1 * 512 = 512 bytes
Sector size (logical/physical): 512 bytes / 512 bytes
I/O size (minimum/optimal): 512 bytes / 512 bytes
Disk label type: dos
Disk identifier: 0xc29c0ac3

   Device Boot      Start         End      Blocks   Id  System
/dev/sdd1            2048    10487807     5242880   8e  Linux LVM
Command (m for help): w #保存分區信息
The partition table has been altered!

Calling ioctl() to re-read partition table.
Syncing disks.
[root@localhost ~]# partprobe /dev/sdd #更新內核分區表
[root@localhost ~]# pvcreate /dev/sdd1 #創建物理卷PV
  Physical volume "/dev/sdd1" successfully created.
[root@localhost ~]# pvs
  PV         VG      Fmt  Attr PSize   PFree
  /dev/sda2  centos  lvm2 a--  <19.00g      0
  /dev/sdb1  VGtest1 lvm2 a--  <10.00g  <9.00g
  /dev/sdb2  VGtest2 lvm2 a--  <10.00g  <9.00g
  /dev/sdc1  VGtest1 lvm2 a--  <10.00g <10.00g
  /dev/sdc5  VGtest2 lvm2 a--  <10.00g <10.00g
  /dev/sdd1          lvm2 ---    5.00g   5.00g
[root@localhost ~]# vgextend VGtest1 /dev/sdd1 #擴展VG卷組容量,把物理卷加入卷組
  Volume group "VGtest1" successfully extended
[root@localhost ~]# vgs
  VG      #PV #LV #SN Attr   VSize   VFree
  VGtest1   3   1   0 wz--n- <24.99g <23.99g
  VGtest2   2   1   0 wz--n-  19.99g  18.99g
  centos    1   2   0 wz--n- <19.00g      0
[root@localhost ~]# pvs
  PV         VG      Fmt  Attr PSize   PFree
  /dev/sda2  centos  lvm2 a--  <19.00g      0
  /dev/sdb1  VGtest1 lvm2 a--  <10.00g  <9.00g
  /dev/sdb2  VGtest2 lvm2 a--  <10.00g  <9.00g
  /dev/sdc1  VGtest1 lvm2 a--  <10.00g <10.00g
  /dev/sdc5  VGtest2 lvm2 a--  <10.00g <10.00g
  /dev/sdd1  VGtest1 lvm2 a--   <5.00g  <5.00g
LV邏輯卷擴容 (支持在線擴展)
在線將/dev/VGtest/LVtest1 擴展到4G,並且要求數據可以正常訪問
[root@localhost ~]# echo "this is a test for LVM" >/appdata/test
[root@localhost ~]# cat /appdata/test #在掛載的邏輯卷裏添加數據,用來測試在邏輯卷擴容是否會破壞原有數據
this is a test for LVM
[root@localhost ~]# lvs
  LV      VG      Attr       LSize   Pool Origin Data%  Meta%  Move Log Cpy%Sync Convert
  LVtest1 VGtest1 -wi-ao----   1.00g
  LVtest2 VGtest2 -wi-ao----   1.00g
  root    centos  -wi-ao---- <17.00g
  swap    centos  -wi-ao----   2.00g
[root@localhost ~]# lvextend -L +2G /dev/VGtest1/LVtest1  #擴容邏輯卷LVtest1,增加2G空間容量(從對應的卷組中劃分空間容量)
  Size of logical volume VGtest1/LVtest1 changed from 1.00 GiB (256 extents) to 3.00 GiB (768 extents).
  Logical volume VGtest1/LVtest1 successfully resized.
[root@localhost ~]# lvs
  LV      VG      Attr       LSize   Pool Origin Data%  Meta%  Move Log Cpy%Sync Convert
  LVtest1 VGtest1 -wi-ao----   3.00g
  LVtest2 VGtest2 -wi-ao----   1.00g
  root    centos  -wi-ao---- <17.00g
  swap    centos  -wi-ao----   2.00g

[root@localhost ~]# resize2fs /dev/VGtest1/LVtest1 #使用resize2fs命令來進行確認增加容量,前面的步驟只是初步分配,還不能實際使用,需要此步驟來確定實際分配使用
resize2fs 1.42.9 (28-Dec-2013)
Filesystem at /dev/VGtest1/LVtest1 is mounted on /appdata; on-line resizing required
old_desc_blocks = 1, new_desc_blocks = 1
The filesystem on /dev/VGtest1/LVtest1 is now 786432 blocks long.
xfs系統確認實際使用的命令
xfs_growfs /dev/VGtest1/LVtest1
查看掛載目錄的空間容量大小
[root@localhost ~]# df -h|grep VGtest
/dev/mapper/VGtest2-LVtest2  976M  2.6M  907M   1% /applog
/dev/mapper/VGtest1-LVtest1  3.0G  3.1M  2.8G   1% /appdata

數據並沒有受損
[root@localhost ~]# cat /appdata/test
this is a test for LVM
縮減邏輯卷LV
縮減邏輯卷的註意事項:
1、查看邏輯卷使用空間狀況
2、不能在線縮減,得先卸載 切記
3、確保縮減後的空間大小依然能存儲原有的所有數據
4、在縮減之前應該先強行檢查文件,以確保文件系統處於一至性狀態
[root@localhost ~]# e2fsck -f /dev/VGtest1/LVtest1 #處於掛載狀態的LV邏輯卷無法強制檢查
e2fsck 1.42.9 (28-Dec-2013)
/dev/VGtest1/LVtest1 is mounted.
e2fsck: Cannot continue, aborting.
[root@localhost ~]# umount /dev/VGtest1/LVtest1 #取消邏輯卷掛載
[root@localhost ~]# e2fsck -f /dev/VGtest1/LVtest1 #檢查邏輯卷
e2fsck 1.42.9 (28-Dec-2013)
Pass 1: Checking inodes, blocks, and sizes
Pass 2: Checking directory structure
Pass 3: Checking directory connectivity
Pass 4: Checking reference counts
Pass 5: Checking group summary information
/dev/VGtest1/LVtest1: 12/196608 files (0.0% non-contiguous), 21309/786432 blocks
[root@localhost ~]# resize2fs /dev/VGtest1/LVtest1 1G #首先需要確定縮減邏輯卷到多大空間容量,-1G表示縮減1G大小,1G表示縮減至1G(原來空間是3G)
resize2fs 1.42.9 (28-Dec-2013)
Resizing the filesystem on /dev/VGtest1/LVtest1 to 262144 (4k) blocks.
The filesystem on /dev/VGtest1/LVtest1 is now 262144 blocks long.

[root@localhost ~]# lvreduce -L 1G /dev/VGtest1/LVtest1 #再進行邏輯卷LV容量縮減
  WARNING: Reducing active logical volume to 1.00 GiB.
  THIS MAY DESTROY YOUR DATA (filesystem etc.)
Do you really want to reduce VGtest1/LVtest1? [y/n]: y
  Size of logical volume VGtest1/LVtest1 changed from 3.00 GiB (768 extents) to 1.00 GiB (256 extents).
  Logical volume VGtest1/LVtest1 successfully resized.
[root@localhost ~]# mount /dev/VGtest1/LVtest1 /appdata #重新掛載邏輯卷
[root@localhost ~]# lvs
  LV      VG      Attr       LSize   Pool Origin Data%  Meta%  Move Log Cpy%Sync Convert
  LVtest1 VGtest1 -wi-ao----   1.00g
  LVtest2 VGtest2 -wi-ao---- 500.00m
  root    centos  -wi-ao---- <17.00g
  swap    centos  -wi-ao----   2.00g
[root@localhost ~]# df -h|grep VGtest
/dev/mapper/VGtest2-LVtest2  460M  1.6M  424M   1% /applog
/dev/mapper/VGtest1-LVtest1  976M  2.6M  914M   1% /appdata
[root@localhost ~]# cat /appdata/test
this is a test for LVM
縮減磁盤空間
發現物理磁盤空間使用不足,將其中一塊硬盤或分區拿掉,避免磁盤浪費
1、pvmove /dev/sdb1 #將/dev/sdb1上存儲的數據移到其它物理卷中
2、vgreduce VGtest /dev/sdb1 #將/dev/sdb1從VGtest卷組中移除
3、pvremove /dev/sdb1 #將/dev/sdb1從物理卷上移除
[root@localhost appdata]# touch stu{0..100}
[root@localhost appdata]# pvs
  PV         VG      Fmt  Attr PSize   PFree
  /dev/sda2  centos  lvm2 a--  <19.00g      0
  /dev/sdb1  VGtest1 lvm2 a--  <10.00g  <9.00g
  /dev/sdb2  VGtest2 lvm2 a--  <10.00g  <9.51g
  /dev/sdc1  VGtest1 lvm2 a--  <10.00g <10.00g
  /dev/sdc5  VGtest2 lvm2 a--  <10.00g <10.00g
  /dev/sdd1  VGtest1 lvm2 a--   <5.00g  <5.00g
[root@localhost appdata]# pvmove /dev/sdb1 #把sdb1磁盤分區的數據轉移到其它磁盤上
  /dev/sdb1: Moved: 6.64%
  /dev/sdb1: Moved: 100.00%
[root@localhost appdata]# vgreduce VGtest1 /dev/sdb1 #把分區sdb1從VG卷組中移除
  Removed "/dev/sdb1" from volume group "VGtest1"
[root@localhost appdata]# pvremove /dev/sdb1 #把sdb1分區從PV物理卷中釋放出來
  Labels on physical volume "/dev/sdb1" successfully wiped.
#如果磁盤劃分了多個分區,做成多個物理卷加入了卷組,那麽可以能重復以上步驟,把所有的空間都從卷組和物理卷中釋放,然後可以拿走這塊磁盤做它用

實現快照,進行備份還原
在/mnt/lvm目錄上,我們將原始的目錄文件進行快照,然後將/LVtets1目錄中的內容清空,並進行還原
[root@localhost ~]# lvs
  LV      VG      Attr       LSize   Pool Origin Data%  Meta%  Move Log Cpy%Sync Convert
  LVtest1 VGtest1 -wi-ao----   1.00g
  LVtest2 VGtest2 -wi-ao---- 500.00m
  root    centos  -wi-ao---- <17.00g
  swap    centos  -wi-ao----   2.00g
[root@localhost ~]# cat /appdata/test
this is a test for LVM
[root@localhost ~]# df -h|grep VGtest
/dev/mapper/VGtest2-LVtest2  460M  1.6M  424M   1% /applog
/dev/mapper/VGtest1-LVtest1  976M  2.6M  914M   1% /appdata
[root@localhost ~]# lvcreate -L 20M -n appdatabackup -s -p r /dev/VGtest1/LVtest1 #利用LVtest1邏輯卷,快照形成一個備份的物理卷appdatabackup(邏輯卷快照功能)
  Using default stripesize 64.00 KiB.
  Logical volume "appdatabackup" created.
[root@localhost ~]# lvs
  LV            VG      Attr       LSize   Pool Origin  Data%  Meta%  Move Log Cpy%Sync Convert
  LVtest1       VGtest1 owi-aos---   1.00g
  appdatabackup VGtest1 sri-a-s---  20.00m      LVtest1 0.06
  LVtest2       VGtest2 -wi-ao---- 500.00m
  root          centos  -wi-ao---- <17.00g
  swap          centos  -wi-ao----   2.00g
[root@localhost ~]# mkdir /tmp/backup
[root@localhost ~]# mount /dev/VGtest1/appdatabackup /tmp/backup #把快照的邏輯卷掛載到目錄上
mount: /dev/mapper/VGtest1-appdatabackup is write-protected, mounting read-only
[root@localhost ~]# cat /tmp/backup/test
this is a test for LVM
[root@localhost ~]# ls -l /appdata/test
-rw-r--r--. 1 root root 23 Oct 13 12:33 /appdata/test
[root@localhost ~]# ls -l /tmp/backup/test
-rw-r--r--. 1 root root 23 Oct 13 12:33 /tmp/backup/test
[root@localhost ~]# rm -rf /appdata/test #刪除LVtest1邏輯卷的數據
[root@localhost ~]# ls -l /appdata/test
ls: cannot access /appdata/test: No such file or directory
[root@localhost ~]# cp /tmp/backup/test /appdata/ #從快照中恢復數據到邏輯卷LVtest1上
[root@localhost ~]# ls -l /appdata/test
-rw-r--r--. 1 root root 23 Oct 13 13:06 /appdata/test
[root@localhost ~]# df -h|grep VGtest
/dev/mapper/VGtest2-LVtest2        460M  1.6M  424M   1% /applog
/dev/mapper/VGtest1-LVtest1        976M  2.6M  914M   1% /appdata
/dev/mapper/VGtest1-appdatabackup  976M  2.6M  914M   1% /tmp/backup
知識擴展
resize2fs命令
resize2fs命令被用來增大或者收縮未加載的“ext2/ext3”文件系統的大小。如果文件系統是處於mount狀態下,那麽它只能做到擴容,前提條件是內核支持在線resize。,linux kernel 2.6支持在mount狀態下擴容但僅限於ext3文件系統。
-d:打開調試特性;
-p:打印已完成的百分比進度條;
-f:強制執行調整大小操作,覆蓋掉安全檢查操作;
-F:開始執行調整大小前,刷新文件系統設備的緩沖區
如果是xfs文件系統,則需要使用xfs_growfs命令
e2fsck命令
e2fsck是檢查ext2、ext3、ext4等文件系統的正確性。
補充說明:
e2fsck執行後的傳回值及代表意義如下:
0 沒有任何錯誤發生。
1 文件系統發生錯誤,並且已經修正。
2 文件系統發生錯誤,並且已經修正。
4 文件系統發生錯誤,但沒有修正。
8 運作時發生錯誤。
16 使用的語法發生錯誤。
128 共享的函數庫發生錯誤。
參 數:
-a 不詢問使用者意見,便自動修復文件系統。
-b <superblock> 指定superblock,而不使用預設的superblock。
-B <區塊大小> 指定區塊的大小,單位為字節。
-c 一並執行badblocks,以標示損壞的區塊。
-C 將檢查過程的信息完整記錄在file descriptor中,使得整個檢查過程都能完整監控。
-d 顯示排錯信息。
-f 即使文件系統沒有錯誤跡象,仍強制地檢查正確性。
-F 執行前先清除設備的緩沖區。
-l <文件> 將文件中指定的區塊加到損壞區塊列表。
-L <文件> 先清除損壞區塊列表,再將文件中指定的區塊加到損壞區塊列表。因此損壞區塊列表的區塊跟文件中指定的區塊是一樣的。
-n 以只讀模式開啟文件系統,並采取非互動方式執行,所有的問題對話均設置以"no"回答。
-p 不詢問使用者意見,便自動修復文件系統。
-r 此參數只為了兼容性而存在,並無實際作用。
-s 如果文件系統的字節順序不適當,就交換字節順序,否則不做任何動作。
-S 不管文件系統的字節順序,一律交換字節順序。
-t 顯示時間信息。
-v 執行時顯示詳細的信息。
-V 顯示版本信息。
-y 采取非互動方式執行,所有的問題均設置以"yes"回答。
LVM邏輯卷管理--在線擴容、邏輯卷與卷組容量縮減、邏輯卷快照