
MySQL-MMM高可用群集(本篇使用MariaDB代替MySQL進行實驗部署)
MMM(Master-Master replication manager for MySQL)是一套支持雙主故障切換和雙主日常管理的腳本程序。MMM使用Perl語言開發,主要用來監控和管理MySQL Master-Master(雙主)復制,雖然叫做雙主復制,但是業務上同一時刻只允許對一個主進行寫入,另一臺備選主上提供部分讀服務,以加速在主主切換時刻備選主的預熱,可以說MMM這套腳本程序一方面實現了故障切換的功能,另一方面其內部附加的工具腳本也可以實現多個slave的read負載均衡。
MMM提供了自動和手動兩種方式移除一組服務器中復制延遲較高的服務器的虛擬ip,同時它還可以備份數據,實現兩節點之間的數據同步等。由於MMM無法完全的保證數據一致性,所以MMM適用於對數據的一致性要求不是很高,但是又想最大程度的保證業務可用性的場景。對於那些對數據的一致性要求很高的業務,非常不建議采用MMM這種高可用架構。
2、MySQL-MMM優缺點
優點:高可用性,擴展性好,出現故障自動切換,對於主主同步,在同一時間只提供一臺數據庫寫操作,保證的數據的一致性。
缺點:Monitor節點是單點,可以結合Keepalived實現高可用。
3、MySQL-MMM工作原理
MMM是一套靈活的腳本程序,基於perl實現,用來對mysql replication進行監控和故障遷移,並能管理mysql Master-Master復制的配置(同一時間只有一個節點是可寫的)。
- mmm_mond:監控進程,負責所有的監控工作,決定和處理所有節點角色活動。此腳本需要在監管機上運行。
- mmm_agentd:運行在每個mysql服務器上的代理進程,完成監控的探針工作和執行簡單的遠端服務設置。此腳本需要在被監管機上運行。
- mmm_control:一個簡單的腳本,提供管理mmm_mond進程的命令。
mysql-mmm的監管端會提供多個虛擬IP(VIP),包括一個可寫VIP,多個可讀VIP,通過監管的管理,這些IP會綁定在可用mysql之上,當某一臺mysql宕機時,監管會將VIP遷移至其他mysql。
在整個監管過程中,需要在mysql中添加相關授權用戶,以便讓mysql可以支持監理機的維護。授權的用戶包括一個mmm_monitor用戶和一個mmm_agent用戶,如果想使用mmm的備份工具則還要添加一個mmm_tools用戶。
系統環境
操作系統:CentOS 7.0 x86_64
數據庫分配
| Function | IP | Hostname | Sever id |
|---|---|---|---|
| MySQL-monitor | 192.168.100.163 | monitor | 無 |
| master1 | 192.168.100.155 | db1 | 1 |
| master2 | 192.168.100.166 | db2 | 2 |
| slave1 | 192.168.100.159 | db3 | 3 |
| slave2 | 192.168.100.158 | db4 | 4 |
虛擬IP地址(VIP):
| IP | role |
|---|---|
| 192.168.100.170 | writer |
| 192.168.100.171 | reader |
| 192.168.100.172 | reader |
實驗部署
一、在master1、master2、slave1、slave2上安裝MariaDB,本實驗用MariaDB代替MySQL,實驗效果相同
1.配置ALI雲源,然後安裝epel-release源
wget -O /etc/yum.repos.d/CentOS-Base.repo http://mirrors.aliyun.com/repo/Centos-7.repo
yum -y install epel-release
yum clean all && yum makecache   //清空所有,重新更新元數據緩存
2.安裝MariaDB
yum -y install mariadb-server mariadb3.關閉防火墻及增強安全設置
systemctl stop firewalld.service
setenforce 0
在其他三臺服務端上進行同樣的操作
4.修改m1主配置文件
vim /etc/my.cnf
[mysqld]
log_error=/var/lib/mysql/mysql.err               //錯誤日誌文件位置
log=/var/lib/mysql/mysql_log.log                 //訪問日誌文件位置
log_slow_queries=/var/lib/mysql_slow_queris.log  //慢日誌文件位置
binlog-ignore-db=mysql,information_schema        //mysql,information_schema這兩個數據庫不生成二進制日誌文件
character_set_server=utf8       //字體設置為utf8
log_bin=mysql_bin                                //二進制日誌文件功能開啟
server_id=1                                  //本臺server_id為1,其他三臺server_id與本臺不同
log_slave_updates=true                           //開啟同步
sync_binlog=1                                    //1為安全值
auto_increment_increment=2
auto_increment_offset=1
5.開啟服務並查看服務狀態
systemctl start mariadb
netstat -anpt | grep 3306
6.沒有問題後,把配置文件復制到其它3臺數據庫服務器上並啟動服務器,註意:配置文件中的server_id要修改
scp /etc/my.cnf [email protected]:/etc/
scp /etc/my.cnf [email protected]:/etc/
scp /etc/my.cnf [email protected]:/etc/
二、配置主主復制(兩臺主服務器相互復制)
1.分別在兩臺主服務器上查看日誌文件名稱和位置值
mysql               //登錄數據庫
>show master status;
2.在m1上為m2授予從的權限,在m2上也要為m1授予從的權限
MariaDB-m1:
grant replication slave on *.* to ‘replication‘@‘192.168.100.%‘ identified by ‘123456‘;
//使用賬戶為replication 密碼為123456
change master to master_host=‘192.168.100.166‘,master_user=‘replication‘,master_password=‘123456‘,master_log_file=‘mysql_bin.000001‘,master_log_pos=245;
//當在MariaDB-m1上執行時,master_host地址為MariaDB-m2地址
MariaDB-m2:
grant replication slave on *.* to ‘replication‘@‘192.168.100.%‘ identified by ‘123456‘;
change master to master_host=‘192.168.100.155‘,master_user=‘replication‘,master_password=‘123456‘,master_log_file=‘mysql_bin.000001‘,master_log_pos=245;
//當在MariaDB-m1上執行時,master_host地址為MariaDB-m2地址
3.開啟同步,查看服務器的主從狀態
>start slave;
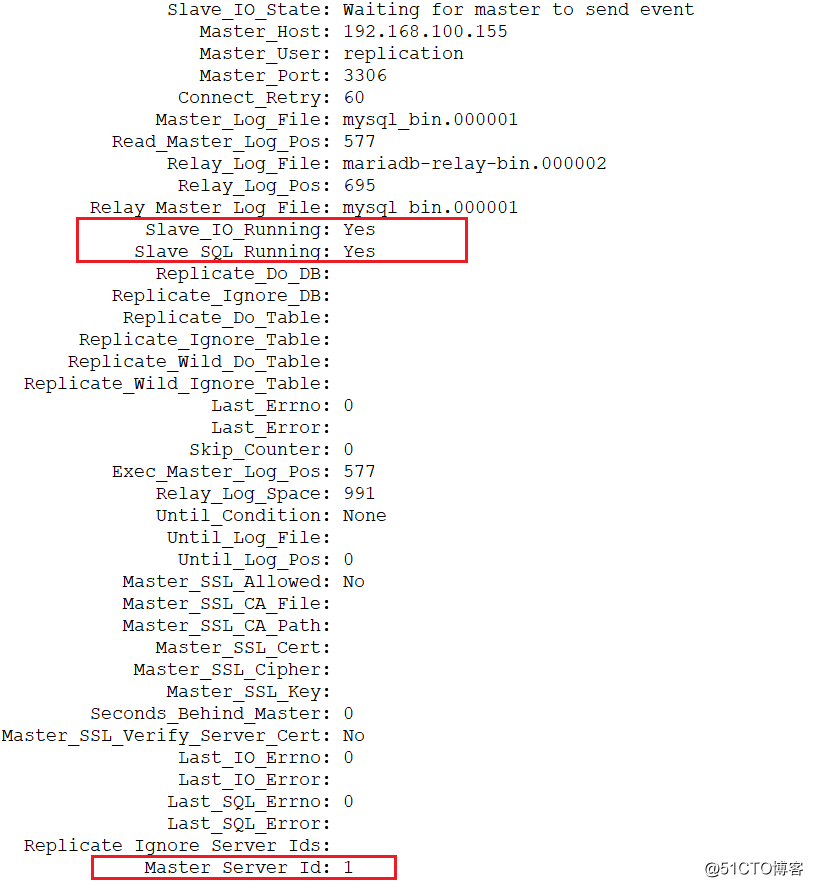
>show slave status\G; //Slave_IO_Running: Yes、Slave_SQL_Running這兩個條目狀態為yes
4.建庫測試主主同步
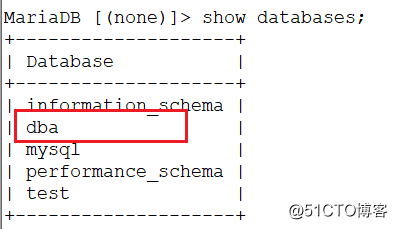
>create database dba;       //在m1上創建dba數據庫,應當在m2上能看到,否則主主同步失敗
>drop database dba;     //在m1上刪除後,m2上的dba也應當沒有
三、主從復制(slave1、slave2兩臺服務器操作相同)
1.登錄mariadb
>mysql2.在兩臺從服務器上分別執行
change master to master_host=‘192.168.100.155‘,master_user=‘replication‘,master_password=‘123456‘,master_log_file=‘mysql_bin.000001‘,master_log_pos=245;3.開啟同步並查看從服務器狀態
>start slave;
>show slave status\G;       //需看到slave1和slave2的Slave_IO_Running: Yes、Slave_SQL_Running參數值為yes
4、測試主從同步
在m1上創建數據庫dba,需要再slave1和slave2上看到同樣的數據庫dba出現,則主從同步成功
四、安裝MySQL-MMM服務器
1.安裝mysql-mmm軟件包
wget -O /etc/yum.repos.d/CentOS-Base.repo http://mirrors.aliyun.com/repo/Centos-7.repo
yum -y install epel-release
yum -y install mysql-mmm*
2.配置MySQL-MMM
vim /etc/mysql-mmm/mmm_common.conf
active_master_role      writer
<host default>
cluster_interface       ens33
pid_path                /run/mysql-mmm-agent.pid
bin_path                /usr/libexec/mysql-mmm/
replication_user        replication
replication_password    123456
agent_user              mmm_agent
agent_password          123456
</host>
<host db1>
ip      192.168.100.155
mode    master
peer    db2
</host>
<host db2>
ip      192.168.100.166
mode    master
peer    db1
</host>
<host db3>
ip      192.168.100.159
mode    slave
</host>
<host db4>
ip      192.168.100.158
mode    slave
</host>
<role writer>
hosts   db1, db2
ips     192.168.100.170
mode    exclusive
</role>
<role reader>
hosts   db3, db4
ips     192.168.100.171, 192.168.100.172
mode    balanced
</role>
3.其他服務器的mmm_common.conf文件內容相同,直接快速傳輸至其他服務器
scp /etc/mysql-mmm/mmm_common.conf [email protected]:/etc/mysql-mmm/
scp /etc/mysql-mmm/mmm_common.conf [email protected]:/etc/mysql-mmm/
scp /etc/mysql-mmm/mmm_common.conf [email protected]:/etc/mysql-mmm/
scp /etc/mysql-mmm/mmm_common.conf [email protected]:/etc/mysql-mmm/
4.在monitor服務器上編輯mmm_mon.conf配置文件
vim /etc/mysql-mmm/mmm_mon.conf
include mmm_common.conf
<monitor>
ip                  127.0.0.1
pid_path            /run/mysql-mmm-monitor.pid
bin_path            /usr/libexec/mysql-mmm
status_path         /var/lib/mysql-mmm/mmm_mond.status
ping_ips            192.168.100.155,192.168.100.166,192.168.100.159,192.168.100.158
auto_set_online     10
# The kill_host_bin does not exist by default, though the monitor will
# throw a warning about it missing.  See the section 5.10 "Kill Host
# Functionality" in the PDF documentation.
#
# kill_host_bin     /usr/libexec/mysql-mmm/monitor/kill_host
#
</monitor>
<host default>
monitor_user        mmm_monitor
monitor_password    123456
</host>
debug 0
5.啟動mysql-mmm-monitor
systemctl start mysql-mmm-monitor.service //啟動mysql-mmm-monitor五、給四臺mysql服務器配置mysql-mmm代理
1、在四臺mysql服務器上為mmm_agent授權
>grant super, replication client, process on *.* to ‘mmm_agent‘@‘192.168.100.%‘ identified by ‘123456‘;2、在所有數據庫上為mmm_monitor授權
>grant replication client on *.* to ‘mmm_monitor‘@‘192.168.100.%‘ identified by ‘123456‘;3.刷新權限
>flush privileges;4、修改各數據庫的mmm_agent.conf的主機名分別為db1、db2、db3、db4
vi /etc/mysql-mmm/mmm_agent.conf
···
this db1            //其他三個服務器分別為db2、db3、db4
5、在所有服務器上啟動mysql-mmm-agent服務
systemctl enable mysql-mmm-agent
systemctl start mysql-mmm-agent
六、回到mmm-monitor上進行檢查
1、查看各節點情況
mmm_control show
db1(192.168.100.155) master/ONLINE. Roles: writer(192.168.100.170)
db2(192.168.100.166) master/ONLINE. Roles:
db3(192.168.100.159) slave/ONLINE. Roles: reader(192.168.100.171)
db4(192.168.100.158) slave/ONLINE. Roles: reader(192.168.100.171)
2、檢查所有選項,需均為OK
mmm_control checks all3、使用下面命令可手動切換主服務器
mmm_control move_role writer db2七、故障測試
1、停止m1服務器的mariadb服務,在檢查服務器狀態,看m2是否搶占虛擬地址
systemctl stop mariadb
mmm_control show
db1(192.168.100.155) master/HARD_OFFLINE. Roles:
db2(192.168.100.166) master/ONLINE. Roles: writer(192.168.100.170)
db3(192.168.100.159) slave/ONLINE. Roles: reader(192.168.100.171)
db4(192.168.100.158) slave/ONLINE. Roles: reader(192.168.100.172)
這裏db1的虛擬ip地址已經漂移到db2上
2、暫停db3服務器的mariadb服務,在檢查狀態
systemctl stop mariadb
mmm_control show
db1(192.168.100.155) master/HARD_OFFLINE. Roles:
db2(192.168.100.166) master/ONLINE. Roles: writer(192.168.100.170)
db3(192.168.100.159) slave/HARD_OFFLINE. Roles:
db4(192.168.100.158) slave/ONLINE. Roles: reader(192.168.100.171),reader(192.168.100.172)
3、恢復db1、db3服務器mariadb服務,在檢查狀態
mmm_control show
db1(192.168.100.155) master/ONLINE. Roles:
db2(192.168.100.166) master/ONLINE. Roles: writer(192.168.100.170)
db3(192.168.100.159) slave/ONLINE. Roles: reader(192.168.100.171)
db4(192.168.100.158) slave/ONLINE. Roles: reader(192.168.100.172)
註:當db1恢復後,並不會搶占vip!
MySQL-MMM高可用群集(本篇使用MariaDB代替MySQL進行實驗部署)