
ssh框架整合shiro權限
關於整合shiro,首先在ssh整合的基礎上進行組合
1.首先,要導入幾個依賴(整合ssh與shiro的依賴):
<properties>
<shiro.version>1.3.2</shiro.version> //整合shiro的版本
</properties>
<dependencies>
//上面的一些有關於整合ssh的依賴就不詳細說了
<!-- 引入shiro依賴 START-->
<dependency>
<groupId>org.apache.shiro</groupId>
<artifactId>shiro-core</artifactId>
<version>${shiro.version}</version>
</dependency>
<dependency>
<groupId>org.apache.shiro</groupId>
<artifactId>shiro-web</artifactId>
<version>${shiro.version}</version>
</dependency>
<dependency>
<groupId>org.apache.shiro</groupId>
<artifactId>shiro-spring</artifactId>
<version>${shiro.version}</version>
</dependency>
<!-- 引入shiro依賴 END-->
</dependencies>
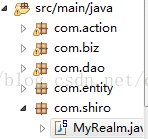
2.如上圖,其他的包我就不詳細說了,說一下 com.shiro包中的MyRealm中的東西,建立MyRealm這個類之後,就繼承AuthorizingRealm
重寫兩個方法,doGetAuthorizationInfo(授權) doGetAuthenticationInfo(認證),裏面的方法先不說了,然後再寫一個applicationContext-shiro.xml文件,在裏面寫MyReam的配置信息: 下面直接上代碼:
<?xml version="1.0" encoding="UTF-8"?>
<beans xmlns="http://www.springframework.org/schema/beans"
xmlns:xsi="http://www.w3.org/2001/XMLSchema-instance"
xsi:schemaLocation="http://www.springframework.org/schema/beans http://www.springframework.org/schema/beans/spring-beans.xsd">
<!-- 1.配置自定義shiro -->
<bean id="myRealm" class="com.shiro.MyRealm">
<property name="iuser_Biz" ref="userBizImpl"></property>
</bean>
<!--2. 配置SecurityManager -->
<bean id="securityManager" class="org.apache.shiro.web.mgt.DefaultWebSecurityManager">
<property name="realm" ref="myRealm"></property>
</bean>
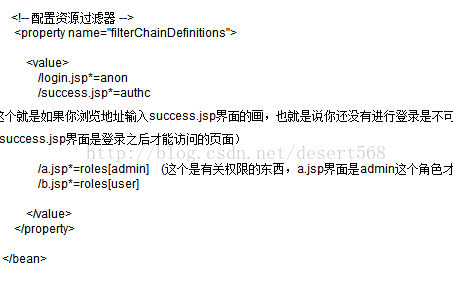
<!-- 3.配置shiroFilter -->
<bean id="shiroFilter" class="org.apache.shiro.spring.web.ShiroFilterFactoryBean">
<property name="securityManager" ref="securityManager"></property>
<property name="unauthorizedUrl" value="/unauthorizedUrl.jsp"></property> //這個屬性就是後面我頁面中關於沒有權限訪問之後跳轉到的界面
<!-- 配置資源過濾器 -->
<property name="filterChainDefinitions">
<value>
/login.jsp*=anon
/success.jsp*=authc
//這個就是如果你瀏覽地址輸入success.jsp界面的畫,也就是說你還沒有進行登錄是不可以訪問success.jsp界面,會幫你跳轉到login.jsp界面
(success.jsp界面是登錄之後才能訪問的頁面)
/a.jsp*=roles[admin] (這個是有關權限的東西,a.jsp界面是admin這個角色才能進入的,而b.jsp界面就是user這個角色才能進入的)
/b.jsp*=roles[user]
</value>
</property>
</bean>
</beans>
3.現在,說一下我的MyReaml類裏面寫的東西:先執行認證,在執行授權:
public class MyRealm extends AuthorizingRealm{
private IUser_Biz iuser_Biz; //這個是我的biz實現dao方法,也就是訪問數據庫
public IUser_Biz getIuser_Biz() {
return iuser_Biz;
}
public void setIuser_Biz(IUser_Biz iuser_Biz) {
this.iuser_Biz = iuser_Biz;
}
//授權
@Override
protected AuthorizationInfo doGetAuthorizationInfo(PrincipalCollection principals) {
// TODO Auto-generated method stub
//獲取用戶名:
String uname=principals.getPrimaryPrincipal().toString();
List<String> roles=new ArrayList<String>(); //這個裏面就是為了方便,我就定義了一個死的角色
if("desert".equals(uname)){
roles.add("admin"); //如果是desert用戶登錄的話,那麽他就是管理員的這個角色,也包括下面的普通用戶這個角色
}
roles.add("user"); //普通用戶
SimpleAuthorizationInfo info=new SimpleAuthorizationInfo();
info.addRoles(roles); //將角色放進SimpleAuthorizationInfo裏面,後來就是在我上面那個a.jsp和b.jsp界面就可以知道什麽樣的角色可以訪問什麽樣的權限了
return info;
}
//認證
@Override
protected AuthenticationInfo doGetAuthenticationInfo(AuthenticationToken token) throws AuthenticationException {
// TODO Auto-generated method stub
System.out.println("認證");
UsernamePasswordToken token2=(UsernamePasswordToken) token;
String uname=token2.getUsername();
//根據用戶名得到密碼:
String upwd=iuser_Biz.getpwd(uname);
SimpleAuthenticationInfo info=new SimpleAuthenticationInfo(uname,upwd,this.getName());
return info;
}
}
4.然後,去你的web.xml文件配置一些東西:一定要按照下面的順序來,不然會報錯
<!DOCTYPE web-app PUBLIC
"-//Sun Microsystems, Inc.//DTD Web Application 2.3//EN"
"http://java.sun.com/dtd/web-app_2_3.dtd" >
<web-app>
<display-name>Archetype Created Web Application</display-name>
<!--加載Spring-->
<context-param>
<param-name>contextConfigLocation</param-name>
<param-value>classpath:applicationContext-*.xml</param-value>
</context-param>
<!-- 配置shiro過濾器:必須配置到Struts2前面 -->
<filter>
<filter-name>shiroFilter</filter-name>
<filter-class>org.springframework.web.filter.DelegatingFilterProxy</filter-class>
</filter>
<!-- 加載struts配置文件 -->
<filter>
<filter-name>struts21</filter-name>
<filter-class>org.apache.struts2.dispatcher.ng.filter.StrutsPrepareAndExecuteFilter</filter-class>
</filter>
<filter-mapping>
<filter-name>shiroFilter</filter-name>
<url-pattern>/*</url-pattern>
</filter-mapping>
<filter-mapping>
<filter-name>struts21</filter-name>
<url-pattern>*.action</url-pattern>
</filter-mapping>
<!--添加監聽-->
<listener>
<listener-class>org.springframework.web.context.ContextLoaderListener</listener-class>
</listener>
</web-app>
5.現在,看一下我一個簡單的登錄界面 也就是:login.jsp:
<%@ page language="java" contentType="text/html; charset=utf-8"
pageEncoding="utf-8"%>
<!DOCTYPE html PUBLIC "-//W3C//DTD HTML 4.01 Transitional//EN" "http://www.w3.org/TR/html4/loose.dtd">
<html>
<head>
<meta http-equiv="Content-Type" content="text/html; charset=utf-8">
<title>Insert title here</title>
</head>
<body>
<form action="useradd.action" method="post">
用戶名:<input type="text" name="user.uname" /><br/>
密碼: <input type="text" name="user.upwd" /><br>
<input type="submit" value="保存" />
</form>
</body>
</html>
6.然後,看一下我struts.xml配置文件的東西:
<?xml version="1.0" encoding="UTF-8"?>
<!DOCTYPE struts PUBLIC
"-//Apache Software Foundation//DTD Struts Configuration 2.3//EN"
"http://struts.apache.org/dtds/struts-2.3.dtd">
<struts>
<package name="myPackgae" extends="struts-default">
<action name="user*" class="userAction" method="{1}">
<result name="success">/success.jsp</result>
<result name="false">/login.jsp</result>
</action>
</package>
</struts>
7.再看一下我的action類:
public class UserAction extends ActionSupport {
private User user;
public User getUser() {
return user;
}
public void setUser(User user) {
this.user = user;
}
public String add() throws Exception {
// TODO Auto-generated method stub
Subject subject=SecurityUtils.getSubject(); //得到subject
UsernamePasswordToken token=new UsernamePasswordToken(user.getUname(),user.getUpwd()); //實例化一個令牌,把用戶名和密碼放入其中
try {
subject.login(token); //這個時候 會自動去MyRealm這個類中的doGetAuthenticationInfo和doGetAuthorizationInfo方法走一走,驗證並授權
} catch (AuthenticationException e) {
// TODO: handle exception
return "false";
}
return "success";
}
}
8.success.jsp
<%@ page language="java" contentType="text/html; charset=utf-8"
pageEncoding="utf-8"%>
<!DOCTYPE html PUBLIC "-//W3C//DTD HTML 4.01 Transitional//EN" "http://www.w3.org/TR/html4/loose.dtd">
<html>
<head>
<meta http-equiv="Content-Type" content="text/html; charset=utf-8">
<title>Insert title here</title>
</head>
<body>
登錄成功!!!!!
<a href="a.jsp">A頁面</a><br/>
<a href="b.jsp">B頁面</a><br/>
</body>
</html>
最後,就可以看效果了,如果是desert用戶登錄的話,他就可以訪問 a.jsp和b.jsp兩個界面,然而登錄是其他的用戶,就只可以訪問b.jsp
上面那種配置文件裏面就是關於什麽用戶 可以跳轉什麽界面,但是用戶進入到這個success.jsp界面可以看到兩個a標簽,
9.shiro標簽定義權限:
<%@ page language="java" contentType="text/html; charset=utf-8"
pageEncoding="utf-8"%>
<%@ taglib uri="http://shiro.apache.org/tags" prefix="shiro" %>
<!DOCTYPE html PUBLIC "-//W3C//DTD HTML 4.01 Transitional//EN" "http://www.w3.org/TR/html4/loose.dtd">
<html>
<head>
<meta http-equiv="Content-Type" content="text/html; charset=utf-8">
<title>Insert title here</title>
</head>
<body>
登錄成功!!!!!
你好:<shiro:principal></shiro:principal></br> //存放的是你登錄進來的用戶名
<shiro:hasRole name="admin">
<a href="a.jsp">A頁面</a><br/>
</shiro:hasRole>
<shiro:hasRole name="user">
<a href="b.jsp">B頁面</a><br/>
</shiro:hasRole>
</body>
</html>
還有一種shiro標簽,就是什麽用戶登錄進來之後只能看到屬於自己的權限,也就是說如果是desert(管理權限,和用戶權限)登錄的話,進來之後,可以看到兩個a標簽,如果是其他的用戶登錄進來之後,就只能看到一個a標簽
希望你們能夠理解。
過幾天說一下關於項目中如何使用權限,因為選擇正在做一個ssh項目,也正在做最後的權限問題,也是弄暈了腦袋,後臺使用easyui做的,畢竟也才工作沒幾個月,所以現在還是有點吃力的。
ssh框架整合shiro權限