
Keepalived+Haproxy高可用負載均衡群集
介紹
HAProxy提供高可用性、負載均衡以及基於TCP和HTTP應用的代理,支持虛擬主機,它是免費、快速並且可靠的一種解決方案。HAProxy特別適用於那些負載特大的web站點,這些站點通常又需要會話保持或七層處理。HAProxy運行在當前的硬件上,完全可以支持數以萬計的並發連接。並且它的運行模式使得它可以很簡單安全的整合進您當前的架構中,同時可以保護你的web服務器不被暴露到網絡上.
haproxy 配置中分成五部分內容,分別如下:
- global:參數是進程級的,通常是和操作系統相關。這些參數一般只設置一次,如果配置無誤,就不需要再次進行修改
- defaults:配置默認參數,這些參數可以被用到frontend,backend,Listen組件
- frontend:接收請求的前端虛擬節點,Frontend可以更加規則直接指定具體使用後端的backend
- backend:後端服務集群的配置,是真實服務器,一個Backend對應一個或者多個實體服務器
- Listen Fronted和backend的組合體
安裝使用
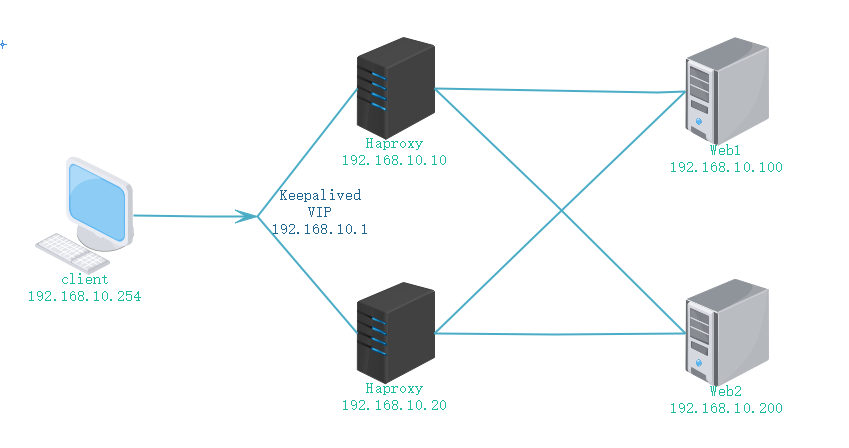
使用以上圖的拓撲來配置使用haproxy
1.配置各服務器的IP地址
略
2.安裝Haproxy(兩臺負載均衡器配置一樣)
#編譯安裝 [[email protected] ~]# tar zxvf haproxy-1.4.24.tar.gz -C /usr/src/ [[email protected]~]# cd /usr/src/haproxy-1.4.24/ [[email protected] haproxy-1.4.24]# make TARGET=linux26 PREFIX=/usr/local/haproxy [[email protected] haproxy-1.4.24]# make install PREFIX=/usr/local/haproxy 參數解釋:linux26表示linux的內核版本號 可以使用uname -r查看 [[email protected] ~]# uname -r 2.6.32-431.el6.x86_64 #創建啟動文件 [[email protected]~]# cp /usr/src/haproxy-1.4.24/examples/haproxy.init /etc/init.d/haproxy [[email protected] ~]# chmod +x /etc/init.d/haproxy [[email protected] ~]# ln -s /usr/local/haproxy/sbin/haproxy /usr/sbin/ #創建配置文件 [[email protected] ~]# mkdir /etc/haproxy [[email protected] ~]# cp /usr/src/haproxy-1.4.24/examples/haproxy.cfg /etc/haproxy/
3.修改Haproxy配置文件(兩臺負載均衡器配置一樣)
[[email protected] ~]# vim /etc/haproxy/haproxy.cfg
修改為:
global
        log 127.0.0.1   local0
        log 127.0.0.1   local1 notice
        #log loghost    local0 info
        maxconn 4096
        chroot /usr/share/haproxy
        uid 99
        gid 99
        daemon
        #debug
        #quiet
defaults
        log     global
        mode    http
        option  httplog
        option  dontlognull
        retries 3
        redispatch
        maxconn 2000
        contimeout      50
        clitimeout      50
        srvtimeout      50
listen  web_pool_server 192.168.10.1:80
        option  httpchk /index.html
        balance roundrobin
        server  inst1 192.168.10.100:80 check inter 2000 fall 3
        server  inst2 192.168.10.200:80 check inter 2000 fall 3
啟動服務:
[[email protected] ~]# /etc/init.d/haproxy restart
Shutting down haproxy:                                     [FAILED]
Starting haproxy: [WARNING] 281/233815 (2923) : parsing [/etc/haproxy/haproxy.cfg:21]: keyword ‘redi ‘option redispatch‘ instead.
[ALERT] 281/233815 (2923) : [/usr/sbin/haproxy.main()] Cannot chroot(/usr/share/haproxy).
                                                           [FAILED]
會出現如上錯誤,解決方法:
方法一:創建此目錄(主要用於存放一些臨時數據文件)
[[email protected] ~]# mkdir /usr/share/haproxy
方法二,將haproxy配置文件中的此行註釋掉
#chroot /usr/share/haprox
haproxy配置項介紹:
Haproxy配置文件愛你通常分為三部分(global、defaults、listen),global為全局配置、defaults為默認配置、listen為應用組件配置。
配置說明如下(可參考:http://freehat.blog.51cto.com/1239536/1347882):


###########全局配置#########
global
    log 127.0.0.1   local0 #[日誌輸出配置,所有日誌都記錄在本機,通過local0輸出]
    log 127.0.0.1   local1 notice  #定義haproxy 日誌級別[error warringinfo debug]
        daemon      #以後臺形式運行harpoxy
        nbproc 1   #設置進程數量
        pidfile /home/haproxy/haproxy/conf/haproxy.pid   #haproxy 進程PID文件
    ulimit-n 819200   #ulimit 的數量限制
    maxconn 4096    #默認最大連接數,需考慮ulimit-n限制
        #chroot /usr/share/haproxy #chroot運行路徑
    uid 99                    #運行haproxy 用戶 UID
        gid 99                    #運行haproxy 用戶組gid
        #debug      #haproxy 調試級別,建議只在開啟單進程的時候調試
        #quiet

########默認配置############
defaults
    log global
        mode http               #默認的模式mode { tcp|http|health },tcp是4層,http是7層,health只會返回OK
        option  httplog         #日誌類別,采用httplog
    option  dontlognull     #不記錄健康檢查日誌信息
    retries 2               #兩次連接失敗就認為是服務器不可用,也可以通過後面設置
    option  forwardfor   #如果後端服務器需要獲得客戶端真實ip需要配置的參數,可以從Http Header中獲得客戶端ip
    option  httpclose    #每次請求完畢後主動關閉http通道,haproxy不支持keep-alive,只能模擬這種模式的實現
        #option redispatch       #當serverId對應的服務器掛掉後,強制定向到其他健康的服務器,以後將不支持
        option abortonclose     #當服務器負載很高的時候,自動結束掉當前隊列處理比較久的鏈接
        maxconn 4096            #默認的最大連接數
        timeout connect  5000ms  #連接超時
        timeout client 30000ms  #客戶端超時
        timeout server 30000ms  #服務器超時
        #timeout check 2000      #心跳檢測超時
    #timeout http-keep-alive10s   #默認持久連接超時時間
    #timeout http-request   10s   #默認http請求超時時間
        #timeoutqueue          1m     #默認隊列超時時間
    balance roundrobin    #設置默認負載均衡方式,輪詢方式
        #balance source        # 設置默認負載均衡方式,類似於nginx的ip_hash
        #balnace leastconn     #設置默認負載均衡方式,最小連接數

########統計頁面配置########
listen admin_stats
        bind 0.0.0.0:1080               #設置Frontend和Backend的組合體,監控組的名稱,按需要自定義名稱
        mode http                       #http的7層模式
        option httplog                  #采用http日誌格式
        #log 127.0.0.1 local0 err       #錯誤日誌記錄
        maxconn 10                      #默認的最大連接數
        stats refresh 30s               #統計頁面自動刷新時間
        stats uri /stats                #統計頁面url
        stats realm XingCloud\ Haproxy  #統計頁面密碼框上提示文本
        stats auth admin:admin     #設置監控頁面的用戶和密碼:admin,可以設置多個用戶名
        stats auth  Frank:Frank   #設置監控頁面的用戶和密碼:Frank
        stats hide-version              #隱藏統計頁面上HAProxy的版本信息
    stats  admin if TRUE       #設置手工啟動/禁用,後端服務器(haproxy-1.4.9以後版本)

########設置haproxy 錯誤頁面#####
errorfile 403  /home/haproxy/haproxy/errorfiles/403.http
errorfile 500 /home/haproxy/haproxy/errorfiles/500.http
errorfile 502 /home/haproxy/haproxy/errorfiles/502.http
errorfile 503 /home/haproxy/haproxy/errorfiles/503.http
errorfile 504 /home/haproxy/haproxy/errorfiles/504.http

########frontend前端配置##############
bind *:80
    #這裏建議使用bind *:80的方式,要不然做集群高可用的時候有問題,vip切換到其他機器就不能訪問了。
    acl web hdr(host) -i www.abc.com
    #acl後面是規則名稱,-i是要訪問的域名,
    acl img hdr(host) -i img.abc.com
    如果訪問www.abc.com這個域名就分發到下面的webserver 的作用域。
    #如果訪問img.abc.com.cn就分發到imgserver這個作用域。
    use_backend webserver if web
    use_backend imgserver if img

########backend後端配置##############
backend webserver             #webserver作用域
    mode http
    balance   roundrobin
    #banlance roundrobin 輪詢,balance source 保存session值,支持static-rr,leastconn,first,uri等參數
    option  httpchk /index.html HTTP/1.0  #健康檢查
    #檢測文件,如果分發到後臺index.html訪問不到就不再分發給它
    server  web1 10.16.0.9:8085 cookie 1 weight 5 check inter 2000 rise 2 fall 3
    server  web2 10.16.0.10:8085 cookie 2 weight 3 check inter 2000 rise 2 fall 3
    #cookie 1表示serverid為1,check inter 1500 是檢測心跳頻率
    #rise 2是2次正確認為服務器可用,fall 3是3次失敗認為服務器不可用,weight代表權重
backend imgserver
    mode http
    option  httpchk /index.php
    balance     roundrobin
    server      img01 192.168.137.101:80  check inter 2000 fall 3
    server      img02 192.168.137.102:80  check inter 2000 fall 3

########tcp配置#################
listen test1
        bind 0.0.0.0:90
        mode tcp
    option  tcplog          #日誌類別,采用tcplog
        maxconn 4086
        #log 127.0.0.1 local0 debug
        server s1 10.18.138.201:80  weight 1
        server s2 10.18.102.190:80  weight 1
haproxy.cfg
4.安裝Keepalived並配置(參數說明可參考:http://www.cnblogs.com/zhichaoma/p/7620443.html)
[[email protected] ~]# yum -y install kernel-devel openssl-devel popt-devel
[[email protected] ~]# tar zxvf keepalived-1.2.13.tar.gz -C /usr/src/
[[email protected] ~]# cd /usr/src/keepalived-1.2.13/
[[email protected] keepalived-1.2.13]# ./configure --prefix=/ --with-kernel-dir=/usr/src/kernels/2.6.32-431.el6.x86_64/ && make && make install
主 修改為:
global_defs {
   router_id R1
}
vrrp_instance VI_1 {
    state MASTER
    interface eth0
    virtual_router_id 51
    priority 100
    advert_int 1
    authentication {
        auth_type PASS
        auth_pass 1111
    }
    virtual_ipaddress {
        192.168.10.1
    }
}
備修改為:
global_defs {
   router_id R2
}
vrrp_instance VI_1 {
    state BACKUP
    interface eth0
    virtual_router_id 51
    priority 90
    advert_int 1
    authentication {
        auth_type PASS
        auth_pass 1111
    }
    virtual_ipaddress {
        192.168.10.1
    }
}
[[email protected] ~]# service keepalived start
[[email protected] ~]# ip a
5.配置web節點服務器
安裝Web服務,創建網站測試頁面
[[email protected] ~]# yum -y install httpd
[[email protected] ~]# service httpd start
Web1的首頁:
[[email protected] ~]# echo "web site test 1" > /var/www/html/index.html
Web2的首頁:
[[email protected] ~]# echo "web site test 2" > /var/www/html/index.html
6.測試
使用客戶機訪問VIP(192.168.10.1)地址,是否有web頁面輪詢(因為兩臺web服務器使用的首頁不同很容易可以看出效果),斷掉一臺haproxy服務器,驗證另一臺服務器是否可以接管調度服務
Keepalived+Haproxy高可用負載均衡群集