
構建ASP.NET MVC5+EF6+EasyUI 1.4.3+Unity4.x註入的後臺管理系統(66)-MVC WebApi 用戶驗證 (2)
前言:
- 構建ASP.NET MVC5+EF6+EasyUI 1.4.3+Unity4.x註入的後臺管理系統(65)-MVC WebApi 用戶驗證 (1)
回顧上一節,我們利用webapi簡單的登錄並進行了同域訪問與跨域訪問來獲得Token,您可以跳轉到上一節下載代碼來一起動手。
繼續上一篇的文章,我們接下來演示利用拿到的Token來訪問接口,管理接口,利用系統權限管理接口,對每個接口進行授權(管理接口為選讀部分,因為你需要閱讀最開始權限管理部分(18-27節),才能閱讀這部分)
開發環境:
VS2015+無數據庫(模擬數據)
樣例代碼下載 訪問密碼 8ca3
知識點:
- WebApi權限驗證
- 應用到實際中來
- 調試
開始:
1.過濾器驗證
我們之前也是通過過濾器來驗證對於Action的操作權限,接口也不例外,在Action切入,在每次訪問的時候都附帶Token信息,也許你可以通過下列在Http請求頭中來附加Token

添加過濾類:SupportFilter並繼承AuthorizeAttribute權限篩選器OnAuthorization基類方法

using System.Linq;
using System.Web;
using System.Web.Http;
using System.Web.Security;

namespace Apps.WebApi.Core
{
    public class SupportFilter : AuthorizeAttribute
    {
        //重寫基類的驗證方式,加入我們自定義的Ticket驗證
        public override void OnAuthorization(System.Web.Http.Controllers.HttpActionContext actionContext)
        {
            //url獲取token
            var content = actionContext.Request.Properties["MS_HttpContext"] as HttpContextBase;
            var token = content.Request.QueryString["Token"];
            if (!string.IsNullOrEmpty(token))
            {
                //解密用戶ticket,並校驗用戶名密碼是否匹配
                if (ValidateTicket(token))
                {
                    base.IsAuthorized(actionContext);
                }
                else
                {
                    HandleUnauthorizedRequest(actionContext);
                }
            }
            //如果取不到身份驗證信息,並且不允許匿名訪問,則返回未驗證401
            else
            {
                var attributes = actionContext.ActionDescriptor.GetCustomAttributes<AllowAnonymousAttribute>().OfType<AllowAnonymousAttribute>();
                bool isAnonymous = attributes.Any(a => a is AllowAnonymousAttribute);
                if (isAnonymous) base.OnAuthorization(actionContext);
                else HandleUnauthorizedRequest(actionContext);
            }
        }

        //校驗用戶名密碼(對Session匹配,或數據庫數據匹配)
        private bool ValidateTicket(string encryptToken)
        {
            //解密Ticket
            var strTicket = FormsAuthentication.Decrypt(encryptToken).UserData;

            //從Ticket裏面獲取用戶名和密碼
            var index = strTicket.IndexOf("&");
            string userName = strTicket.Substring(0, index);
            string password = strTicket.Substring(index + 1);
            //取得session,不通過說明用戶退出,或者session已經過期
            var token = HttpContext.Current.Session[userName];
            if (token == null)
            {
                return false;
            }
            //對比session中的令牌
            if (token.ToString() == encryptToken)
            {
                return true;
            }

            return false;

        }
    }
}
HttpActionContext是無法取到URL的參數的,需要轉換為HttpContextBase,這個類我都有註釋,很容易看懂。
1.從URL取到Token,利用之前加密的方式來揭秘Token並得出Token中的用戶名
2.利用用戶名獲取Session中的Token
3.ValidateTicket驗證,判斷Session中的Token是否與獲取到的相同?
2.應用到實際當中來
最後對每個Action進行註解,好在調用接口的時候優先判斷是否有權限訪問

3.運行調試
調試之前,我們需要寫點代碼來訪問
修改Home Index代碼
<script src="~/Scripts/jquery-1.10.2.min.js"></script>
<style>html,body{height:100%}.box{filter:progid:DXImageTransform.Microsoft.gradient(startColorstr=‘#6699FF‘, endColorstr=‘#6699FF‘);background-image:linear-gradient(bottom,#69F 0,#69F 100%);background-image:-o-linear-gradient(bottom,#69F 0,#69F 100%);background-image:-moz-linear-gradient(bottom,#69F 0,#69F 100%);background-image:-webkit-linear-gradient(bottom,#69F 0,#69F 100%);background-image:-ms-linear-gradient(bottom,#69F 0,#69F 100%);margin:0 auto;position:relative;width:100%;height:100%}.login-box{width:100%;max-width:500px;height:400px;position:absolute;top:50%;margin-top:-200px}@@media screen and (min-width:500px){.login-box{left:50%;margin-left:-250px}}.form{width:100%;max-width:500px;height:275px;margin:25px auto 0 auto;padding-top:25px}.login-content{height:300px;width:100%;max-width:500px; padding: 0px; color: rgb(128, 0, 128); line-height: 1.5 !important;">255,250,2550,.6);float:left}.input-group{margin:0 0 30px 0!important}.form-control,.input-group{height:40px}.form-group{margin-bottom:0!important}.login-title{padding:20px 10px; padding: 0px; color: rgb(128, 0, 128); line-height: 1.5 !important;">0,0,0,.6)}.login-title h1{margin-top:10px!important}.login-title small{color:#fff}.link p{line-height:20px;margin-top:30px}.btn-sm{padding:8px 24px!important;font-size:16px!important}
</style>

<div class="box" style="margin:100px;height:400px;width:500px;">
    <div class="login-box">
        <div class="login-title text-center">
            <h1><small>登錄</small></h1>
        </div>
        <div class="login-content ">
            <div class="form">
                <form action="#" method="post">
                    <div class="form-group">
                        <div class="col-xs-12  ">
                            <div class="input-group">
                                <span class="input-group-addon"><span class="glyphicon glyphicon-user"></span></span>
                                <input type="text" id="username" name="username" class="form-control" placeholder="用戶名">
                            </div>
                        </div>
                    </div>
                    <div class="form-group">
                        <div class="col-xs-12  ">
                            <div class="input-group">
                                <span class="input-group-addon"><span class="glyphicon glyphicon-lock"></span></span>
                                <input type="text" id="password" name="password" class="form-control" placeholder="密碼">
                            </div>
                        </div>
                    </div>
                    <div class="form-group form-actions">
                        <div class="col-xs-4 col-xs-offset-4 ">
                            <button type="button" id="Login" class="btn btn-sm btn-info"><span class="glyphicon glyphicon-off"></span> 登錄</button>
                        </div>
                    </div>

                </form>
            </div>
        </div>
    </div>
</div>
Token:<div id="myToken"></div>
<input type="button" id="getData" value="獲取API Get/{id}的值" />
利用Token後獲得的值:<div id="myVal"></div>
<script>
    $(function () {
        $("#Login").click(function () {
            $.ajax({
                type: "get",
                url: "/api/Account/Login",
                data: { userName: $("#username").val(), password: $("#password").val() },
                success: function (data, status) {
                        if (data.type==0) {
                            alert("登錄失敗");
                            return;
                        }
                        alert("登錄成功:Token" + data.message);
                        $("#myToken").html(data.message);
                },
                error: function (e) {
                    alert("登錄失敗!");
                },
                complete: function () {

                }
            });
        });
        $("#getData").click(function () {
            $.ajax({
                type: "get",
                url: "/api/Values/Get/5?Token=" + $("#myToken").html(),
                success: function (data, status) {
                    alert(data);
                },
                error: function (e) {
                    alert("失敗!");
                },
                complete: function () {

                }
            });
        });
    });
</script>
添加一個按鈕和DIV好顯示結果:
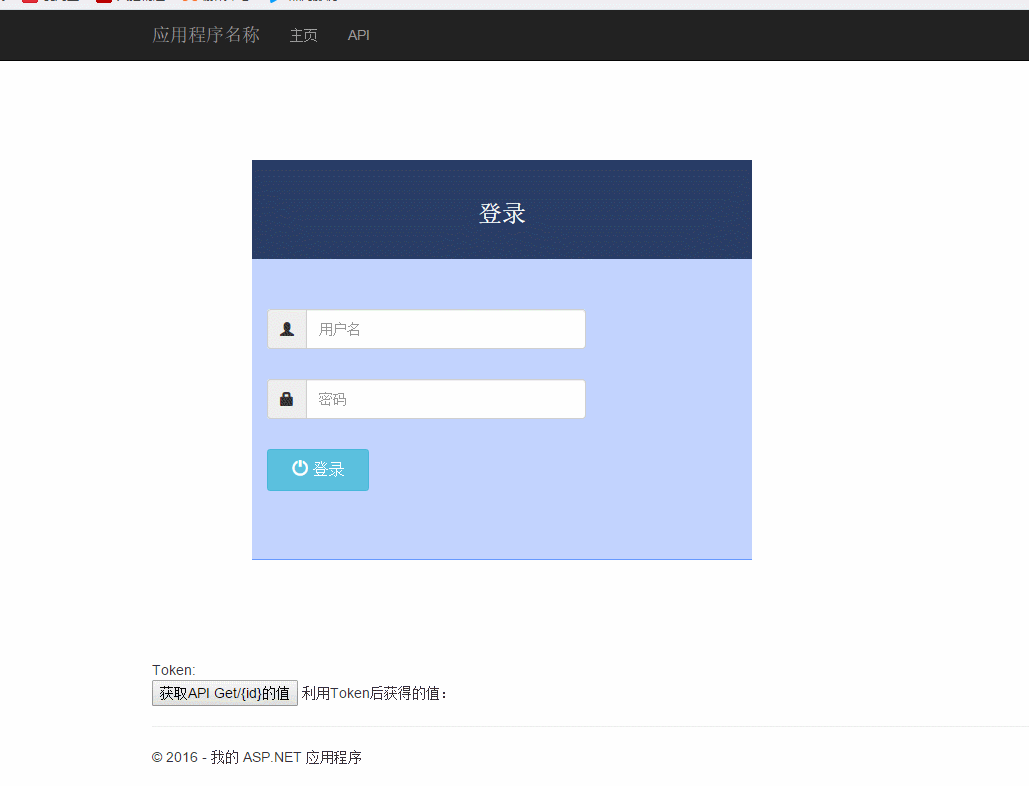
我們獲得了正確的數據。如果沒有token,我們的結果將會返回一個401

大家可以下載代碼把斷點設置在

可以調試程序對於Token處理的順序!
總結:
本節講解了如何利用Token在來訪問需要授權的接口!利用到了MVC的過濾器,在調用Action時候優先進行權限校驗,這樣就完成了對用戶進行接口授權的樣例。
以上部分一般都夠用了,如果你(ˇ?ˇ) 想~更加深入和細微的粒度授權,那麽就要對每個接口進行單獨授權
如果你有興趣,那可以繼續閱讀下面的對API的管理授權
--------------------------------------------------------------------------------------------------------醜陋的分割線-----------------------------------------------------------------------------------------
下面將演示如何管理接口,這需要你之前有跟讀本系列的18-27節權限才能閱讀!因為大部門利用了之前的管理界面的功能和代碼,是緊密聯系的,不過沒有關系,就算你沒有學習之前的系列文章,也許也能從本節中獲得知識!
知識點:
1.取所有類庫中的Api接口
2.管理接口
3.對接口進行授權
4.在過濾器添加權限驗證
開始:
回顧一下我們的模塊管理:

管理的是每一個控制器中的Action(操作碼)
我們的WebApi也是如此,每個控制器的操作碼,在WebApi運行時候把數據填充到SysModule表和SysModuleOperation表中中來
1.取得類庫中所有Api接口
這個真的好用,取得的接口,你平時可以用於管理或自動測試接口
//把控制器當成URL,把Aciton當成操作碼插入到數據表做為權限設置,類似之前的權限系統
//獲得API管理器
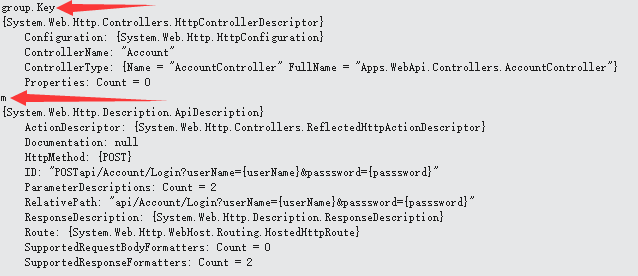
Collection<ApiDescription> apiColl = GlobalConfiguration.Configuration.Services.GetApiExplorer().ApiDescriptions;
ILookup<HttpControllerDescriptor, ApiDescription> apiGroups = apiColl.ToLookup(api => api.ActionDescriptor.ControllerDescriptor);
foreach (var group in apiGroups)
{
//-----------插入Action
foreach (var m in group)
{
}
}
第一個foreach取得控制器,第二個foreach取得控制器下面的Action。大家把這句話添加到Home的Index中來,跟蹤一下,分別可以看到Group和m中模型的屬性。
現在知道怎麽加表了吧!
            foreach (var group in apiGroups)
            {

                string controllerName = group.Key.ControllerName;
                //----------插入控制器
                rootModel = m_BLL.GetById(controllerName);
                if (rootModel == null)
                {
                    SysModuleModel model = new SysModuleModel()
                    {
                        Id = controllerName,
                        Name = controllerName,
                        EnglishName = "",
                        ParentId = "ApiInterfaceAuth",
                        Url = "api/"+ controllerName,
                        Iconic = "fa fa-television",
                        Enable = true,
                        Remark = "Api接口授權",
                        Sort = 1,
                        CreatePerson = "Admin",
                        CreateTime = DateTime.Now,
                        IsLast = true
                    };
                    m_BLL.Create(ref errors, model);
                }
                //-----------插入Action
                foreach (var m in group)
                {
                    string actionName = m.ActionDescriptor.ActionName;
                    SysModuleOperateModel model = operateBLL.GetById(m.ActionDescriptor.ActionName);
                    if (model == null)
                    {
                        model = new SysModuleOperateModel();
                        model.Id = controllerName + actionName;
                        model.Name = m.Documentation == null ? actionName : m.Documentation;
                        model.KeyCode = actionName;
                        model.ModuleId = controllerName;
                        model.IsValid = true;
                        model.Sort = 0;
                        operateBLL.Create(ref errors, model);
                    }

                }
            }
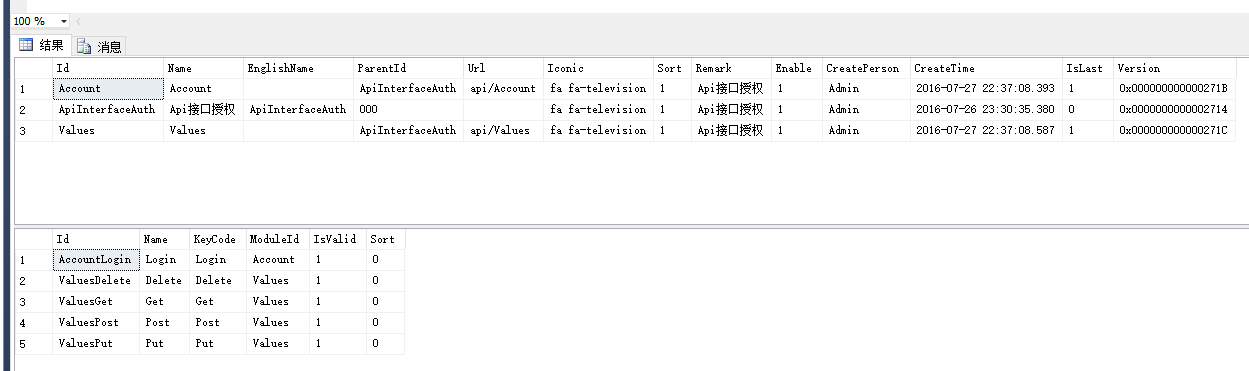
運行之後數據庫將自動添加,幾條數據
2.管理接口
表數據跟我們普通的是沒有區別的,在界面想辦法做個開關做為切換,我這裏做了個下拉來切換類型

切換下拉時候,改變查詢條件
 <div style="float:left">
                   菜單類型切換: <select class="easyui-combobox" name="swicthType" id="swicthType" style="width:80px;height:26px;margin-right:10px; ">
                        <option value="menu">系統菜單</option>
                        <option value="api">Api接口</option>
                    </select>
                </div>
$(‘#swicthType‘).combobox({
            editable: false,
            onSelect: function (record) {
                if (record.value == "api") {
                    $(‘#List‘).treegrid({"url":‘@Url.Action("GetList")?id=ApiInterfaceAuth‘});
                    $(‘#OptList‘).datagrid(‘loadData‘, { total: 0, rows: [] });
                } else {
                    $(‘#List‘).treegrid({"url":‘@Url.Action("GetList")?id=0‘});
                   $(‘#OptList‘).datagrid(‘loadData‘, { total: 0, rows: [] });
                }

            }
        });
3.對接口進行授權
授權後可以查詢到:

為了更好的區分,我將只給超級管理員Get接口的權限
4.在過濾器中添加驗證
這時候我們需要復制之前系統中過濾器的驗證代碼過來使用,並稍作修改為下面代碼:
public class SupportFilter : AuthorizeAttribute
    {
        //重寫基類的驗證方式,加入我們自定義的Ticket驗證
        public override void OnAuthorization(System.Web.Http.Controllers.HttpActionContext actionContext)
        {
            //url獲取token
            var content = actionContext.Request.Properties[ConfigPara.MS_HttpContext] as HttpContextBase;

            var token = content.Request.QueryString[ConfigPara.Token];
            if (!string.IsNullOrEmpty(token))
            {
                //解密用戶ticket,並校驗用戶名密碼是否匹配

                //讀取請求上下文中的Controller,Action,Id
                var routes = new RouteCollection();
                RouteConfig.RegisterRoutes(routes);
                RouteData routeData = routes.GetRouteData(content);
                //取出區域的控制器Action,id
                string controller = actionContext.ActionDescriptor.ControllerDescriptor.ControllerName;
                string action = actionContext.ActionDescriptor.ActionName;
                //URL路徑
                string filePath = HttpContext.Current.Request.FilePath;
                if (LoginUserManage.ValidateTicket(token) && ValiddatePermission(token, controller, action, filePath))
                {
                    //已經登錄,有權限,且沒有單機登錄限制
                    base.IsAuthorized(actionContext);
                }
                else
                {
                    HandleUnauthorizedRequest(actionContext);
                }
            }
            //如果取不到身份驗證信息,並且不允許匿名訪問,則返回未驗證401
            else
            {
                var attributes = actionContext.ActionDescriptor.GetCustomAttributes<AllowAnonymousAttribute>().OfType<AllowAnonymousAttribute>();
                bool isAnonymous = attributes.Any(a => a is AllowAnonymousAttribute);
                if (isAnonymous) base.OnAuthorization(actionContext);
                else HandleUnauthorizedRequest(actionContext);
            }
        }
        public bool ValiddatePermission(string token, string controller, string action, string filePath)
        {
            bool bResult = false;

            List<permModel> perm = null;

            perm = (List<permModel>)HttpContext.Current.Session[filePath];
            if (perm == null)
            {
                SysUserBLL userBLL = new SysUserBLL()
                {
                    m_Rep = new SysUserRepository(new DBContainer()),
                    sysRightRep = new SysRightRepository(new DBContainer())
                };
                {
                    var userName = LoginUserManage.DecryptToken(token.Trim());
                    perm = userBLL.GetPermission(userName, controller);//獲取當前用戶的權限列表
                    HttpContext.Current.Session[filePath] = perm;//獲取的勸降放入會話由Controller調用
                }
                //查詢當前Action 是否有操作權限,大於0表示有,否則沒有
                int count = perm.Where(a => a.KeyCode.ToLower() == action.ToLower()).Count();
                if (count > 0)
                {
                    bResult = true;
                }
                else
                {
                    bResult = false;
                    LoginUserManage.RedirectUrl();
                }
            }
            return bResult;
        }
    }
這樣,訪問時候將對當前訪問的控制器和Action進行權限校驗,沒有權限同樣返回401
接下來寫兩個方法測試一下,一個訪問Values的Get方法,一個訪問Values的Post
<script>
    $(function () {
        $("#Login").click(function () {
            $.ajax({
                type: "get",
                url: "/api/Account/Login",
                data: { userName: $("#username").val(), password: $("#password").val() },
                success: function (data, status) {
                        if (data.type==0) {
                            alert("登錄失敗");
                            return;
                        }
                        alert("登錄成功:Token" + data.message);
                        $("#myToken").html(data.message);
                },
                error: function (e) {
                    alert("登錄失敗!");
                },
                complete: function () {

                }
            });
        });
        $("#getData").click(function () {
            $.ajax({
                type: "get",
                url: "/api/Values/Get/5?Token=" + $("#myToken").html(),
                success: function (data, status) {
                    alert(data);
                },
                error: function (e) {
                    alert("失敗!");
                },
                complete: function () {

                }
            });
        });
        $("#postData").click(function () {
            $.ajax({
                type: "post",
                url: "/api/Values/Post?Token=" + $("#myToken").html(),
                data:{value:"123"},
                success: function (data, status) {
                    alert(data);
                },
                error: function (e) {
                    alert(e);
                },
                complete: function () {

                }
            });
        });
    });
</script>

總結:
其實基於WebApi的權限他們也是如此設計的,您可以集成到你現有的權限系統來
感謝你抽時間看完本節,所謂 贊 得高尿得遠,嘿嘿...
構建ASP.NET MVC5+EF6+EasyUI 1.4.3+Unity4.x註入的後臺管理系統(66)-MVC WebApi 用戶驗證 (2)