
Spring-boot之jQuery File Upload後臺配置方法
阿新 • • 發佈:2017-08-19
文件上傳 query jquer highlight origin exc exist int alt 
文件上傳在Spring-boot中本身配置起來非常簡單,但是有個多文件傳遞和單個傳遞的問題。
兩者配置是略有不同的,而且還有一些讓我這個技術小白很容易踩坑的地方。
重要的幾點:
上傳的是單個文件: MultipartFile file
上傳的是多個文件: MultipartFile[] file
先從單個文件上傳 後臺配置來說:
public Map uploadFile(@RequestParam("file") MultipartFile file,HttpServletRequest req) { // 註意的是 MultipartFile file 表示上傳單個文件


 File tempFile = new File( 文件上傳目錄 );
  if (!tempFile.getParentFile().exists()) {
    tempFile.getParentFile().mkdirs();   // 如果沒有找到上傳的目錄就會創建這個目錄
  }

  if (!file.isEmpty()) {

    try {
      BufferedOutputStream out = new BufferedOutputStream(new FileOutputStream(tempFile));   // 開始上傳

      out.write(file.getBytes());
      out.flush();
      out.close();

    } catch (FileNotFoundException e) {

      e.printStackTrace();
      result.put("msg", "上傳文件產生錯誤," + e.getMessage());
      result.put("result", false);

     }  catch (IOException e) {

      ....

    }

  }

  return result;

}
spring-boot後臺完整代碼:

1 import java.io.BufferedOutputStream; 2 import java.io.File; 3 import java.io.FileNotFoundException; 4 import java.io.FileOutputStream; 5 import java.io.IOException; 6 import java.text.SimpleDateFormat; 7 import java.util.Date; 8 import java.util.HashMap;View Code9 import java.util.Map; 10 11 import javax.servlet.http.HttpServletRequest; 12 13 import org.springframework.beans.factory.annotation.Autowired; 14 import org.springframework.beans.factory.annotation.Value; 15 import org.springframework.web.bind.annotation.RequestMapping; 16 import org.springframework.web.bind.annotation.RequestMethod;17 import org.springframework.web.bind.annotation.RequestParam; 18 import org.springframework.web.bind.annotation.ResponseBody; 19 import org.springframework.web.bind.annotation.RestController; 20 import org.springframework.web.multipart.MultipartFile; 21 22 @RestController 23 @RequestMapping("/upload") 24 public class UploadFileController { 25 // 存儲文件 26 @RequestMapping(value = "/uploadFile",method={RequestMethod.POST}) 27 public Map uploadFile(@RequestParam("file") MultipartFile file,HttpServletRequest req) { 28 Map result = new HashMap<>(); 29 SimpleDateFormat df = new SimpleDateFormat("yyyyMMdd");// 設置日期格式 30 String dateDir = df.format(new Date());// new Date()為獲取當前系統時間 31 File tempFile = new File(fileDIr + dateDir + File.separator 32 + file.getOriginalFilename()); 33 34 if (!tempFile.getParentFile().exists()) { 35 tempFile.getParentFile().mkdirs(); 36 } 37 if (!file.isEmpty()) { 38 try { 39 BufferedOutputStream out = new BufferedOutputStream(new FileOutputStream(tempFile)); 40 // "d:/"+file.getOriginalFilename() 指定目錄 41 out.write(file.getBytes()); 42 out.flush(); 43 out.close(); 44 } catch (FileNotFoundException e) { 45 e.printStackTrace(); 46 result.put("msg", "上傳文件產生錯誤," + e.getMessage()); 47 result.put("result", false); 48 } catch (IOException e) { 49 e.printStackTrace(); 50 result.put("msg", "上傳文件產生錯誤," + e.getMessage()); 51 result.put("result", false); 52 } 53 result.put("msg", "上傳成功"); 54 result.put("result", true); 55 } else { 56 result.put("msg", "上傳文件為空"); 57 result.put("result", false); 58 } 59 return result; 60 } 61 }
這段代碼可以直接放到spring-boot中跑,
再從多個文件上傳 後臺配置來說:
jQuery File Upload 就是一個支持多文件上傳插件,這個時候如果繼續調用上面的單文件上傳的接口就直接前臺報錯啦,當然還有其他的原因。
註意以下幾點就好:
1. 由於是多文件,所以上傳過來的是一個數組文件,所以需要用: MultipartFile[] multipartfiles
2.由於jQuery File Upload的輸入框中:<input id="fileupload" type="file" name="files[]" multiple>
name="files[]" 這個name需要和 @RequestParam(value ="files[]")的value值相等,這樣就可以上傳文件了。
完整後臺代碼
 1 import java.io.File;
 2 import java.util.Map;
 3
 4 import javax.servlet.http.HttpServletRequest;
 5 import javax.servlet.http.HttpServletResponse;
 6
 7 import org.springframework.web.bind.annotation.RequestMapping;
 8 import org.springframework.web.bind.annotation.RequestMethod;
 9 import org.springframework.web.bind.annotation.RequestParam;
10 import org.springframework.web.bind.annotation.RestController;
11 import org.springframework.web.multipart.MultipartFile;
12
13 @RestController
14 @RequestMapping("/upload")
15 public class UploadFileController {
16     // 存儲文件
17     @RequestMapping(value = "/uploadFile",method={RequestMethod.POST})
18     public Map uploadFile(@RequestParam(value ="files[]") MultipartFile[] multipartfiles,HttpServletRequest req) {
19         Map result = new HashMap<>();
20        String savePath = ‘文件目錄‘;
21        if(null != multipartfiles && multipartfiles.length > 0){
22            //遍歷並保存文件
23            for(MultipartFile file : multipartfiles){
24                file.transferTo(new File(savePath + file.getOriginalFilename()));
25            }
26        }
27         result.put("msg", "上傳成功");
28         result.put("result", true);
29         return result;
30     }
31 }
View Code
最後說一說前端jQuery File Upload的使用方法:
放到spring-boot項目下的static目錄下面:

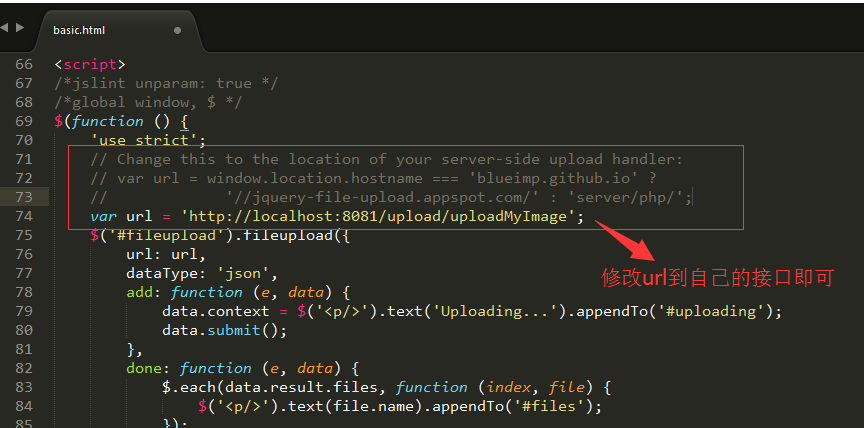
這樣就可以了,完了....所以使用起來非常的方便
Spring-boot之jQuery File Upload後臺配置方法