1. 程式人生 > 實用技巧 >Flink 從 0 到 1 學習之(6)如何自定義 Data Sink ?

Flink 從 0 到 1 學習之(6)如何自定義 Data Sink ?

前言

前篇文章 介紹了 Flink Data Sink,也介紹了 Flink 自帶的 Sink,那麼如何自定義自己的 Sink 呢?這篇文章將寫一個 demo 教大家將從 Kafka Source 的資料 Sink 到 MySQL 中去。

準備工作

我們先來看下 Flink 從 Kafka topic 中獲取資料的 demo,首先你需要安裝好了 FLink 和 Kafka 。

執行啟動 Flink、Zookepeer、Kafka,

好了,都啟動了!

資料庫建表

1
2
3
4
5
6
7
8
DROP TABLE IF EXISTS `student`;
CREATE TABLE `student`
(

`id` int(11) unsigned NOT NULL AUTO_INCREMENT,
`name` varchar(25) COLLATE utf8_bin DEFAULT NULL,
`password` varchar(25) COLLATE utf8_bin DEFAULT NULL,
`age` int(10) DEFAULT NULL,
PRIMARY KEY (`id`)
) ENGINE=InnoDB AUTO_INCREMENT=5 DEFAULT CHARSET=utf8 COLLATE=utf8_bin;

實體類

Student.java

1

2
3
4
5
6
7
8
9
10
11
12
13
14
15
16
17
18
19
20
21
22
23
24
25
26
27
28
29
30
31
32
33
34
35
36
37
38
39
40
41
42
43
44
45
46
47
48
49
50
51
52
53
54
55
56
57
58
59
60
61
62
63
64
65
package com.zhisheng.flink.model;

/**
* Desc:
* weixin: zhisheng_tian
* blog: http://www.54tianzhisheng.cn/
*/
public class Student {
public int id;
public String name;
public String password;

public int age;

public Student() {
}

public Student(int id, String name, String password, int age) {
this.id = id;
this.name = name;
this.password = password;
this.age = age;
}

@Override
public String toString() {
return "Student{" +
"id=" + id +
", name='" + name + '\'' +
", password='" + password + '\'' +
", age=" + age +
'}';
}

public int getId() {
return id;
}

public void setId(int id) {
this.id = id;
}

public String getName() {
return name;
}

public void setName(String name) {
this.name = name;
}

public String getPassword() {
return password;
}

public void setPassword(String password) {
this.password = password;
}

public int getAge() {
return age;
}

public void setAge(int age) {
this.age = age;
}
}

工具類

工具類往 kafka topic student 傳送資料

1
2
3
4
5
6
7
8
9
10
11
12
13
14
15
16
17
18
19
20
21
22
23
24
25
26
27
28
29
30
31
32
33
34
35
36
37
38
39
40
import com.alibaba.fastjson.JSON;
import com.zhisheng.flink.model.Metric;
import com.zhisheng.flink.model.Student;
import org.apache.kafka.clients.producer.KafkaProducer;
import org.apache.kafka.clients.producer.ProducerRecord;

import java.util.HashMap;
import java.util.Map;
import java.util.Properties;

/**
* 往kafka中寫資料
* 可以使用這個main函式進行測試一下
* weixin: zhisheng_tian
* blog: http://www.54tianzhisheng.cn/
*/
public class KafkaUtils2 {
public static final String broker_list = "localhost:9092";
public static final String topic = "student"; //kafka topic 需要和 flink 程式用同一個 topic

public static void writeToKafka() throws InterruptedException {
Properties props = new Properties();
props.put("bootstrap.servers", broker_list);
props.put("key.serializer", "org.apache.kafka.common.serialization.StringSerializer");
props.put("value.serializer", "org.apache.kafka.common.serialization.StringSerializer");
KafkaProducer producer = new KafkaProducer<String, String>(props);

for (int i = 1; i <= 100; i++) {
Student student = new Student(i, "zhisheng" + i, "password" + i, 18 + i);
ProducerRecord record = new ProducerRecord<String, String>(topic, null, null, JSON.toJSONString(student));
producer.send(record);
System.out.println("傳送資料: " + JSON.toJSONString(student));
}
producer.flush();
}

public static void main(String[] args) throws InterruptedException {
writeToKafka();
}
}

SinkToMySQL

該類就是 Sink Function,繼承了 RichSinkFunction ,然後重寫了裡面的方法。在 invoke 方法中將資料插入到 MySQL 中。

1
2
3
4
5
6
7
8
9
10
11
12
13
14
15
16
17
18
19
20
21
22
23
24
25
26
27
28
29
30
31
32
33
34
35
36
37
38
39
40
41
42
43
44
45
46
47
48
49
50
51
52
53
54
55
56
57
58
59
60
61
62
63
64
65
66
67
68
69
70
71
72
73
package com.zhisheng.flink.sink;

import com.zhisheng.flink.model.Student;
import org.apache.flink.configuration.Configuration;
import org.apache.flink.streaming.api.functions.sink.RichSinkFunction;

import java.sql.Connection;
import java.sql.DriverManager;
import java.sql.PreparedStatement;

/**
* Desc:
* weixin: zhisheng_tian
* blog: http://www.54tianzhisheng.cn/
*/
public class SinkToMySQL extends RichSinkFunction<Student> {
PreparedStatement ps;
private Connection connection;

/**
* open() 方法中建立連線,這樣不用每次 invoke 的時候都要建立連線和釋放連線
*
* @param parameters
* @throws Exception
*/
@Override
public void open(Configuration parameters) throws Exception {
super.open(parameters);
connection = getConnection();
String sql = "insert into Student(id, name, password, age) values(?, ?, ?, ?);";
ps = this.connection.prepareStatement(sql);
}

@Override
public void close() throws Exception {
super.close();
//關閉連線和釋放資源
if (connection != null) {
connection.close();
}
if (ps != null) {
ps.close();
}
}

/**
* 每條資料的插入都要呼叫一次 invoke() 方法
*
* @param value
* @param context
* @throws Exception
*/
@Override
public void invoke(Student value, Context context) throws Exception {
//組裝資料,執行插入操作
ps.setInt(1, value.getId());
ps.setString(2, value.getName());
ps.setString(3, value.getPassword());
ps.setInt(4, value.getAge());
ps.executeUpdate();
}

private static Connection getConnection() {
Connection con = null;
try {
Class.forName("com.mysql.jdbc.Driver");
con = DriverManager.getConnection("jdbc:mysql://localhost:3306/test?useUnicode=true&characterEncoding=UTF-8", "root", "root123456");
} catch (Exception e) {
System.out.println("-----------mysql get connection has exception , msg = "+ e.getMessage());
}
return con;
}
}

這裡的 source 是從 kafka 讀取資料的,然後 Flink 從 Kafka 讀取到資料(JSON)後用阿里 fastjson 來解析成 student 物件,然後在 addSink 中使用我們建立的 SinkToMySQL,這樣就可以把資料儲存到 MySQL 了。

1
2
3
4
5
6
7
8
9
10
11
12
13
14
15
16
17
18
19
20
21
22
23
24
25
26
27
28
29
30
31
32
33
34
35
36
37
38
39
40
41
42
43
package com.zhisheng.flink;

import com.alibaba.fastjson.JSON;
import com.zhisheng.flink.model.Student;
import com.zhisheng.flink.sink.SinkToMySQL;
import org.apache.flink.api.common.serialization.SimpleStringSchema;
import org.apache.flink.streaming.api.datastream.DataStreamSource;
import org.apache.flink.streaming.api.datastream.SingleOutputStreamOperator;
import org.apache.flink.streaming.api.environment.StreamExecutionEnvironment;
import org.apache.flink.streaming.api.functions.sink.PrintSinkFunction;
import org.apache.flink.streaming.connectors.kafka.FlinkKafkaConsumer011;
import org.apache.flink.streaming.connectors.kafka.FlinkKafkaProducer011;

import java.util.Properties;

/**
* Desc:
* weixin: zhisheng_tian
* blog: http://www.54tianzhisheng.cn/
*/
public class Main3 {
public static void main(String[] args) throws Exception {
final StreamExecutionEnvironment env = StreamExecutionEnvironment.getExecutionEnvironment();

Properties props = new Properties();
props.put("bootstrap.servers", "localhost:9092");
props.put("zookeeper.connect", "localhost:2181");
props.put("group.id", "metric-group");
props.put("key.deserializer", "org.apache.kafka.common.serialization.StringDeserializer");
props.put("value.deserializer", "org.apache.kafka.common.serialization.StringDeserializer");
props.put("auto.offset.reset", "latest");

SingleOutputStreamOperator<Student> student = env.addSource(new FlinkKafkaConsumer011<>(
"student", //這個 kafka topic 需要和上面的工具類的 topic 一致
new SimpleStringSchema(),
props)).setParallelism(1)
.map(string -> JSON.parseObject(string, Student.class)); //Fastjson 解析字串成 student 物件

student.addSink(new SinkToMySQL()); //資料 sink 到 mysql

env.execute("Flink add sink");
}
}

結果

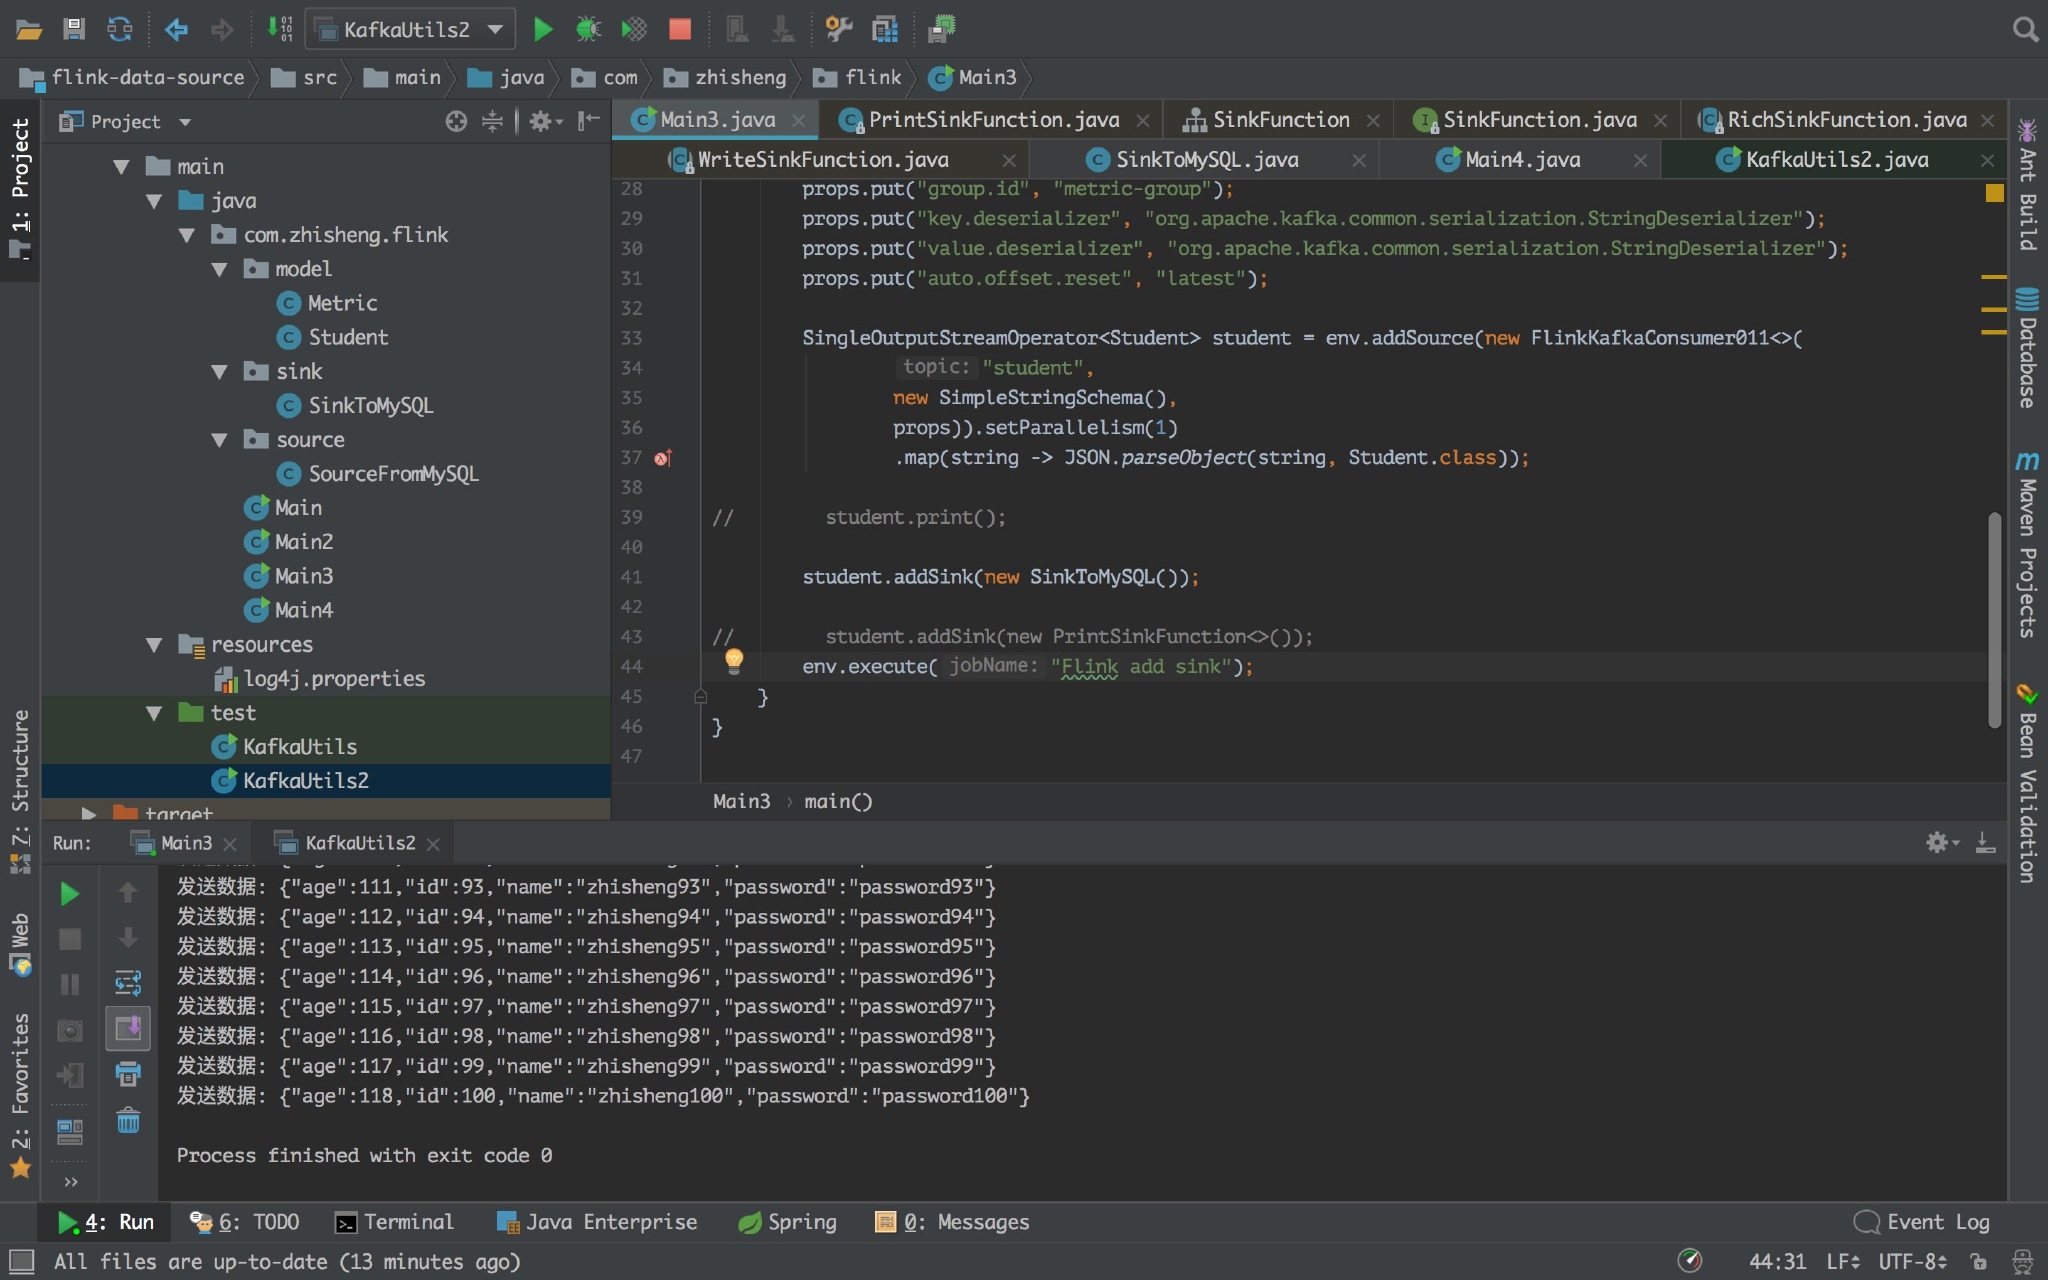
執行 Flink 程式,然後再執行 KafkaUtils2.java 工具類,這樣就可以了。

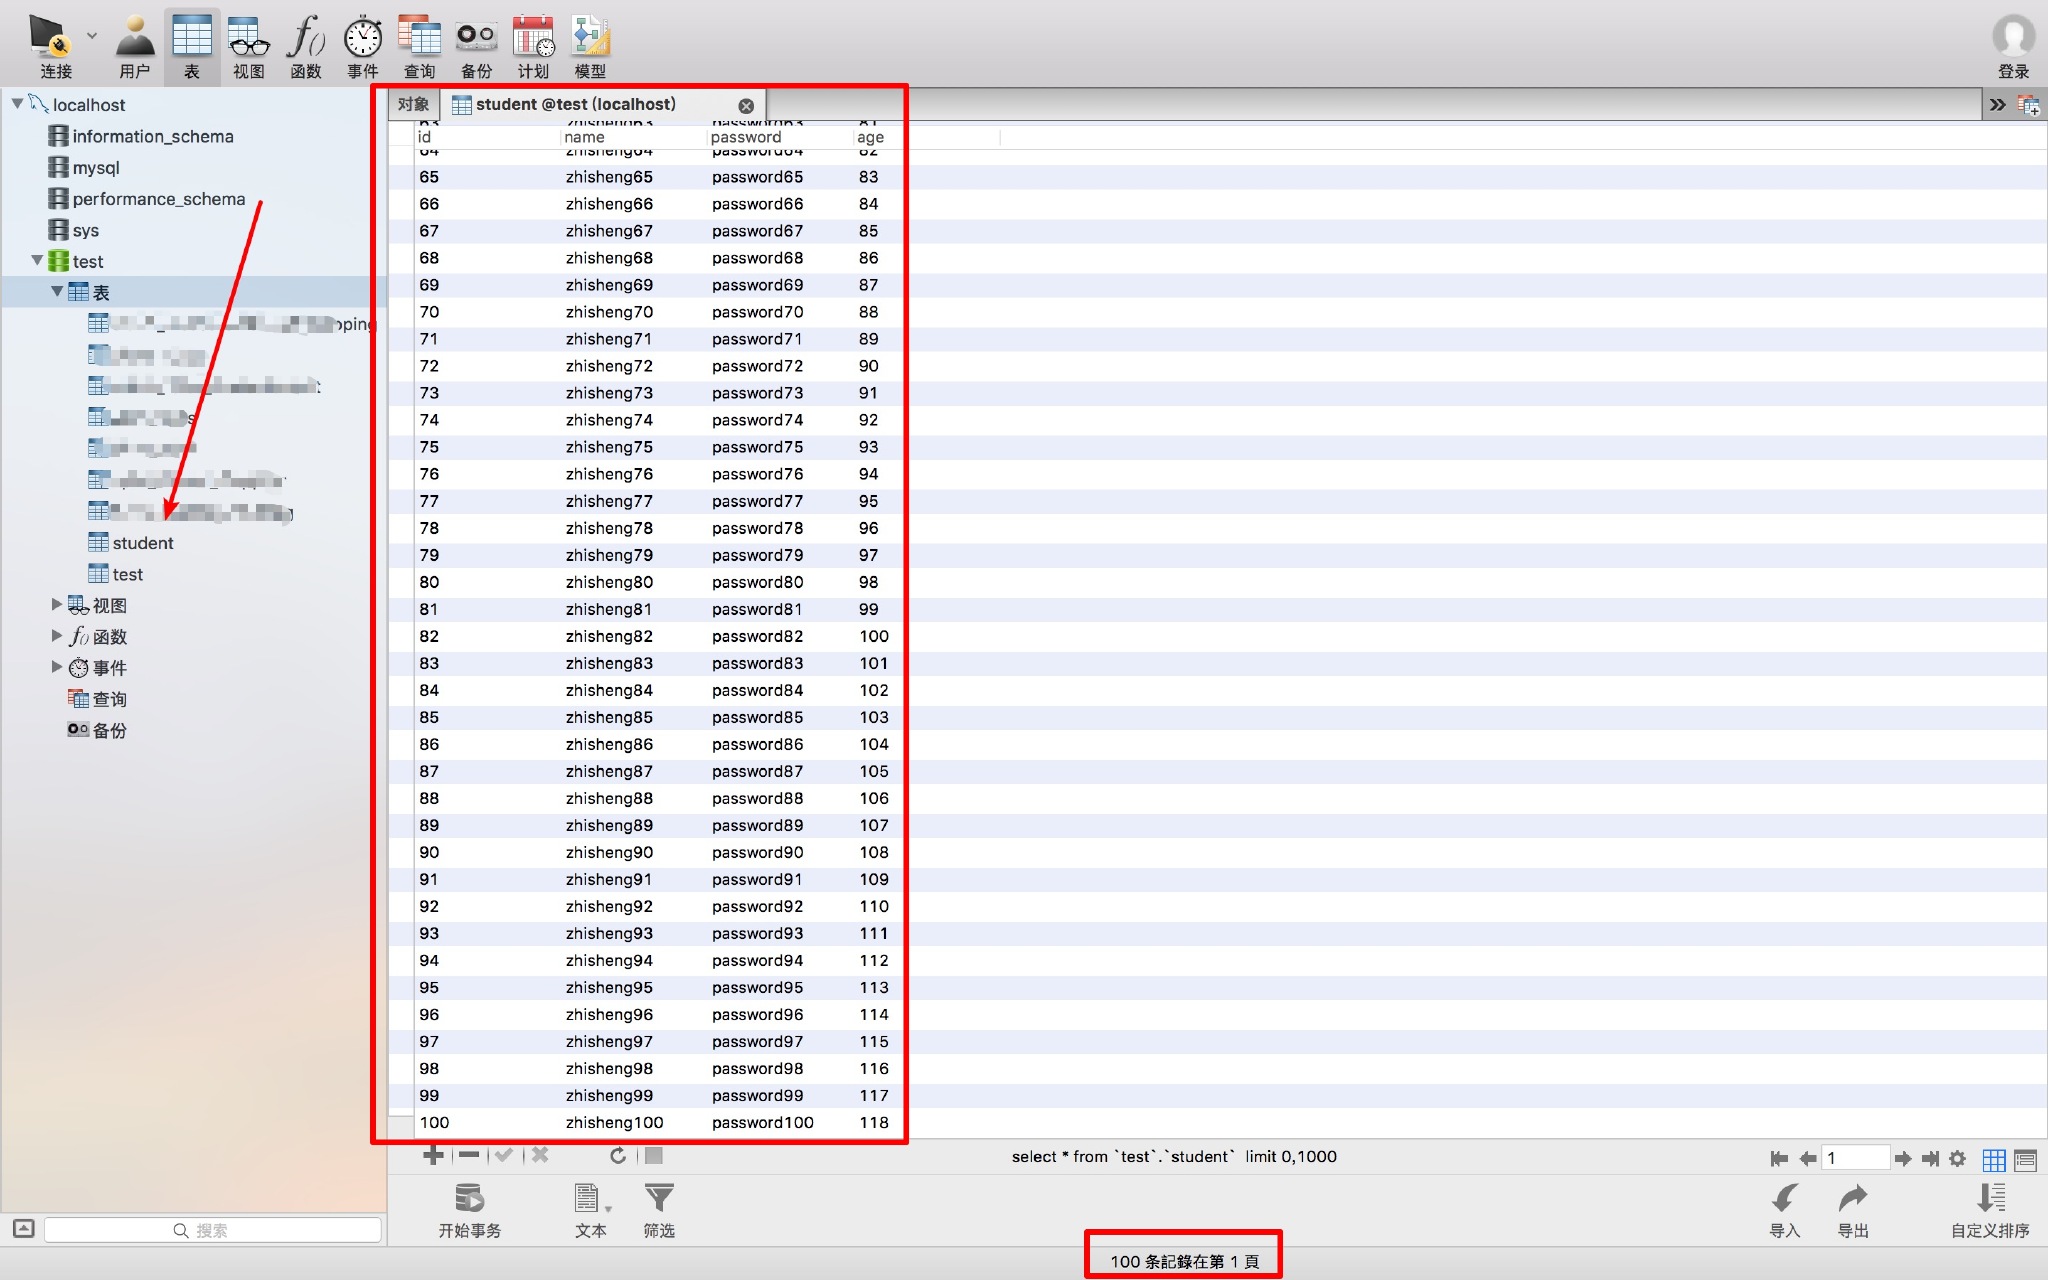
如果資料插入成功了,那麼我們檢視下我們的資料庫:

資料庫中已經插入了 100 條我們從 Kafka 傳送的資料了。證明我們的 SinkToMySQL 起作用了。是不是很簡單?

專案結構

怕大家不知道我的專案結構,這裡發個截圖看下:

最後

本文主要利用一個 demo,告訴大家如何自定義 Sink Function,將從 Kafka 的資料 Sink 到 MySQL 中,如果你專案中有其他的資料來源,你也可以換成對應的 Source,也有可能你的 Sink 是到其他的地方或者其他不同的方式,那麼依舊是這個套路:繼承 RichSinkFunction 抽象類,重寫 invoke 方法。