
Step by step install and run Hadoop 2.9.1 on Windows 10 64 bit (最全步驟整理)
1. Java
Download the Java 1.8 64 bit version fromhttps://java.com/en/download/ --------- If not 64 bit java there will be error when start resource node manager
Java 安裝自選目錄:比如C:\java64 -----這裡重要
Once installed confirm that you’re running the correct version from command line using ‘java -version’ command,output of which you can confirm in command line like this:
C:\Users>java -version
java version "1.8.0_251"
Java(TM) SE Runtime Environment (build 1.8.0_251-b08)
Java HotSpot(TM) 64-Bit Server VM (build 25.251-b08,mixed mode)
2. WinRAR/7-ZIP
Downloaded and installed WinRAR 64 bit release fromhttp://www.rarlab.com/download.htmthat will later allow me to decompress Linux type tar.gz packages on Windows. Or use 7-zip
3. Hadoop
The next step was to install a Hadoop distribution. Download a binary form:
https://archive.apache.org/dist/hadoop/common/hadoop-2.9.1/hadoop-2.9.1.tar.gz
Unzip it and rename folder name to hadoop and put it underC:\Learning ------- 如果用你自己的目錄,名字中間不要有空格(因為Hadoop初始開發基於linux, linux 檔名字不能有空格)
It‘s time to start the Hadoop cluster with a single node.
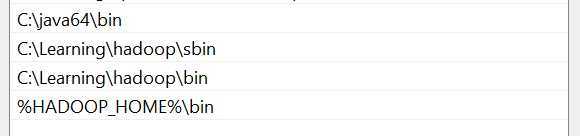
3. 1 Setup Environmental Variables
list as below:


Add following dir to path:
3.2 Edit Hadoop Configuration
注意:如果你不想自己配置下面 3.2 過程, 除了3.2.3 其它的步驟可以忽略, 那麼下載下面連結(bin data etc)資料夾放到你的hadoop目錄下覆蓋(https://github.com/yjy24/bigdata_learning),然後從3.2.3 開始繼續!
3.2.1 新建data 目錄和子目錄
c:/Learning/hadoop/data
c:/Learning/hadoop/data/namenode
c:/Learning/hadoop/data/datanode
3.2.2 Configure Hadoop
a) C:\Learning\hadoop\etc\hadoop\core-site.xml
<configuration> <property> <name>fs.defaultFS</name> <value>hdfs://localhost:9000</value> </property> </configuration>b) C:\Learning\hadoop\etc\hadoop\mapred-site.xml
<configuration> <property> <name>mapreduce.framework.name</name> <value>yarn</value> </property> </configuration>c) C:\Learning\hadoop\etc\hadoop\hdfs-site.xml
<configuration> <property> <name>dfs.replication</name> <value>1</value> </property> <property> <name>dfs.namenode.name.dir</name> <value>file:///Learning/hadoop/data/namenode</value> </property> <property> <name>dfs.datanode.data.dir</name> <value>file:///Learning/hadoop/data/datanode</value> </property> </configuration> d) C:\Learning\hadoop\etc\hadoop\yarn-site.xml</configuration> <configuration> <property> <name>dfs.replication</name> <value>1</value> </property> <property> <name>dfs.namenode.name.dir</name> <value>file:///Learning/hadoop/data/namenode</value> </property> <property> <name>dfs.datanode.data.dir</name> <value>file:///Learning/hadoop/data/datanode</value> </property> </configuration> e) C:\Learning\hadoop\etc\hadoop\hadoop-env.cmd 顯性設定JAVA_HOME setJAVA_HOME=C:\java64
3.2.3 windows 需要的的 libs
1. install Visual C++ 2010 Redistributable Package (x64):https://www.microsoft.com/en-us/download/details.aspx?id=14632
2. 把 winutils.exe 等 windows 需要的檔案放到C:\Learning\hadoop\bin 下面 下載https://github.com/yjy24/bigdata_learning下面的bin 直接覆蓋C:\Learning\hadoop\bin 裡面有window需要的所有檔案 -- 針對 2.9.1 3. 把裡面的 hadoop.dll 放置到 C:\Windows\System32 一份3.3 Start Hadoop all service
3.3.1 格式化 Hadoop namenode:
命令: hdfs namenode -format Log on scren:20/04/19 10:40:13 INFO common.Storage: Storage directory \Learning\hadoop\data\namenode has been successfully formatted.
20/04/19 10:40:13 INFO namenode.FSImageFormatProtobuf: Saving image file \Learning\hadoop\data\namenode\current\fsimage.ckpt_0000000000000000000 using no compression
20/04/19 10:40:13 INFO namenode.FSImageFormatProtobuf: Image file \Learning\hadoop\data\namenode\current\fsimage.ckpt_0000000000000000000 of size 320 bytes saved in 0 seconds .
20/04/19 10:40:13 INFO namenode.NNStorageRetentionManager: Going to retain 1 images with txid >= 0
20/04/19 10:40:13 INFO namenode.NameNode: SHUTDOWN_MSG:
3.3.2 啟動 Hadoop all service:
C:\Learning\hadoop\sbin\start-all.cmd ---- 要用管理員身份執行
四個service視窗會開啟執行 ------ 任何一個都不能有錯誤
恭喜你可以開始執行你的Hadoop程式了!
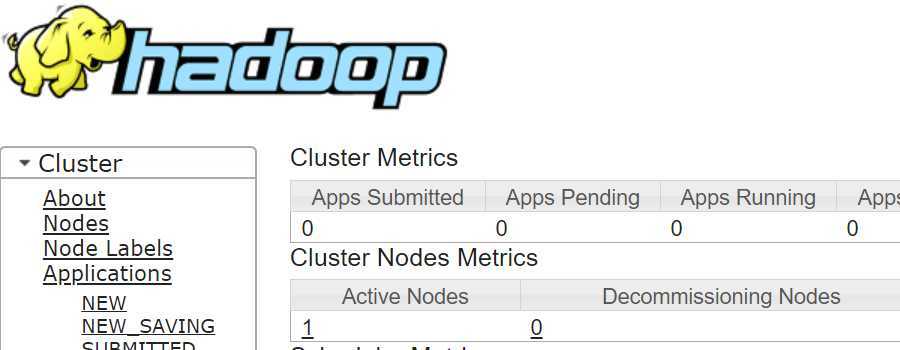
3.4 Open Hadoop GUI
Once all above steps were completed,opened browser and navigated to:http://localhost:8088/cluster
這裡可以檢視job的執行情況 log 資訊。
--------------------------------------------------End---------------------------------------------------